1 Introduction

Computer-based assessment (CBA)3 has gained importance in various research fields that investigate human education, cognition, affect, experience, and human behavior. The success of CBA is due to many advantages for testing in general and for measuring competencies and skills in particular (see chapter 2). However, the development of computer-based tests requires either programming skills or software tools. Various successful software tools exist for computer-based surveys and questionnaires (e.g., limesurvey), for IMS QTI-based tests (e.g., TAO) and for interactive e-learning content (e.g., H5P). Data collection can also be implemented using software for electronic data capture (e.g., REDcap), for psychological experiments (e.g., PsychoPy or Open Sesame) or using the open source statistical software environment R (e.g., Concerto, formr or even Shiny). The type of assessments that can be created is often limited by the software tools or the developers’ resources and programming skills.
However, the implementation of CBA can be laborious and expensive. As a result, applications using CBA make less use of the possibilities of the existing technology, and how constructs are measured is affected by the available features of existing tools. Moreover, when content experts write items on paper and technical experts implement the assessment material on digital platforms, it becomes more challenging to unlock the diagnostic potential of CBA.
CBA ItemBuilder: In this book we will introduce the CBA ItemBuilder, an authoring tool for computer-based assessment that enables content experts to become test authors and to design different item types with a graphical editor. The CBA ItemBuilder is created for persons with no, or with no specific programming experiences. Researchers, (PhD)-students, content experts and teachers with no specific background in web development can use the CBA ItemBuilder to create and implement complex items, after following some of the quick start tutorials provided in this book, and after exploring some of the examples in the CBA ItemBuilder.
The CBA ItemBuilder, as a specialized development environment for assessment material, provides a graphical page designer. The CBA ItemBuilder allows creating items with multiple pages by placing elements (such as texts, radio buttons, buttons, etc.) to specific locations in a visual editor (called Page Editor, see section 3.1.3).4
Item Authors: Item authors, i.e., content experts or researchers, can use this graphical editor to design one or several items by creating pages with images, texts or videos, implementing special features for test-takers like timers or instant feedback, defining rules for (automatic) scoring and create complex items with dynamic behavior (see section 2.11.1 for a more detailed discussion of the possible division of labor for the creation of computer-based assessment content by item developers).
The available features of the CBA ItemBuilder are permanently extended and updated. Features described in this book match version 10.0.0 of the CBA ItemBuilder and covers many of the features available in this version.5
Software Developers: The CBA ItemBuilder supports not all options to create interactive items. However, the lack of functionalities or features does not necessarily mean that the CBA ItemBuilder can not be used for large parts of creating computer-based assessment content. Instead, software developers can be involved in implementing the missing functionality as an HTML5/JavaScript. HTML5/JavaScript can be integrated and used via iframes (or in the component model of the CBA ItemBuilder ExternalPageFrames). Moreover, items generated with the CBA ItemBuilder can also be embedded into other environments that render content as HTML5/JavaScript. Section 1.8 summarizes the important things developers need to know about these two use cases.
1.1 Installation & Requirements

While the items created with the CBA ItemBuilder can be used in different web-based environments (see chapter 7), a desktop application is necessary for designing, authoring, and editing the CBA ItemBuilder project files. An install-wizard as shown in Figure 1.1 is provided to install the CBA ItemBuilder to a default location that does not require local administrator privileges.6
System Requirements: Current Windows operating systems (Windows 8, 10 and 11) are supported. A computer with an SSD is recommended for fast and smooth operation. Minimal required disk space is 2 GB. Dual core CPU and at least 4 GB Ram are recommended.
Items are being created with the CBA ItemBuilder, a desktop application that requires a Windows operating systems. However, the created assessment components (so-called Tasks stored in CBA ItemBuilder Project Files) can be used in typical Web Browsers on any operation system and device type (including mobile devices). A build-in internal Rendering (see section 3.1.2) shows how pages will look like in a Web Browser and content created with the CBA ItemBuilder can be displayed in any Web Browser installed on the local computer using the Preview-feature (see section 1.4). The use of either Chrome, Firefox or the Chrome-based Edge browser is suggested.
Technical Configuration: The CBA ItemBuilder is configured using an so-called ini-file (cba-itembuilder.ini). This allows activating and deactivating specific features and running the CBA ItemBuilder in different environments. By default, the CBA ItemBuilder is expected to run without modifying the ini-file. Details can be found in the appendix (see appendix B.4).
De-Installation: The de-installation of a previous version of the CBA ItemBuilder is (technically) not necessary. Copies of different versions of the CBA ItemBuilder can be installed on a computer in parallel. However, to de-install a previous version, just delete the CBA ItemBuilder folder or use the shortcut Uninstall CBA ItemBuilder created during the installation.
Manual Installation: For developers the CBA ItemBuilder is also delivered as zip archive without installer. To manually install the CBA ItemBuilder, extract the content of the zip archive to a local drive. The plain CBA ItemBuilder will run after unzipping the content, after starting the executable cba-itembuilder.exe. The CBA ItemBuilder will require a free port (by default 7070). If this port is not available, adjust the configuration in the file cba-itembuilder.ini (change: -Djetty.port={free port}, see appendix B.4 for detail).
Multiple Versions: Multiple instances of CBA ItemBuilder can be installed in parallel on one computer (see section 6.8.8 for use cases).
1.2 Contact & Support

The CBA ItemBuilder is provided free of charge for non-commercial projects in the field of education (i.e., educational research, psychological diagnostics and related areas) by the Centre for Technology-Based Assessment (TBA), a scientific research and infrastructure center at DIPF | Leibniz Institute for Research and Information in Education.
1.3 Quick Start: Get the Right Version

The CBA ItemBuilder is continuously developed, so there are different program versions available. In order to reproduce the exact display of existing CBA ItemBuilder project, it might be necessary to use the exact same CBA ItemBuilder version and, if possible, the identical browser. The development of the software follows the paradigm that a) older CBA ItemBuilder project files can be opened with newer versions of the CBA ItemBuilder, but b) older versions of the CBA ItemBuilder cannot open project files saved with a newer version of the software. If project files created with an older version of the CBA ItemBuilder are opened in a newer version (a), the items are internally migrated to the newer version (see section 3.2.1 for details about this Migration).
Which Version to Choose? If you are starting from scratch and using CBA ItemBuilder for the first time, install the latest version. If you have existing items that you want to view in the preview (section 1.4), whose scoring you want to view (section 1.5) or whose log events you want to explore (section 1.6), you could also consider using the version with which these items were created and tested.7 If you are planning to update or revise existing items (see section 1.7) for an upcoming assessment, you might want to use the latest version of the CBA ItemBuilder.
How to Start: After installing the CBA ItemBuilder, it can be started by double-clicking the icon or the executable file cba-itembuilder.exe in the installation directory (see section 1.1). The CBA ItemBuilder will allow editing of one CBA ItemBuilder project file at a time, and typically only one instance of the CBA ItemBuilder will be opened at the same time.8
Main Window: The Main Window of the CBA ItemBuilder consists of at different areas (see Figure 1.2): On the left side the Project View is located, with the Component Edit below. The gray area right to the Project View is reserved for various editors, like the Page Editor. If requested, additional views can be shown on the right part of the main window.
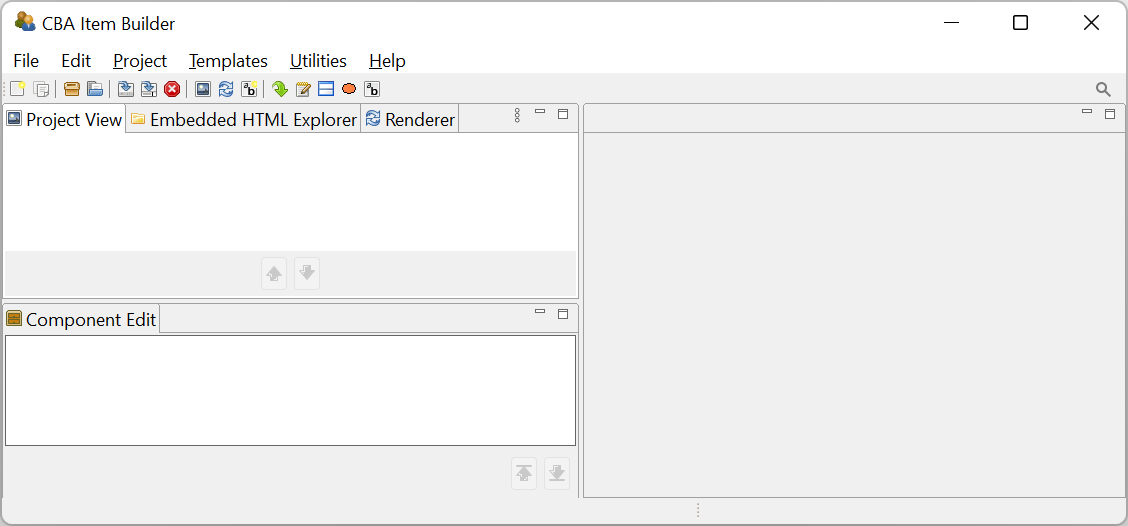
FIGURE 1.2: CBA ItemBuilder Main Window.
The Help menu of the main menu contains the entry About, that shows the version information (see Figure 1.3).
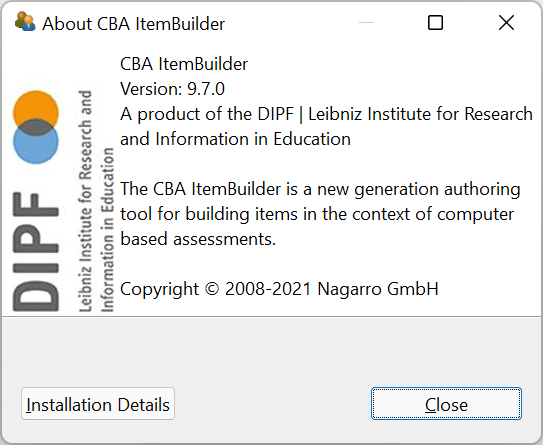
FIGURE 1.3: CBA ItemBuilder About-Dialog.
Migration: It is important that CBA ItemBuilder projects are never opened with previous version, i.e. versions that are older than the last version that was used to save the CBA ItemBuilder project file. However, opening CBA ItemBuilder projects with newer version is possible. If CBA ItemBuilder projects are opened and saved with a newer version of CBA ItemBuilder, a so-called Migration is done automatically.9 Once a project file is migrated (i.e, opened and saved) to a particular newer version, no version of the CBA ItemBuilder older than that particular version can open the migrated project file.
1.4 Quick Start: Preview Items

Once the CBA ItemBuilder has been started, Project Files can be opened and presented using the so-called Preview feature. To preview an item means opening the project file within the CBA ItemBuilder desktop application and requesting the preview feature, which will bring up a web browser that shows a particular task.
In the following, we assume that you have either already received CBA ItemBuilder project files with item material. You could have obtained the CBA ItemBuilder project file from a collaborator, or a research data center (e.g., DIPF FDZ) or that you are starting to explore example projects from this book that can be downloaded from links provided in the figure’s captions (html|ib).
1.4.1 Basic Terminology
The CBA ItemBuilder is used to create and manage item projects. In order to implement a typical computer-based assessment, multiple project files are created and edited with the CBA ItemBuilder. If an assessment is created by several people, the individual project files can be shared and edited with one instance of the CBA ItemBuilder of the appropriate version. To see how the content of a project file actually looks like in the assessment, the Preview function can be used.
Project File: Projects files are zip archives that can be opened, edited, or modified and previewed with the CBA ItemBuilder desktop application to see the content of the assessment material that is included in that file. All content that belongs to an item project is stored in the zip archives, and the zip archives should be modified only with the CBA ItemBuilder as editor.
Project files contain all the information that belongs to a particular part of an assessment (e.g., an item, a unit, an instruction, etc.). More specifically, project files include:
The visual design of the item in terms of one or multiple pages, input elements, graphics etc. is included in the project file (see section 3.3).
At least one starting point (referred to as the entry-point defined as a so-called Task, see section 3.6 for details) must be defined. If multiple parts of the assessment are defined in one project file, multiple Tasks can be defined.
The internal logic controlling the behavior of the item (using so-called finite-state machine, see section 4.4) are included directly in the project file.
The definition of potential scoring rules (see chapter 5) are embedded in the project files.
Additional resources (such as images, sound, and video files, see section 3.10.1) required to render the assessment can be included in the project files.
Assessments implemented with the CBA ItemBuilder use one or multiple project files. The option of previewing CBA ItemBuilder project files, presented in this section, allows to view and inspect parts of assessments outside and independently from the delivery platform.
After a project file has been saved locally on the computer on which the CBA ItemBuilder is installed, it can be opened to start the preview. A typical file menu (see Figure 1.5) gives access to the basic functions for creating new projects (New project) opening existing CBA ItemBuilder project files (Open project), for saving a project file (Save), for renaming project files (Save As ...), and for closing the current project file (Close project).10
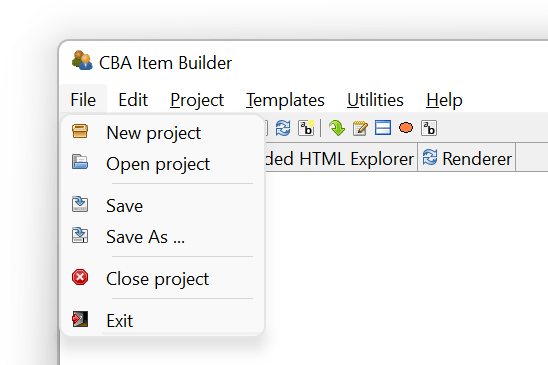
FIGURE 1.5: CBA ItemBuilder File-Menu.
Project Files, i.e., zip archives containing parts of assessments, can be copied, moved, and shared like ordinary files. Project files can also be managed using version control tools (e.g., GIT or SVN, see section 8.3.2).
One specific feature needs to be mentioned briefly (see section 3.2.1 for more information):
The zip archives created by the CBA ItemBuilder as Project Files contain everything needed to develop and use a particular assessment component, including the generated configuration files required for deployment (see chapter 7 for details). This configuration or code is automatically generated when the item is saved using the CBA ItemBuilder, and it is specific to a particular version of the CBA ItemBuilder.
1.4.2 Preview Item in Browser
The best way to get to know the CBA ItemBuilder is with concrete examples. In this manual all embedded items are linked as CBA ItemBuilder project files. As soon as you have downloaded a concrete CBA ItemBuilder project file and saved it as a zip archive locally on your computer, it can be opened with the CBA ItemBuilder. This link provides access to the CBA ItemBuilder project file shown in Figure 1.4.
Preview: The content of a CBA ItemBuilder project file can be displayed in a web browser in the way, the content will be presented in the actual assessment. This feature of the CBA ItemBuilder is called Preview.
There are several ways to request the preview for an opened CBA ItemBuilder project file. The easiest way is to use the main menu (Project > Preview project see first entry in Figure 1.6).

FIGURE 1.6: CBA ItemBuilder Project-Menu.
After calling the preview via the menu (or using the icon ![]() of the Toolbar, see section 3.1.1), the Preview dialog appears (see Figure 1.7). This dialog allows selecting which part of the project file should be previewed. Typically a task is previewed, and often a project file contains only one task. In this case, the default selection (the first Task will be previewed, see
of the Toolbar, see section 3.1.1), the Preview dialog appears (see Figure 1.7). This dialog allows selecting which part of the project file should be previewed. Typically a task is previewed, and often a project file contains only one task. In this case, the default selection (the first Task will be previewed, see Task01 in the example shown in Figure 1.7) must be confirmed by pressing OK.

FIGURE 1.7: CBA ItemBuilder Preview-Dialog.
CBA ItemBuilder project files can contain multiple entry points, called Tasks (see section 3.6 for details). Each Task can select a different parts of an CBA ItemBuilder project file by specifying the starting Page.11 If multiple Tasks are defined, the Preview follows navigation request for next and previous Tasks and shows the Tasks according to the order, in which they are defined within the CBA ItemBuilder project file. The Preview will apply proportional scaling if requested using the Scaling Options (see section 3.2.2 for details).
The preview dialog also can be used to preview selected pages directly. This option is only of importance during the development of assessment material (see chapter 3). Moreover, the dialog also offers the possibility to preview the project if no task is defined, using the first defined page as the (temporary) entry point.
Which (Web-)Browser should be use for Preview? The preview of the CBA ItemBuilder uses the so-called default browser of a computer to show the assessment materials such as items, if configured as Systems Default Browser in the dialog Preferences in the section CBA Preview (see Figure 1.8):

FIGURE 1.8: CBA ItemBuilder Preferences-Dialog.
The dialog shown in Figure 1.8 also shows additional settings, such as the auto-save configuration (see section 3.2.1) and the hot keys used for Scoring Debug Window (see section 1.5.2), the Trace Debug Window (see section 1.6.2) and the State Machine Debug Window (see chapter 4).
If different browsers are expected, given a particular delivery strategy, it should be ensured that the items, including the externally integrated components, are compatible with the used browsers. Section 8.4.1 describes how the preview can be used in different browsers to check the cross-browser compatibility locally.
Automatic Start (Autostart): Web browsers prevent audio and video files from playing before the first user interaction. This security setting is not a restriction in practice since a login or welcome page is usually displayed before the first item. After clicking a button on this page, for example, audio and video components can then be started automatically on all subsequent pages. However, this does not apply to the preview, which uses a new browser or browser tab. The Preview can be requested with a log-in dialog (see the checkbox Show login dialog in Figure 1.7) to allow the preview audio and video components with auto-play. Otherwise, a warning message is shown as displayed in Figure 1.9.
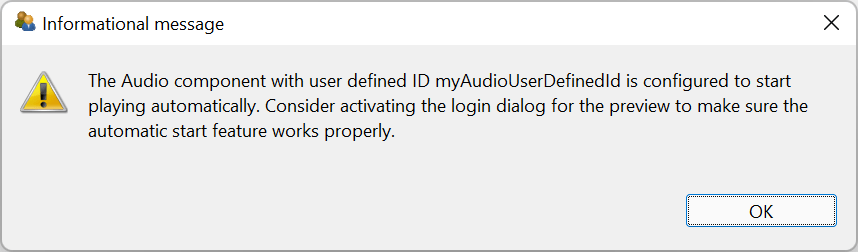
FIGURE 1.9: Warning about autostart of audio and video components.
Summary: With the CBA ItemBuilder, assessment components can be created as project files. Complete assessments with multiple tests or booklet designs with rotations (see section 2.7.2) usually consist of a sequence of many assessment components (i.e., several project files with the corresponding tasks as the entry points). Using the preview function described in this section, the individual assessment components stored in a particular Project File can be displayed and checked directly from the CBA ItemBuilder. Thus, the components of assessments can be viewed even outside the sometimes complex rotation designs.
1.5 Quick Start: Explore Scoring

Viewing assessment content created with the CBA ItemBuilder in the preview (see section 1.4) also allows to view the built-in automatic scoring. A possibility to access the automatic scoring of tasks is useful, for example, to check which scoring results from a specific input or a certain test-taking behavior.
In the following, it is assumed that assessment content created with the CBA ItemBuilder is available that contains automatic scoring rules. This section aims to provide the required information for exploring the implemented scoring in project files, either for testing or understanding available instruments.
1.5.1 Basic Terminolgy
A majority of assessments conducted for the different use cases (see chapter 2) can be described as a data collection based on responses or test-taking behavior within a computerized environment. Accordingly, it can be useful to think of the result of assessments as a data set, typically with persons in rows and variables in columns.
Result Variables vs. Score Variables: For each person, the data set should contain the scored final answer to each item (e.g., a score variables either \(0\) for wrong, \(1\) for correct). The data set could also include a variable for the selected answer option (i.e., a raw result variable). Result variables and score variables can be defined for simple single choice tasks (see section 2.2) simply by naming the possible and correct answer option(s). For more complex computer-based items, the definition of a result variable may already rely on several input elements or may require the use of information from the test editing process.
Typically, score variables assign credits (no credit and full credit for dichotomously scored items and one or multiple additional partial credits for polytomously scored items) to possible result variables’ values. In other words, once all possible values of result variables are defined, the definition of the scoring variables is also almost done. Unfortunately, for polytomously scored items, defining partial credits is not necessarily possible without taking into account empirical data to make sure the intended order of partial credits holds empirically.
Manual Scoring vs. Automatic Scoring: An important distinction concerns the difference between automatically scored answers and manually scored answers. The integrated handling of scoring definitions implemented in CBA ItemBuilder concerns automatic scoring of mainly closed answers. This refers to responses by selecting an input element, selecting a page, entering a particular state, etc. For free text answers, the automatic scoring is limited to the identification of given text by means of regular expressions.
Classes as Variables: Each variable, i.e., each column in the result data set, is defined in the CBA ItemBuilder as a so-called class. Each part of an assessment, which is defined as a CBA ItemBuilder project file, can generate any number of result variables and the corresponding classes are defined within the tasks. Accordingly, the classes form the columns of the result data set. Thereby variables can either have categorical values (called hit-conditions) or take over character strings into the result variables (called result-texts).
Hit-Conditions as Values: Hit-conditions are logical expressions, which combine one or more possible inputs of test-takers. If, for instance, the correct answer option is selected in a single choice item, this can be indicated by a first hit-condition. If a wrong answer option is selected, this can be indicated by a second hit-condition. If the two hit conditions are defined so that either one or the other condition is active, then the two hit-conditions form the values of one variable. The assignment of hits to classes specifies this relationship of hit-conditions as the variable’s values. The CBA ItemBuilder provides a variety of options to define hit-conditions (see section 5.3).
Missing Values: Besides the hit conditions defined for specific constellations of responses, missing answers can find special consideration. For distinguishing reasons why replies or responses are not available for a particular test-taker in the result data set, hits can also be defined for so-called missing values (see section 2.5.2 for more details).
Text Responses: Beyond categorical variables, whose values can be defined by hit conditions, there are also answer variables that contain the text answers. For such variables, the sorting definition consists of specifying from which input elements the result text should be taken (see section 5.3.10).
Codebook vs. Scoring Definition: For the result data set of a computer-based assessment, all used variables should have so-called variable labels. For importing the data sets into statistical programs like SPSS, Stata, or R, the definition of a data type for each variable can also be useful. This information per variable is typically stored in so-called codebooks. Codebooks for CBA ItemBuilder tasks should define for each class whether it should be used as a categorical variable (i.e., hit conditions are used as values) or whether it uses the result text (i.e., the variable represents a text response). For categorical variables, the value labels can then also be defined in the codebook. The possible values of categorical variables are defined as hit conditions. For each hit condition, a value label and, if necessary, a numerical value must be defined in the codebook, with which the values of the categorical result variables should be represented in the final result data set. For CBA ItemBuilder tasks in assessments, the codebook represents a translation of the scoring definitions into result data sets. The next section describes how the scoring definition for CBA ItemBuilder tasks can be checked and displayed directly in the embedded preview, using the Scoring Debug Window.
1.5.2 Scoring Debug Window
Direct access to verify the scoring definition based on classes and hit-conditions for a running item is provided as the so-called Scoring Debug Window. If configured, this window can be called directly by a key combination (default is Strg / Ctrl + S, see appendix B.4 for details) as soon as the preview for a Task or a Project is requested as described in section 1.4.2. The Scoring Debug Window is available when a Task or Project is previewed using the CBA ItemBuilder.12
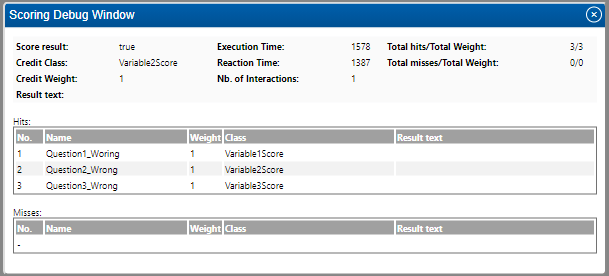
FIGURE 1.10: CBA ItemBuilder Scoring Debug Window.
Figure 1.10 shows a screenshot of the Scoring Debug Window for the example item shown in Figure 1.11. The Scoring Debug Window is organized into three sections:
The first section displays summaries for the entire task. This information can be useful for simple items (see section 5.4). Regarding the general description of automatic scoring using the CBA ItemBuilder, provided in this section, the task summaries are not relevant.
The second section contains the list of all hits assigned to classes and, if used, the result text. This list contains the information described in the previous section. The interpretation of these outputs is described in detail by means of examples in the following section.
Finally, the third section, not described here in detail (see section 5.3.2), contains potentially existing miss-conditions.
The three lines of the hits table in figure 1.10 can be read as follows: Line 1 shows that the hit Question1_Wrong is active, which is assigned to the class Variable1Score. Line 2 says that the hit Question2_Wrong is active, which is assigned to the class Variable2Score. Line 3 finally shows that the hit Question3_Wrong is active, which is assigned to the class Variable3Score. As the hit names suggest, neither Question1, Question2 nor Question3 was answered correctly. For all three variables in the data set, the expected information would be that the respective question were answered wrong.
Figure 1.10 shows the Scoring Debug Window for the CBA ItemBuilder project file shown in Figure 1.11. For the shown task three questions are defined on one page. Question 1 is answered correctly if option C is selected. Question 2 is answered correctly if option A and B are selected. The correct answer for question 3 is D.
With the help of the Scoring Debug Window, it can now be checked that the correct answer also causes the hit, which shows a correct answer to be activated.
The active hit or miss as shown in the column Nameof the Scoring Debug Window or the provided Result text is used as value for a variable (see column Class).
Examples: The CBA ItemBuilder shown in Figure 1.11 can be used to play with the Scoring Debug Window. In this project, the scoring definition differentiates wrong vs. correct responses. Accordingly, with respect to the differentiation in score variables and result variables, Figure 1.11 only contains score variables. To understand this property, select different wrong answers to the three questions for the following item and check the scoring with the Scoring Debug Window. As you can see, there is a distinction between correct and wrong answers. Which wrong answers are selected for the three questions is not taken into account in the scoring.
Figure 1.12 contains the identical three questions, but now with a scoring that contains result variables as well as score variables. A deployment platform that can handle CBA ItemBuilder tasks is expected to provide the variable as defined within the tasks. If the result data should contain variables that contain which answers were selected in addition to the variables for correct versus wrong answers, the result variables can be defined as part of the CBA ItemBuilder scoring.
For the Single Choice task (question 1), a hit shows the different possible choices (compare the hits Question1_OptionA, Question1_OptionB, Question1_OptionC, and Question1_OptionD which are all assigned to the class Question1).
Note, however, that for the Multiple Choice task (question 2), one class (i.e., one variable) is defined for each option. Accordingly, two hits for the class Variable2A show if option A for question 2 is selected (Question2A_Selected) or not selected (Question2A_NotSelected). One result variable is required for each option of a Multiple Choice task (see the classes Variable2A, Variable2B, Variable2C, and Variable2D). Moreover, as already shown in Figure 1.11 , the score variable for question 2 indicates if the two required options are selected (see hits Question2_Wrong and Question2_Correct for class Variable2Score).
Finally, for the Constructed Response task (question 3), the class Question3 only has one assigned hit (Question3). This hit, however, uses the so-called result_text()-operator (see section 5.3.10 for details). Using theresult_text()-operator causes the entered character to be displayed in the Result text column of the Scoring Debug Window. This illustrates that the text entered in the input field (here only one letter) can then be used for the result data set.
Summary: The definition of automatic scoring of items is described in detail in Chapter 5. Accordingly, this section did not describe how to define scoring. But it was shown that with the help of the Scoring Debug Window in the preview of the CBA ItemBuilder, the defined scoring can be checked and displayed for different inputs. In order to check for existing ItemBuilder project files whether the integrated scoring works correctly, it is not necessary to check the various rotations of a test delivery with a booklet design. The checking of the scoring can be done separately for the individual assessment components.
1.6 Quick Start: Explore Log Events

An important challenge in documenting log data is to enable secondary researchers to understand which user interactions within the assessment led to which (basic) log events.
To interpret log data of computer-based tests, some form of documentation is necessary. For assessments created with the CBA ItemBuilder, the CBA ItemBuilder project files can be used for documentation purposes (see section 8.7.2 for details), after sensitive item content is replaced with dummy text (image or media files).
1.6.1 Basic Terminology
If CBA ItemBuilder project files are available, researchers can inspect not only the scoring (see section 1.5) in the preview (see section 1.4), but also get an impression of the additional behavioral data created during the task execution.
Log Events: The following basic understanding of log events is necessary to assign the processing behavior to the log data. Log data consists of single log events. Log events can result from user interaction (e.g., clicks) or internal system changes (e.g., timers). In the context of assessments, log events always occur with an assignment to a person. There is always a person identifier associated with a log event (that can have different names such as actor, pupil, student, test-taker, respondent, etc.). Log events also always occur at a particular time. Accordingly, at least one timestamp is always associated with log events, indicating when the event occurred. Other timestamps that show, for instance, when the event was transmitted or received are possible but not mandatory for log events. The meaning of log events is encoded in the so-called event type (sometimes also denominated as event name). How events of a certain event type can be interpreted should be comparable for assessments using the same assessment platform. However, the meaning of identically named events may differ between different assessment platforms. An event of a particular event type that occurred at a specific time can be the central information in particular log data. However, events of a particular event type can also provide additional information. For example, a mouse-click event could inform about whether the right or left mouse button was clicked. This additional information is called event-specific data. If the event-specific data can be described by enumerating key-value pairs, we also speak of event-specific attributes. Event-specific data can be mandatory (i.e., every event of this event type provides it) or optional (i.e., events of that event type can provide this information but do not have to). Finally, log events always have an identifier for a part of the assessment (instrument identifier). In the context of log data collected with the CBA ItemBuilder the name of the CBA ItemBuilder project (i.e. the name of the project file) is often sufficient.
Original Items: If the original items are available, i.e., the ItemBuilder project files are available as they were used in a delivery platform (see chapter 7), the preview of the CBA ItemBuilder can be used to explore the triggered log events using the Tracing Debug Window described in the next section. Suppose the original project files can be used. In that case, it is automatically ensured that the so-called UserDefinedIds of the individual components used in the CBA ItemBuilder, which can be affected by user interactions, can be identified in the event-specific data of the log events. The UserDefinedIds are necessary for the interpretation of log events as soon as several components of one type within an ItemBuilder project have to be distinguished in order to assign the log events exactly (see section 3.7.4 for details).
Mock-Items: Unfortunately, for some instruments it is necessary to keep the task content secret. The stimulus and question texts, the concrete tasks, pictures, audio and video files, etc. must then be kept confidential. However, the confidential item contents are not necessary to explore the computer-based instrument concerning log events that are triggered by different user interactions. Mock-items are items in which the protected item contents have been replaced, keeping the structure and especially the UserDefinedIds unchanged (see section 8.7.2 for more details).
Since the CBA ItemBuilder versions can differ concerning the collected log data, it is suggested to use the identical CBA ItemBuilder version if this feature is used to make sense of log data from existing data collections (see section 1.3).
1.6.2 Trace Debug Window
Like the Scoring Debug Window, the Tracing Debug Window is a functionality provided by the CBA ItemBuilder during the preview of tasks. To use this feature, an original item or mock item must first be opened with the CBA ItemBuilder in the appropriate version. Afterward, as described in section 1.4, the preview must be requested. As soon as a task is previewed, a key combination (default is Strg / Ctrl + Y, see appendix B.4 for details) requests the Tracing Debug Window.
Figure 1.13 shows a screenshot of the Tracing Debug Window for the example item shown in Figure 1.14.
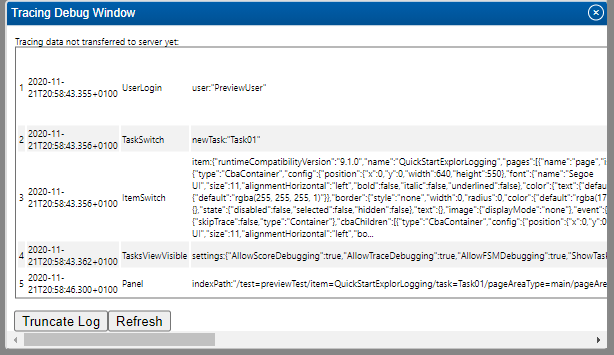
FIGURE 1.13: CBA ItemBuilder Tracing Debug Window.
Select the answer by clicking on one of the buttons. The Tracing Debug Window displays the past log events of the interaction with the currently displayed item:
- The first column contains a counter for the log events.
- The second column shows the timestamp.
- The third column is filled with the event type.
All following columns contain event-specific data, including the UserDefinedId. The Tracing Debug Window can be used to display the recent log events. After some time, the entries are deleted, i.e., only the most recent log events are displayed. Note that the input focus must be within the item before the keyboard shortcut is detected. The text click here in the example item (see, for instance, Figure 1.14) reminds you to set the input focus before pressing Cntrl + Y. While the Trace Debugger is open, no further log events are triggered respectively registered.
Examples: The CBA ItemBuilder project file shown in Figure 1.14 gives an insight into how the Tracing Debug Window works In this example simple buttons are used to implement a Single-Choice Item. The buttons are arranged in an identical way on different pages. With the help of the UserDefinedId of the buttons the selection behavior can be traced.
Summary: The Tracing Debug Window of the CBA ItemBuilder’s preview can be used to display which log events a particular user interaction has within the computer-based assessment components. The complete list of implemented log events of the current version of the CBA ItemBuilder can be found in appendix B.7. Additional log events can be added by the execution environment (see chapter 7). Log events are generated by default (i.e., no specific configuration is required to enable logging, see section 2.8).
1.7 Quick Start: Revise Item Content

A primary motivation for developing an authoring tool for computer-based assessments was that item content should be easy to create and adopt without programming knowledge. Content experts should use the CBA ItemBuilder to develop assessment components and modify, adapt, and improve existing content. The subsequent section deals with this use case. In the following, it is assumed that assessment components (i.e., tasks or items) already exist in the form of CBA ItemBuilder Project Files, which are to be adapted, revised, or changed.
There may be several reasons why existing assessments might be adapted and modified. The ability to make minor changes is an essential part of Open Assessments. Potential reasons why existing instruments (i.e., assessment components in the form of instructional pages, tasks, and questions) should be adapted, could include:
An instrument computerized using the CBA ItemBuilder is not available in the required language and should be translated by a content expert into a new language.
An instrument was translated by an expert, and the translation was verified. However, since different languages require a different amount of space, so-called layout adaptions might be required for the assessment components created with the CBA ItemBuilder.13
Computer-based instruments include additional components besides the actual test created by tasks and questions that embed and frame the assessment into a particular context. However, wording that was appropriately and accurately chosen for a particular occasion may be disruptive, obstructive, or misleading for further application of a test or instrument. This may relate only to how the target persons are addressed, to the wording in the consent form for participation, or other parts of the text used within assessment components.
Within items, tasks or questions, individual phrases may need explanation for a particular target audience or may need to be replaced with other phrases that are more familiar or common to target audiences.
Finally, perhaps some questions or tasks should be excluded or changed. As far as the changes require adjustments within Project Files, these can be implemented with the CBA ItemBuilder. Changes that affect the composition of assessments from multiple CBA ItemBuilder Project Files must then be configured in the test delivery software (see chapter 7).
Test and questionnaire development of psychometric instruments requires a scientific approach and in-depth understanding of the construct itself and the process of item development, test theory, and validation that goes far beyond the technical implementation in an assessment software. When items of computer-based tests are developed and scaled in terms of calibration, changes to item content and significant changes to response formats and item presentation may need to investigate and, in case, re-scale the modified items (see section 8.7.4 for a detailed discussion).
Hence, the following section can only describe from a purely technical perspective how CBA ItemBuilder Project Files at hand can be used as a starting point for sensitive changes to existing assessment components. CBA ItemBuilder Project Files could be available, for instance, because they were provided by a research data center or shared by other scientists.
1.7.1 Basic Terminology
In order to modify and adapt assessment components created with CBA ItemBuilder, a rough understanding of the structure of CBA ItemBuilder Project Files is required first. Project Files can be thought of as a workspace that contains all content that can be edited with the CBA ItemBuilder. This content is divided into the following units:
Pages: Content is placed on pages and one or more pages are displayed simultaneously. In the Project View (see section 3.1 for a full description of the user interface) all pages are listed. If you right-click a page and select the entry
Preview Page, you can view each page in isolation in the browser as it will then look during the runtime of the assessment. The pages have names assigned by the item author. Do not rename pages, because they are used as references for links and in the possibly configured dynamic parts. If all the contents of a Project File are to be translated, all pages must be edited. If only one part is to be adjusted or changed, the appropriate page must first be found. Pages can be previewed, or opened by double-clicking in the Page Editor.Components: The Page Editor shows a design view for editing pages. Pages are designed by placing components in the Drawing Area of the Page Editor. The design view is not 100% the same as how a page will look at runtime, but it reflects which component is placed at which position. Components are hierarchically nested on pages and can only be inserted in certain orders.
Two views of the CBA ItemBuilder are central for editing components:
Component View: Without going into detail about the design of pages using components (see section 3.7), the so-called Component Edit provides direct access to all components of a page. The Component Edit is the tab next to the Project View. It is possible to navigate within the tree view of the Component Edit to see nested components. To modify the properties of existing components, the context menu of components that opens after right-click on components in the Component Edit can be used.
Property View: In order to be able to change the visible parts of components, it is first necessary to identify what type of component it is. The type of a component is displayed directly in the Component Edit in square brackets. To view and change further details about the components, the entry
Show Properties Viewcan be selected from the context menu of the component in the Component Edit. This opens the Properties view in the right area of the CBA ItemBuilder. The Properties view allows to edit properties of the component that is currently selected in the Drawing Area of the Page Editor or in the Component Edit. Most properties, with the exception of editing formatted text, can be changed directly in the Properties view.
Adaptations may also be necessary for images, audio, or video files that are used to design pages of assessment components in Project Files:
- Resource Browser: Images, videos and audio files are not created with the CBA ItemBuilder. Instead, media files are embedded into the Project Files and components link to the required resources. All resources included in a Project File can be viewed (and exchanged) via the Resource Browser, which can be opened via the menu
Projectand the entryResource Browser.
With the help of the above-mentioned features of the CBA ItemBuilder, items can be customized and, for example, translated, as described in the next section.
1.7.2 Change Content in Existing Project-Files
To make changes to an assessment component created with the CBA ItemBuilder, the Project File must be opened. The CBA ItemBuilder requires additional configuration to allow opening two parallel programs on one computer (see section 6.8.8). As described in detail in the chapter 3, content can be edited using the Page Editor and assessment components created using the CBA ItemBuilder can be modified. For some selected purposes, the specific dialogs are available.
Edit all text fields function (in the Project menu), which can be used to make text changes and translations easily.
Change Texts using the Edit Text Occurrence-Dialog: For changing text, the CBA ItemBuilder provides a function that displays all components with text. The text can be changed immediately by double-clicking, without the need to open single pages. To use this function a Project File must only be opened. Then the option Edit all text field can be accessed via the menu Project. In the dialogue opening thereby (see illustration 1.15) all components are indicated, which have a text property.
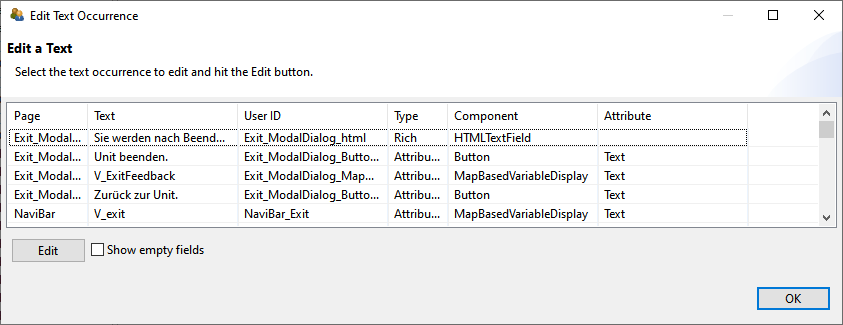
FIGURE 1.15: CBA ItemBuilder Edit Text Occurrence Dialog.
The page on which a component with a particular text is placed is shown in the first column of the dialog shown in Figure 1.15. A preview of the text is shown in the second column, followed by the UserDefinedId (i.e., the user-defined internal identifier of the component). The columns Type, Component and Attribute inform about the types of the component the text belongs to. Do not translate texts that you don’t expect to be shown in the assessment to test-takers (such as texts used as variable names for components of type MapBasedVariableDisplay).
Depending on the design of the items by the item authors, it may be necessary to modify components manually, as described in the following. In general, the way how to change properties and the content of component depends on the type of component. The type of each component can be identified when the component is displayed in the Component Edit.
Change Text in Property View: For all components that only show text in one particular font size and font family (e.g., TextField, Button, Link, RadioButton, CheckBox, …), the text can be changed by changing the value of this property in the Properties view. For components that allow text to be formatted differently (formatted text), the CBA ItemBuilder provides internal editors (see the next subsection). To change simple text using the Properties view, the page must first be double-clicked for editing in the Project View. Then you can switch to the Component Edit (the next tab right to the Project View). Expanding the tree in the Component View is possible using the small arrows left to the text naming the [component type]. With the help of the right mouse button and the entry Show Properties View the Properties view can be shown. The Properties view always shows the properties of the component selected in the Component View / Page Editor. The Properties view is a powerful tool within the CBA ItemBuilder, allowing for instance, to adjust the displayed text of many components changing the value in the section Text of the Properties view.
X and Y properties.
The font and font size used to display components with a text property can be adjusted in the Appearance section of the Properties view.
Change Formatted Text: Components of type TextField, HTMLTextField and ImageTextField do not use the Text Property. Instead, the text for these components can each be edited with a separate text editor, which also provides functions for formatting text sections. To open this editor these components can be double clicked in the Page Editor. TextFields and ImageTextFields also provide the entry Edit Rich Text in the context menu of the Component Edit. After an editor is opened for editing, the text can be changed. The changes are applied when the editor is closed via the Save and Close button.
Change Images, Videos and Audios: Components that show images or play videos or audio files refer to the media files embedded in the Project Files. The references are shown in the Properties view. To change or adjust media files, the reference can remain unchanged if the file name and file extension remains identical. It is sufficient to update the media files themselves (see section 3.10.1). Note that in case of images and videos the updated files require to have the identical size. Images are used with many different components for designing CBA ItemBuilder Pages, for instance, as background in containers of the type Panel (see section 3.10 for details).
If text is included in many images (instead of having images in the background and transparent components to show text on top within the CBA ItemBuilder, see section 3.7.5), we suggest the following: First export all images from a CBA ItemBuilder Project File that contain any text. This can be done manually by clicking on each image in the Resource Preview of the Resource Browser and exporting it via Save Image (or similar). Alternatively, the CBA ItemBuilder Project File can also be opened using a program for ZIP archives to copy the image files from the sub-directory resources (see section 8.3.3 for details).
Translated or modified image files, audio files or videos can be easily replaced by Add in the Resource Browser. To do this, close all open pages beforehand (so that no Page Editor is visible anymore).
Change Text Mapped to Numbers: The CBA ItemBuilder also supports the display of dynamic content with various components. For this purpose, so-called Value Maps (see section 4.2.4) are used to assign texts, images or videos to numerical values (Guards). The images used there can be exchanged with the help of the Resource Browser, as described. Texts, however, must be edited in the Value Map Details. For this purpose, the entry Browse Value Maps can be opened via the menu Project. If a Value Map contains text, then this can be edited after selection of the Value Map in the Value Map Details with the help of the Edit button.
The CBA ItemBuilder automatically checks the consistency of the configuration when a large number of changes are made and displays an error message if necessary. A collection of error messages and possible solutions can be found in section 6.8.4.
1.8 CBA ItemBuilder for Software-Developers

The CBA ItemBuilder supports mainly two use cases that require software developers.
Embedded Content into CBA ItemBuilder Tasks: Content can be embedded into CBA ItemBuilder items using iframes (used within CBA ItemBuilder designed Pages with components called ExternalPageFrames, see section 3.14). A simple interface allows the embedded HTML5/JavaScript to interact with the CBA ItemBuilder task, to store data, and to re-store its state on re-visit is available.
Software developers can find all required information in section 4.6.
iframes, and that can interact with the content created by item authors using a simple API based on Post Messages.
Open source repositories with content generated for ExternalPageFrames are welcome.14
Embedding CBA ItemBuilder Tasks into other Applications: Items created with the CBA ItemBuilder can also be embedded into other web-based delivery software. For this use case the so-called TaskPlayer API is provided.
Software developers can find all required information in section 7.7.
Open Source Contribution to the CBA ItemBuilder: Currently, open-source contributions to the CBA ItemBuilder’s source code (i.e., the desktop application) and the React runtime cannot be managed and considered for integration by DIPF/TBA.