4 Enrichting Items using Dynamic Content

The CBA ItemBuilder is an authoring tool that allows defining simple and complex items using different editors. In the previous chapter 3, the Page Editor was introduced for creating static content. The Page Editor together with the Palette allows to design pages uses a graphical representation of components and point & click techniques. Moreover, the Properties view was used to define and change detailed information for a selected component. The CBA ItemBuilder also uses text-based syntax to enrich the items with dynamic content, if necessary, for complex items.
Example: Before we describe the various uses of the syntax in detail, we start with an elementary example illustrating the CBA ItemBuilders’ logical layer (i.e., the finite-state machine idea) that rests on this text-based syntax. Imagine, we want to improve the usability of a drag-and-drop item, to make the computer-based assessment more accessible to all students. For that purpose, we want to show a tiny hint on how to respond using the drag-and-drop user interaction.
We use a modal dialog (see section 3.15) that is shown if a button with a question mark is clicked (see Figure 4.1). However, let’s assume that we want to hide this button as soon as the student interacted with the item showing that they are familiar with the drag-and-drop technique. That means, as soon as one element was successfully moved in a drag-and-drop order interaction, we want to hide the button for requesting the hint. Accordingly, the item technically should distinguish two states: In the first condition (state State_Hint_Visible), we do not yet know whether the test-taker knows how to answer the question. Therefore, the hint button should be visible that explains how the items can be answered. As soon as the test-taker has shown that they can respond to the task using the drag-and-drop technique, this hint is no longer necessary. Accordingly, the item should change into a different condition (state State_Hint_Invisible). So in the state State_Hint_Invisible, the button should be invisible, and the first drag-and-drop operation can be used to trigger the change from state State_Hint_Visible to state State_Hint_Invisible.
To get an insight into the logic layer of the CBA ItemBuilder, which is designed using Finite-State Machines, at runtime, you can request support in the Preview.
State Machine Debug Window: For the dynamic content, the CBA ItemBuilder offers a built-in State Machine Debug Window. Similar to the Scoring Debug Window (see section 1.5.2) and the Trace Debug Window (see section 1.6.2), the State Machine Debug Window can be requested using a hotkey (default is Strg / Ctrl + M, see appendix B.4 for details).
The State Machine Debug Window shows states and variables that can determine at runtime the appearance and behavior of assessment components created with the CBA ItemBuilder. Variables that can be defined (see section 4.2) are listed, together with the values of the variables at the time the State Machine Debug Window was opened. Below this, the Current State (for each Finite-State Machine, see section 4.4.2) is displayed, followed by the list of already visited States. Finally, the FSM events that have just occurred (see section 4.4.3) are displayed.
4.1 Syntax Overview

To implement dynamic item contents, the CBA ItemBuilder provides editors for various forms of text-based syntax. The different syntax types are designed in such a way that no specific programming knowledge is required and the different editors support editing and correcting syntax. Hence, although the ItemBuilder is primarily a graphical tool, some advanced features require the use of simple syntax expressions. Apart from the basic similarity of syntax variants, there are specific operators and syntax rules, which are described in the corresponding sub-sections:
- Task Initialization (i.e., syntax-based configuration of Tasks, see section 4.5)
- Finite-State Machines (i.e., internal logic layer of the CBA ItemBuilder capable to change behavior and visual presentation of items, see section 4.4)
- Conditional Links (i.e., links that change the link target according to conditions, see section 4.3)
Syntax will also be used in the next chapter to combine information from the response (e.g., component states from input components such as RadioButtons, CheckBoxes, SingleLineInputFields, etc.) and probably the response process (e.g., visited pages, occurred states, values of variables, etc.) to outcomes:
- Scoring (i.e., the definition of hits conditions using a scoring syntax, see chapter 5)
The graphical user interface allows the definition of the visible elements assessment components such as items and instruction pages. However, computer-based assessments’ full potential can only be realized with the CBA ItemBuilder by using the syntax components.
4.1.1 Basic Syntax Elements
The various definitions, which are made in the CBA ItemBuilder using a syntax that is easy to learn, are based on common design principles.
UserDefinedIds: To refer to components that have been created and placed in the Page Editor in the Drawing Area, the UserDefineId is always used (see section 3.7.4). Since these identifiers must always be unique within a CBA ItemBuilder Project File, each component can be referenced by the string that was defined as UserDefinedId. UserDefineIds can be used to name components or to query or evaluate the state of components.
If components can occur multiple times within a task, for instance, because a PageArea can be included multiple times (see section 3.5.4), the UserDefinedId of the container in which components are nested used must be included (see section 4.1.4).
Operators: In addition to the UserDefineIds, predefined keywords also form the syntax provided by the CBA ItemBuilder. These keywords mark Operators that can be used to apply changes to components or to perform more specific evaluations of component states in scoring conditions. Operators follow a common scheme: name(arguments). The operators are distinguished by their name and the different operators can have arguments, but do not have to. The meaning of the arguments is determined thereby over the order and defined for each operator. Arguments are specified in quotation marks if they are strings. Multiple operators can be listed, depending on the context, using spaces (Conditional Links, see section 4.3.3; Task Initialization rules, see section 4.5), commas (Actions in finite-state machine rules, see section 4.4.6) or combined by logical expressions (Scoring Conditions, see section 5.3.2).
Auto-Completion: A useful helper for syntax creation is auto-completion. To enable this feature, press Ctrl + Space (Strg + Space) in a syntax editor of the CBA ItemBuilder. Available operators and existing UserDefinedIds are then displayed and selected by pressing Enter.
FIGURE 4.3: Screenshot of the Auto-Completion feature in syntax editors.
Auto-completion is available in the editor for creating conditional links (see section 4.3), in the editor for defining state machine events and rules (see section 4.4), in the editor for defining the task-initialization (see section 4.5), and in the editor for scoring rules (i.e., Hit- / Miss-conditions, see section 5.3).
With a small red icon, errors within syntax definitions are automatically detected and displayed.
4.1.2 Comments
In all syntax flavors Comments can be defined to document and describe purpose of particular part of the syntax. To mark a line as a comment in a syntax, add two slashes left to the text that should be treated as comment (e.g., (...) // My Comment ). Everything in the remaining line of a syntax right to the // will be ignored.
Multiple lines can be commented by starting either each line with // or using the syntax /* Comment (that can multi-line text) */. Everything between /* and */ is ignored as interpreted as comment, even if it spans multiple lines.
4.1.3 Logical Expressions and Bracketing
The CBA ItemBuilder syntax is not a complex programming language and requires only to learn few keywords (mainly, the so-called operators, see 4.4.6). However, three crucial points must be acknowledged to use the CBA ItemBuilder syntax capabilities efficiently, as described in the following.
Case Sensitive: All syntax statements are case-sensitive. This applies to UserDefinedIds (see section 3.7.4), to the operators (see section 4.4.6), the keywords Events: and Rules which are used to structure the Finite-State Machine syntax, and the Logical Expressions. Use the Auto-Completion (see section 4.1.1) to avoid invalid syntax due to wrong capitalization.
Logical Expressions: The CBA ItemBuilder can logically link or negate statements in the different syntax variants, e.g., logical conjunction (and), logical disjunction (or) and logical negation (not). For the formulation of logical expressions, the keywords true and false are additionally available. For example, if true is specified as a condition, this condition is always fulfilled.
Bracketing: Logical expressions in the syntax of the CBA ItemBuilder must always be formulated in such a way that not more than two expressions occur within one pair of brackets. For more than two statements, this requires nesting the statements, as illustrated with the following examples:
- Logical conjunction of two conditions:
( Condition1 and Condition2 ) - Logical disjunction of two conditions:
( Condition1 or Condition2 ) - Logical negation of a condition:
not Condition - Logical conjunction of three conditions:
( ( Condition1 and Condition2 ) and Condition3 )- Can be considered as two conjunction
A: ( Condition1 and Condition2 ),B: Condition3,
- combined to
( A and B ).
- Can be considered as two conjunction
- Logical negation of a conjunction of three conditions:
not ( ( Condition1 and Condition2 ) and Condition3 )- Can be considered as two conjunction
A: ( Condition1 and Condition2 ),B: Condition3, - combined to
C: ( A and B ), and - negate as
not C.
- Can be considered as two conjunction
- Logical negation of a conjunction of three conditions (two with negation):
not ( ( Condition1 and not Condition2 ) and not Condition3 )
The CBA ItemBuilder has a built-in syntax checker that identifies errors with small icons and mouse-over texts. Writing syntax in several lines and using comments can help write maintainable valid syntax for complex statements.
4.1.4 UserDefinedIds of Nested Pages in Syntax
Special rules apply, if pages are nested. For instance, if components of the type PageArea are used for the design of pages, then the components defined on the embedded page can appear several times within a Task because using the same embedded page multiple times is possible. This means that the UserDefinedId is defined for the embedded page are no longer sufficient to uniquely identify a particular component. However, each PageArea itself has its own UserDefinedId. In order to be able to use components on nested pages such as PageAreas in the syntax of the CBA ItemBuilder, the UserDefinedId of the container (i.e., the PageArea) must be used as a prefix:
PageAreas must be specified in the form UserDefinedId_of_the Container.UserDefinedId_of_the_Component.
The syntax editor does not check if a component is on a page referenced by a PageArea. Ignoring this rule is a common source of errors for conditions and operators in conditional links (see section 4.3.4), finite-state machine operators (see section 4.4.6), and scoring (see section 5.3.9).
4.1.5 Argument Indices
At selected points in the syntax, the CBA ItemBuilder allows so-called argument indices. For example, the operator trace_text(Argument), which can be used to insert a text into the trace log of the CBAItemBuilder, can be used with an argument list (see section 4.4.6). If only a string argument is used, for instance, the string My custom log information can be inserted into the log data:
trace_text("My custom log information")If an argument index is used in the first string argument with the syntax %{Index}$s, values of variables can be inserted into the created log entry. With this syntax any number of additional values can be inserted into the first string argument, based on an index starting with 1. In the following example, the values of the Variables (see section 4.2) myVar1 and myVar2 are used:
trace_text("My custom log with value %1$s for variable myVar1 and
            value %2$s for variable myVar2", myVar1, myVar2)
When this operator is called, and assuming the values 10 for myVar1 and 5 for variable myVar2, the following text would be added to the trace log: "My custom log with value 10 for variable myVar1 and value 5 for variable myVar2"
Argument lists can be used for the trace_text()-operator (see section 4.4.6 for an example) and for the result_text()-operator (see section 5.3.10 for an example).
4.2 Variables and Value Maps

Variables are placeholders for values of a particular variable Type, used in the logic layer of CBA ItemBuilder projects.
INTEGER (i.e. can only contain numbers without decimal places), NUMBER (i.e. floating point numbers with a specific accuracy), STRING (i.e. text represented as characters) or BOOLEAN (i.e. logical values true or false).
Variables can be used for various purposes, for instance, in conditions of the finite-state machine rules (see section 4.4.5) or to adapt the presentation of text, numbers or images 4.2.5. To map values of Type INTEGER to text, images, audio and video files, Value Maps are used (see section 4.2.4).
Variables are created in the CBA ItemBuilder by specifying a unique Variable Name on the project level (see section 4.2.1) and by defining the Type of the variable and an initial value. Variables are globally available across different states of the finite-state machine(s) and can be used by different pages within a project. In this way, variables provide a way represent addition information across states and this information can be used to control the behavior and the visual presentation of complex items within Tasks. The initial value of variables is defined (see section 4.2.1 and can be adopted to Task-specific values using Task Initialization Rules (see section 4.5). Values of variables can also be changed within transitions of the finite-state machine (i.e., using Operators as described in subsection 4.4.6). Moreover, variables can be linked to specific input components (see section 4.2.2).
Variables can be used at various places, for instance, to formulate conditional rules in the finite-state machine (see 4.4.5). Moreover, in connection with Value Maps (see section 4.2.4) and Map-based Value Displays (see subsection 4.2.5) variables play an essential role for the connection of static and dynamic content. In the following, Variables are introduced in more detail beginning with their definition (see section 4.2.1). Specific values of variables can be labeled by naming them (see section 4.2.1).
4.2.1 Introduction
Variables are defined in the Browse Variables view of the CBA ItemBuilder that can be requested using the entry Browse Variables of the menu Project (or using the icon ![]() ). After requesting Browse Variables an editor opens up in the right part of the CBA ItemBuilder as shown in Figure 4.4 (see also section 3.1.4).
). After requesting Browse Variables an editor opens up in the right part of the CBA ItemBuilder as shown in Figure 4.4 (see also section 3.1.4).
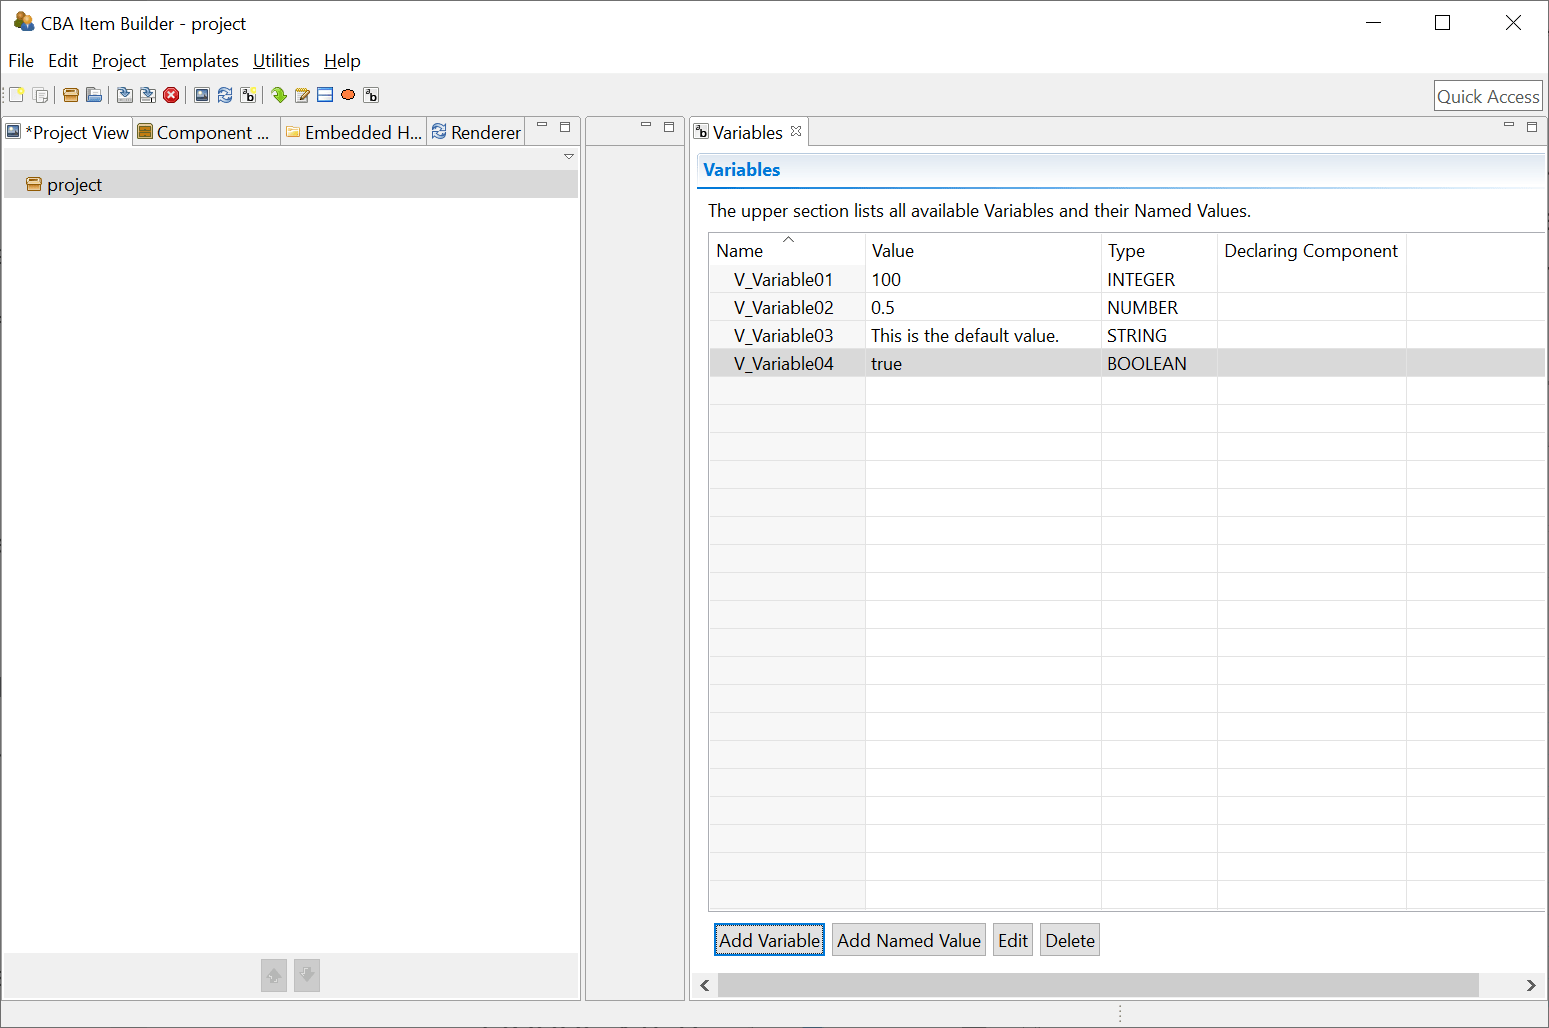
FIGURE 4.4: Editor for Variables.
Variable Definition: Adding new variables with the button Add Variable and editing existing variables using the button Edit opens the dialog Set Variable attributes as shown in Figure 4.5. The Name of variables must be unique and follow the rules already described for project names and page name (i.e., only letters, digits, and underscores are allowed and the first character must not be a digit).
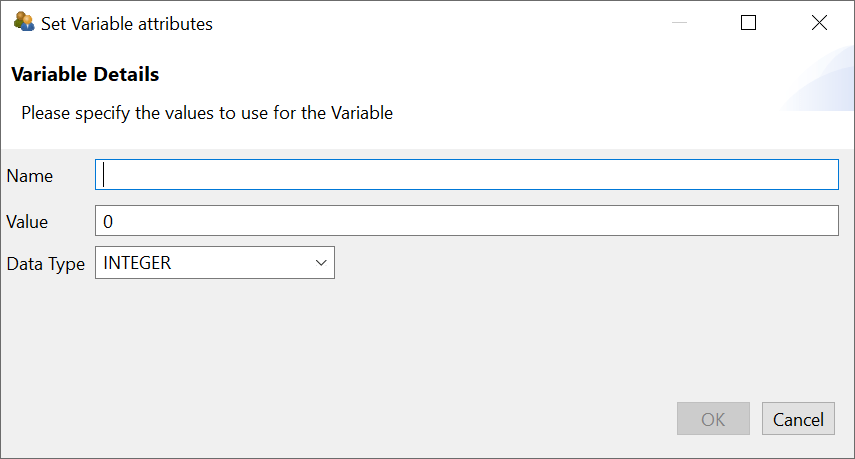
FIGURE 4.5: Set Variable attributes dialog.
Each variable requires a Type (either INTEGER, NUMBER, STRING or BOOLEAN) and the provided Value must fit to the variable Type. The value is only the default value of variables that can be changed in various was.
Named Variable Values: Individual values of variables can be assigned to labels. These so-called Named Values help to make syntax that uses the variables easier to read and understand.
For defined variables the button Add Named Value can be used to add new Named Values (and the buttons Edit and Delete can be used to modify or removed Named Values). Named Values are CBA ItemBuilder’s approach to improve readability of syntax that implements different interpretation on specific values of variables. Instead of adding a comment that the value \(1\) represents, for instance, Visited and the value \(2\) of a variable represents Not Visited, named values can be defined for variable values.
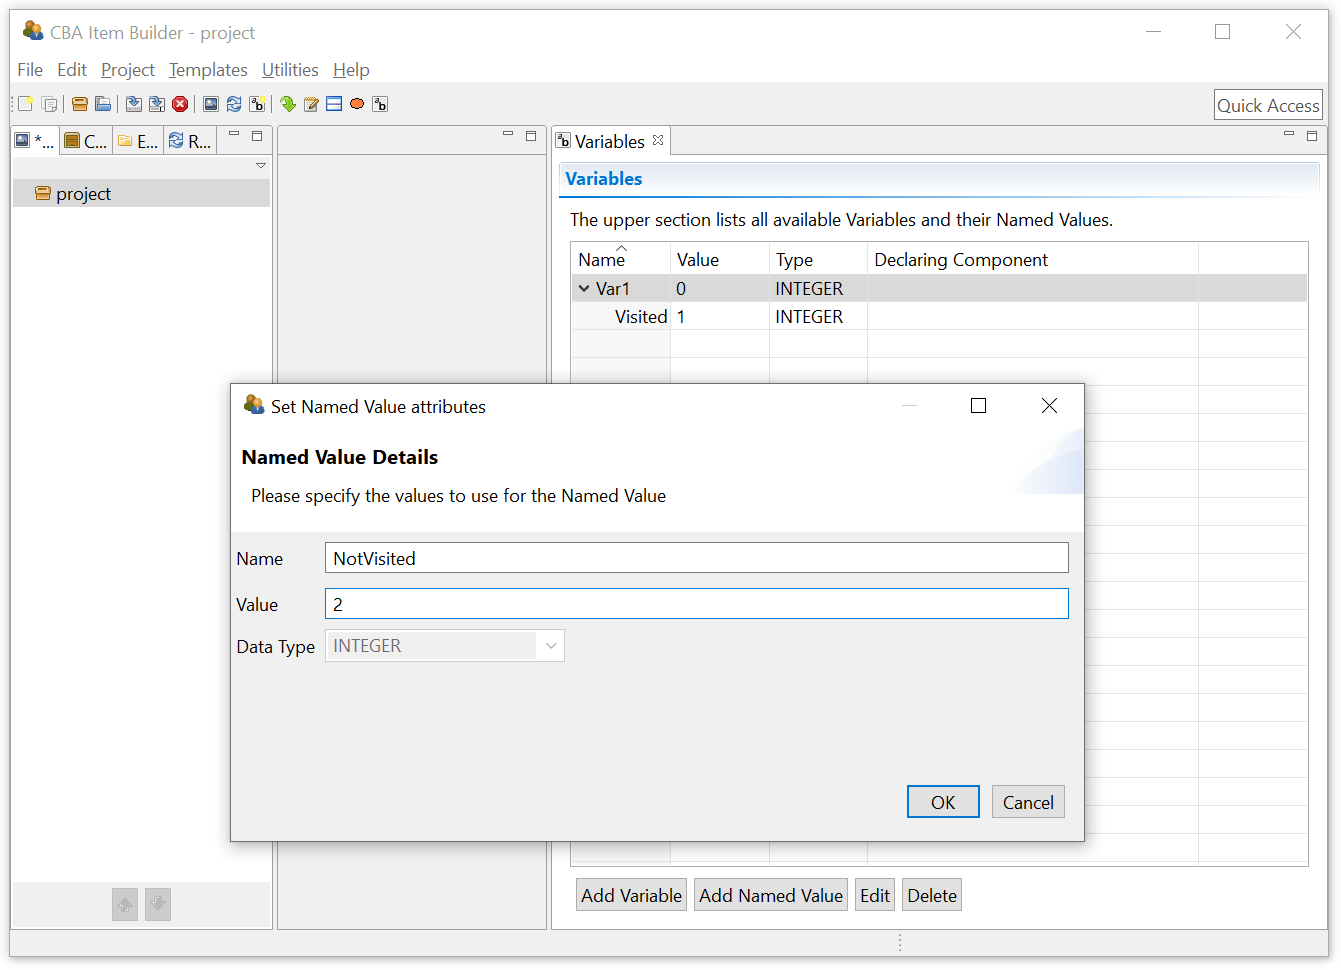
FIGURE 4.6: Set Named Value attributes dialog.
Named variables can be used to structure the syntax of finite-state machines (see section 4.4). To display different labels according to variable values, so-called Value Maps can be used as described in section 4.2.4).
Change Variable Values: The prerequisite to use variables for dynamic content is that values of variables can be changed at runtime, either in connection with a user interaction or based on triggering events, such as time-controlled finite-state machine events. Values of variables can be changed with different mechanisms, which are listed in the following:
Special input elements (so-called Value Inputs) can be bound directly to variables, so that a change to the input elements directly causes a change of the variable values. Details about Value Inputs are described in the section 4.2.2.
Drag-and-drop operations can also be used to change the values of variables. The drag-and-drop fields (using so-called
MapBasedVariableDisplays) are assigned to variables whose values are changed by the drag and drop user interaction. A detailed description of the possibilities for implementing drag and drop in the CBA ItemBuilder can be found in the section 4.2.6.
- Variable values can be set or changed using
set()- andreset()-Operators in Conditional Links (see section 4.3.3) and in Rules of the Finite-State Machine (see section 4.4.6).
Variables keep their values across page (and state changes in the finite-state machine, below). Thus variables can be used to represent additional information that describe the behavior and visual presentation of items, in addition to the Current State of finite-state machine(s).
Use Variable Values: The value of variables can be used fur different purposes, for instance, to display dynamic numbers, texts, images and videos (see section 4.2.5), to specific conditions for scoring (see section 5.3.5) or to create conditional Finite-State Machine Rules (see section 4.4.5).
4.2.2 Value Inputs
The CBA ItemBuilder provides some components, that change the value of Variables in line with user interactions. In particular sliders (ScaleVariableInput), spinners (SpinnerVariableInput) and input fields (VariableValueInput) are directly linked to variables of type INTEGER (see Figure 4.7).
Link Variables to Components: Components that can be linked to variables (e.g., Value Inputs) provide a context menu entry Link Variable as shown in Figure 4.8. Analogous to the definition of Links, the use images, audio and video files, the assignment of Events and Value Maps, the connection of components to variables is made via the context menu entry Link Variable.
Components of type VariableValueInput and SpinnerVariableInput only need to be linked to a variable. Changes in the input immediately change the value of the linked variable. Components of type ScaleVariableInput also need to be linked to a so-called Value Map (see section 4.2.4).
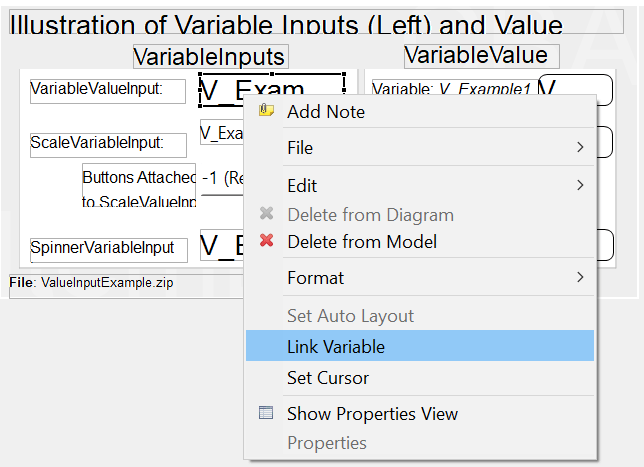
FIGURE 4.8: Context menu in the Page Editor to Link Variables.
Attach ScaleValueInput to Buttons: Components of type Button (see section 3.11.2) can be linked directly to ScaleValueInput so that a click on a particular button increases or decreases the value of the linked variable. The numerical value to increase or decrese the variable must be specified as the property Increment in the Properties view (can be a positive or negative integer number, default is \(0\)). To assign a Button to a ScaleValueInput use the entry Attach ScaleValueInput in the context menu of a Button in the Page Editor and select the ScaleValueInput in the dialog (see Figure 4.9).
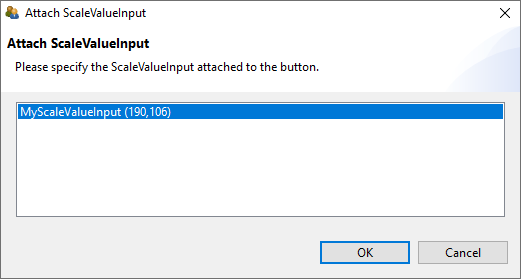
FIGURE 4.9: Dialog for assigning a Button to a ScaleValueInput.
4.2.3 Variable Value Displays
An essential use of variables is to display values within assessment components, i.e., on the side of an item. For this use case, VariableValueDisplays are provided as component that show the value of linked variables plain and unchanged. Examples of using components of type VariableValueDisplay can be seen in the right part of Figure 4.7 and in Figure 4.10.
Layout: Font family, font size and font color, text alignment and text decoration as well as borders and transparency of VariableValueDisplays can be defined in the Properties view.
Events: VariableValueDisplays raise an FSM Event (see section 4.4.3 and Figure 4.35) and the Variable Displays as well as Maps-based Variable Displays (see section 4.2.5) can be used to implement Drag-and-Drop user interactions (with the additional FSM Events, see section 4.2.6).
4.2.4 Value Maps
Variable values can not only be displayed 1:1, but can also be displayed as images, audio or video files or as text with the help of translation tables. The assignment of values of a variable to other values is defined in the CBA ItemBuilder with the help of Value Maps.
Value Maps are defined in the Value Maps view of the CBA ItemBuilder that can be requested using the entry Browse Value Maps of the menu Project (or using the icon ![]() ). After requesting Browse Value Maps an editor opens up in the right part of the CBA ItemBuilder (see also section 3.1.4). The Value Maps view as shown in Figure 3.1.4 contains an upper table of all defined Value Maps with a Value Map Details view in the lower part.
). After requesting Browse Value Maps an editor opens up in the right part of the CBA ItemBuilder (see also section 3.1.4). The Value Maps view as shown in Figure 3.1.4 contains an upper table of all defined Value Maps with a Value Map Details view in the lower part.
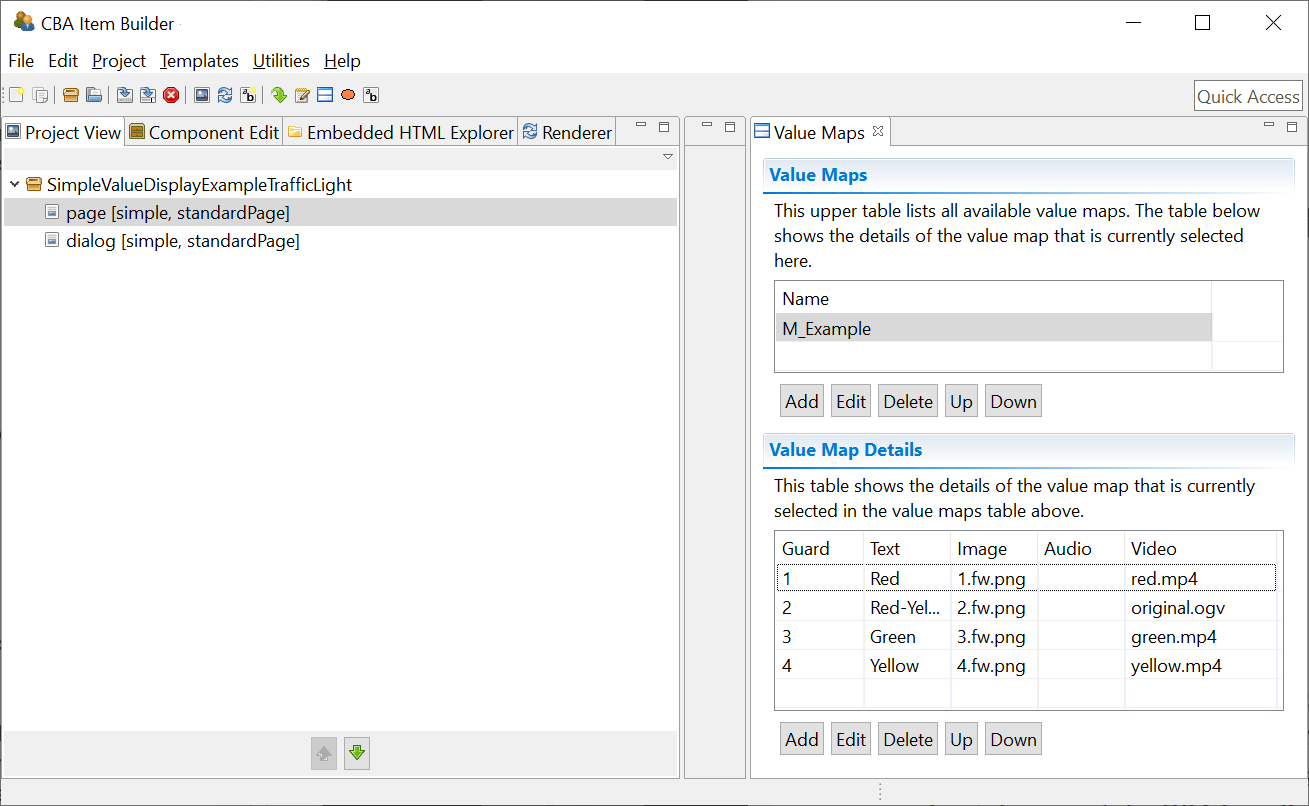
FIGURE 4.11: Editor for Value Maps.
Value Maps can be added using the Add button in the upper table, requiring a name that can be changed using the Edit button. The value maps in the upper table can be re-ordered using buttons Up and Down.
Once a Value Map has been created and selected in the upper table, new entries can be added with the Add button and modified with Edit.
In the example in Figure 4.11, the Value Map M_Example is selected in the upper pane, so the Value Map Details view shows the defined values. For each definition a Guard is necessary, together with at least one text, one image, one audio resource or one video resource. It is also possible to assign different resources directly to a Guard. In the example in Figure 4.11, Guards \(1\), \(2\), \(3\), and \(4\) are each assigned a text, an image, and a video.
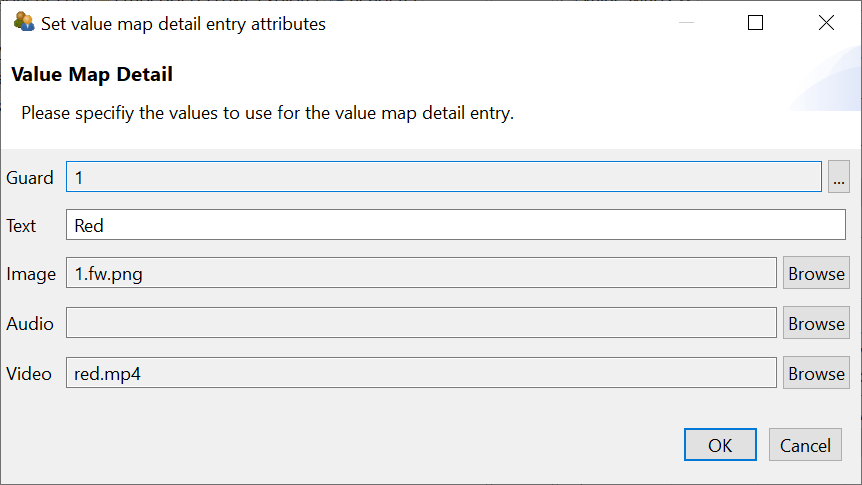
FIGURE 4.12: Dialog Set value map detail entry attributes.
Text resources can be defined directly in the editor in Figure 4.12 by typing. Images, audio, and video files refer to the resources imported via the Resource Browser (see section 3.10.1) in a CBA ItemBuilder Project File.
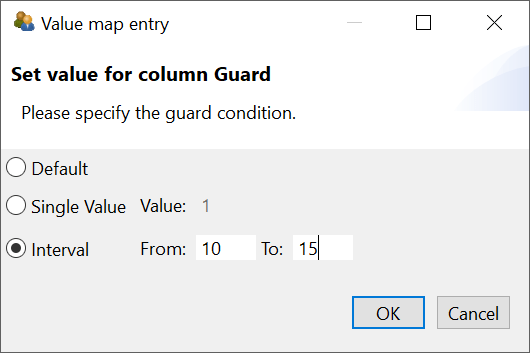
FIGURE 4.13: Dialog for defining Guards using the dialog Set value for column Guard.
For the definition of Guards, a choice can be made between the Default Value (i.e., the value when no other Guard applies), a single numerical value (Single Value), and a range between two numerical values (Interval), see Figure 4.13).
Variables and Value Maps are permanently assigned to components when designing pages. However, both can be freely combined between different components, i.e., a Variable can be used with one Value Map in one component and with an additional Value Map in another component.
4.2.5 Maps-based Variable Displays
Components of type MapBasedVariableDisplay can be used with Variables for displaying dynamic content in the CBA ItemBuilder pages. A static example is shown in Figure 4.14 (see section 4.2.6 for the use of MapBasedVariableDisplays in combination with Drag-and-Drop).
The component MapBasedVariableDisplay can be used to display either text or images or to play audio or video files (to show the raw number of a Variable the component VariableValueDispaly as described in section 4.2.3 is provided). To define which part of the Value Map should be used, the property Value Display Type must be defined in the Properties view (see Figure 4.15).
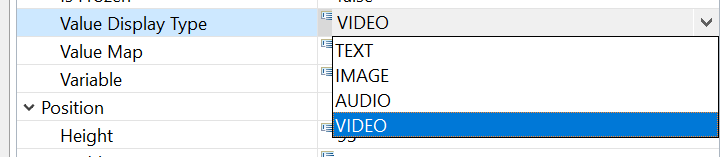
FIGURE 4.15: Property Value Display Type for components of type MapBasedVariableDisplay in the Properties view.
Link Value Map to Components: All components that can use Value Maps, for instance, MapBasedVariableDisplays, provide an entry Link Value Map in the context menu. In the then opening editor Set Value Map, an existing Value Map can be selected. To remove an assigned Value Map, the Set Value Map editor allows deselection.
4.2.6 Drag-and-Drop
Drag-and-drop response formats can now be implemented using Variables (see section 4.2) and Maps-based Variable Displays (see section 4.2.5). Let’s start with two examples from real assessments (Jiang et al. 2021) shown in Figure 4.17 and 4.18 (see Gong et al. 2022 for an example how to analyze the log data collected with these items).
Figure 4.19 illustrates how value of variables are changed with drag-and-drop operations. Inspect the example and first of all see, how the Dragged element corresponds to the variable value of the MapBasedVariableDisplay at which the drag-and-drop operation was started. The variable value is shown in the item, as soon as an element is dragged.
At the moment when a drag-and-drop operation is completed (i.e. at drop) the values of the variables are swapped in this example (drag-and-drop mode is DROP_SWITCH, see Figure 4.21 for alternative configurations).
Technical Details and Concepts For the description and definition of drag-and-drop, a distinction must be made between a drag-and-drop source and a traget. Drag-and-drop is when something is moved from source to target, either with the mouse as pointing device or by touch.
Either the MapBasedVariableDisplays are dragged and dropped on fixed positions, or for free positioning, drag-and-drop allows to move the MapBasedVariableDisplays within a parent panel. Figure 4.20 illustrates both types of drag-and-drop functionality: On the left sid, drag-and-drop of MapBasedVariableDisplaysis possible within a Panel with the property Drop Target=true (free drag and drop). On the right side, drag-and-drop is possible between MapBasedVariableDisplays on fixed positions. For both modes, MapBasedVariableDisplays are used as draggable/droppable components.
Drag-and-drop only requires Variables and Value Maps together with MapBasedVariableDisplays. Dragging an element from a source position to the target position results in a change of values of the variables linked to the MapBasedVariableDisplay. The behavior of successful drag-and-drop operations of an object from a source to a target is configured by defining how variable values are changed. The semantic of the drag-and-drop behavior is reduced to modifying the values of the underlying variables, linked to the MapBasedVariableDisplays. This has the advantage that scoring can be done quickly based on the variable values and the various scoring operators (see chapter 5). The following three modes are available that define, how variables are changed after a sucessful drop-operation: DROP_SWITCH, DROP_MOVE and DROP_COPY (see Figure 4.21).
The variables are always assigned to a MapBasedVariableDisplay, but the different MapBasedVariableDisplays do not have to use the same Value Maps. This also allows drag-and-drop groups to be implemented, as shown in Figure 4.22.
MapBasedVariableDisplays provide specific Events that can be used in the finite-state machine (see section 4.4). The default Raised Event is triggered, when a MapBasedVariableDisplay is clicked, a Drag Event is triggered together with drag operations and a Drop Event is fired when something is dropped at a MapBasedVariableDisplay (see Figure 4.35 for an example). Even complex pattern based on finite-state machine rules can be implemented using Events, for instance, to impose specific restrictions for allowed drag-and-drop operations.
4.2.7 Dynamic Text in HTMLTextFields
HTMLTextField's can be used to display dynamic text. To do this, you must insert keywords in the content of the HTMLTextField using the following syntax. These keywords are at runtime translated and replaced with the string values of the referenced parameters:
${ParameterName}The possible values for ParameterName are either names of FSM variables or references to the scoring result of a task. Accordingly, this mechanism can be used, for example, to implement simple feedback or, in the case of complex tasks, feedback on the scoring can be built into the item, for instance, for testing purposes.
Dynamic texts can be used in component of type HTMLTextField with the keywords following the $-sign in curly brackets. Dynamic texts are updated at Runtime each time the HTMLTextField is refreshed (for instance, when the pages change or the HTMLTextField is clicked, see Figure 4.23 for an example).
If a parameters of the item score is requested and the name of the task is not defined in the project, -1 is shown at Runtime.
The following qualified values for ParameterName are available for dynamic texts:
| Qualified Parameter | Description |
|---|---|
| ItemScore .{TaskName} .{ScoreType} | Displays the value of the {ScoreType} for task {TaskName}. The task-name is defined in the task definition (see 3.6) and the {ScoreType} is one of the following keywords (see 5.4 for details): result, credit_Class, credit_weight, reactionTime, reactionTimeTotal, execTime, execTimeTotal, nb_Hits, nbInteractions, nbInteractionsTotal, Hit_weight, nb_Misses, Miss_weight
|
| FSMVariable .{FSMVariableName} | Displays the value of the FSM variable {FSMVariableName} as string |
4.3 Conditional Links

4.3.1 Introduction
To design assessment components with multiple views, the CBA ItemBuilder uses the concept of pages. Navigation between pages is possible with dedicated links. Two links are distinguished: Regular Links, which statically always lead to the same page, versus Conditional Links, whose target page can change according to specific conditions. An example of a Conditional Link has already been shown in section 3.11. Another synthetic example illustrating various properties of conditional links is shown in Figure 4.24). The syntax for defining Conditional Links follows the simple schema:
{Page: Condition}The syntax requires the use of curly brackets to define that a Page left of the colon is used as the target page of a link if the Condition right of the colon applies.
Figure 4.24 provides different synthetical examples that help to describe the Conditional Link feature of the CBA ItemBuilder:
Conditional Link 1illustrates aButtonthat is combined with a condition that spans two lines: Line 1{Target1: Checkbox1}specifies that the target pageTarget1is used if theCheckboxwith theUserDefinedID: Checkbox1is selected. Line 2 then contains the statement that theButtonshould link to pageTarget2, ifCheckbox1is not selected. The condition in Line 2 uses the logical operator for negationnot(see section 4.1.3).The syntax allows the specification of several combinations of pages and conditions, each included in a new line embedded in curly brackets.
Conditional Link 2illustrates how the different conditions are processed. For this purpose, another line was added as a new first line:{Target2: true}.The conditiontruethat was inserted here is always fulfilled (see section 4.1.3). Since the CBA ItemBuilder checks the defined conditionals one after the other, theButtonwith the textConditional Link 2will always refer to the pageTarget2, even ifCheckbox2is selected, because this combination of page and condition is defined after the reference to{Target2: true}.
Conditional Link 3illustrates that if no condition is met, then no link is activated. In this example, ifCheckbox3is not selected, then clicking on theButtonhas no effect.The fourth example in Figure 4.24 shows how Links and Conditional Links relate to each other. For this, the Conditional Link was only defined that the condition
Chechbox4should lead to the pageTarget1. In addition, however, the regular Link toTarget2was specified via the Link Page dialog. The result first checks whether a Conditional Link applies. If this is the case (i.e. ifCheckbox4is selected), then theButtonpoints to pageTarget1. If none of the conditions is true, then the regular link is used, i.e.Conditional Link 4points to pageTarget2.The last example shows that conditions can also be combined if the rules for setting parentheses are followed. Conditional Link 5’ refers, according to the definition, to the page ‘Target1’, if all
checkboxesexceptCheckbox4are selected. Then, in the second part of the syntax, if the first condition was not met, the link refers to pageTarget2, again with the keywordtrue(i.e., always).
The examples illustrated in Figure 4.24 illustrate that conditional links to references to pages can be used in a variety of ways. Of course, the pages do not necessarily have to be dialog pages (see section 3.15). Conditional links can be used like links to all possible pages, but the respective context (e.g. X-Page, see section 3.11.4) must be considered. As described in the following section 4.3.3, Conditional Links can also be used to make changes to the item. For this purpose it may also be useful that Conditional Links point to the page on which they are defined.
Defining Conditional Links in the Link Page dialog: Components that can be used to link pages (see section 3.11) usually allow also the definition of conditional links in addition to the definition of regular links.
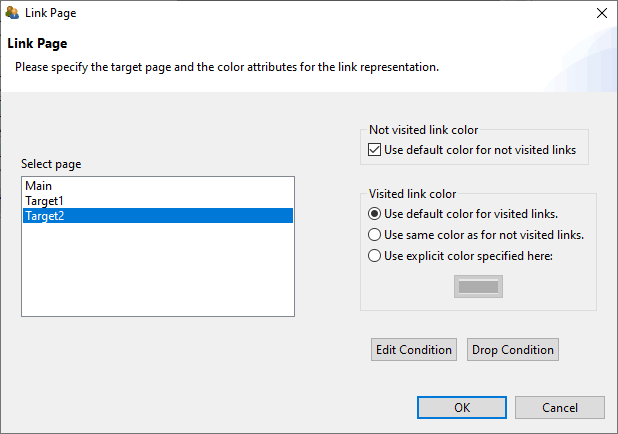
FIGURE 4.25: Dialog Link Page with buttons Edit Condition and Drop Condition.).
The syntax editor required for defining Conditional Links can be invoked with the button Edit Condition (see Figure 4.25). This button allows adding new Conditional Links as well as editing existing Conditional Links. If an existing Conditional Link is to be removed completely, either the syntax can be deleted completely or the button Drop Condition is used.
Applied Examples: Conditional links can be used for a variety of applications. Selected examples can be seen in Figure 4.26.
The first example illustrates adaptive feedback, that informs about the correctness of a particular answer or about any other (intermediate) condition, that can be formulated as Condition. If Conditional Links are used to select a page that is shown, the information that is selected by conditions must be placed on different pages. Moreover, a component that can be used to Link Pages must be used to trigger the evaluation of the Condition. In the example in Figure 4.26, the decision of which feedback to display is made by the Conditional Link defined for the Next button. If the question is answered correctly (i.e. the radio button with the
UserDefinedID: rbGreenwas selected), then the Next button links to the page:{feedbackCorrect:rbGreen}.On the other hand, if a radio button with a differentUsderDefinedIDis selected ((rbRed or rbBlue)), then the Conditional Link points to thefeedbackWrongpage.The first example in Figure 4.26 illustrates yet another important use of conditional links. The Conditional Links definition for the
nextbutton also handles the case where no selection has been made. This is done implicitly, since all previously defined pairs of pages and conditions cover all possible selections in theRadioButtonGroup(if the question was answered, thenrbRed,rbGreenorrbBluemust be selected). If none of the options is answered, then the Conditional Link is used to refer to a page which is defined as a modal dialog (see section 3.15). No specific condition is needed for this, i.e. the keywordtruehas been used so that this condition is always met:{feedbackMissing:true}. Since this last condition is only checked if the previously defined conditions were not fulfilled, it can be used to implement a feedback that informs about a missing answers for that question.
The second applied example in Figure 4.26 shows how Conditional Links can be used to show or skip additional pages with specific questions or tasks. By linking multiple pages via next/back buttons, the target person does not necessarily have to be informed about which components of an instrument have been skipped or filtered. In the example a Conditional Link was used in both directions, i.e. with the
Nextbutton a page with a specific question is only shown if the answer Yes (rbYes) was selected:{filteringOptional: rbYes}. If the radio button with theUserDefinedID: rbNowas selected ({filtering2: rbNo}), the page will be switched tofiltering2immediately. The back button on pagefiltering2uses the same logic to link either to pagefiltering1or to pagefilteringOptionalwhen navigating back.The third example shows how text responses can be included in the condition for Conditional Links. The operator
matches()is used, which is also used for scoring text responses (see section 5.3.4). The operator is used in the condition for the Conditional Link at theNextbutton on pageanswercorrect1to check if the correct response has been entered. If this is not the case, i.e.13was not entered in theSingleLineInputFieldwith theUserDefinedId: txtResponse, then the Conditional Link points to the same page again:{answercorrect1:not matches(txtResponse, "13") /*...*)}. If the question has not yet been answered correctly, then the page is not changed, i.e. an answer format Answer-Until-Correct can be implemented in this way. If the first conditionnot matches(txtResponse, "13")is not met (i.e. ifmatches(txtResponse, "13")is met), then the Conditional Link in this example points back to the home pagepage({page:true}). The text/*...*/indicates how comments can be used within conditions of Conditional Links (see section 4.1.2). But it also indicates that in this example a further functionality was used, namely the use of additional operators that are executed when a certain Conditional Link is activated.
Beyond the selected application examples, various forms of interactivity in assessment components can be implemented with the help of Conditional Links, which cannot all be listed exhaustively here. However, Conditional Links can also be used as an alternative to regular links to trigger actions (e.g., to set a button frozen). Conditional Links are part of the standard repertoire for designing interactive assessment components that do not require the definition of a complete Finite-State Machine (see section 4.4). Often Conditional Links therefore also refer to the current page in practice, in order to trigger actions with the help of links, as described in the next section.
Regular Expression: The validation of text input in conditional links can include regular expressions using the matches()-operator:
{Page: matches(Component, RegularExpression)}Deprecated Features / Features under Development: The use of the getItemScore(Task, Calculation)-operator is currently under development.
The use of FSM variables in conditions is currently not supported in conditional links.
[Issue 45]4.3.2 Quick Start (Continued): Feedback Using Conditional Links for Single Page Items
In section 3.3 we created different single page items. In this quick-start, it will be illustrated how conditional links can be used to create different implementations of result feedback:
- Single Choice Item: Feedback using Dialogs
- Multiple-Choice Item: Feedback using PageAreas
- Text Entry Item: Feedback using MapBasedValueDisplays
4.3.2.1 Feedback using Dialogs
1. Open SinglePageItems_01SC.zip and Save as SinglePageItems_01SC_Feedback.zip: Open the item created in the section 3.3.2 (or download SinglePageItems_01SC.zip) using the icon ![]() in the CBA ItemBuilder (or use the main menu
in the CBA ItemBuilder (or use the main menu File and the entry Open project). Save the Project File with the new name SinglePageItems_01SC_Feedback.zip using the main menu File and the entry Save as... (or use the icon ![]() ).
).
2. Create new Page: Make sure the project name SinglePageItems_01SC_Feedback is shown in the Project View in the left part of the CBA ItemBuilder. Right-click on this project name in the Project View and select the entry Add new simple page in the context menu. In the dialog that opens, a Page Name, e.g. FeedbackCorrect, must be entered. Confirm the dialog with OK (without ticking the checkbox Create as X-page?).
3. Add Frame and Panel: The Project View now contains the newly created page FeedbackCorrect. Double-click this page to open the Page Editor in the main area of the CBA ItemBuilder’s main window. In the Page Editor that opens, the Palette  is now required. If the Palette is not displayed, it can be shown at the right window border with the small icon
 ![]() . Select the
. Select the Frame-component by clicking on ![]() ) in the palette. Draw the
) in the palette. Draw the Frame in the empty drawing area of the Page Editor by first click and then move the mouse with the pressed left mouse button, so that a gray rectangular with dashed line appears. Release mouse and select the newly created Frame by clicking on the rectangular. Right-click on the Frame and select the entry Show Properties View in the context menu. Find the section Position and enter the following values: Height: 600, Width: 800, X: 112, and Y: 84. Change the property Dialog in section Misc to MODAL_DIALOG and change the property Closable to false.
Select the Frame in the Page Editor and create a new Panel on the page FeedbackCorrect. Select the Panel ![]() in the Palette. To add the
in the Palette. To add the Panel to the Frame click in the drawing area of the Page Editor within the area that is covered by the Frame, hold the mouse button while moving the mouse and see a small rectangle appearing. Open the Properties view and enter the following values in the Position section: Height: 600, Width: 800, X: 0, and Y: 0.
4. Add a HTMLTextField: Select the Panel in the Page Editor and create a new HTMLTextField on the page FeedbackCorrect. Select the HTMLTextField ![]() in the Palette. To add the
in the Palette. To add the HTMLTextField to the Panel click in the drawing area of the Page Editor within the area that is covered by the Panel, hold the mouse button while moving the mouse and see a small rectangle appearing. Open the Properties view and enter the following values in the Position section: Height: 100, Width: 750, X: 30, and Y: 30. Double-click the HTMLTextField and enter the text Your answer was correct. Select the text and change the font size to 28. Finally, save the changes using the button Save and Close.
5. Add a Button: Select the Panel in the Page Editor and create a new Button. click the entry Button ![]() in the Palette. When the component type is selected in the Palette a new button can be added to the page by drawing a rectangle into the Drawing Area. Open the Properties view and enter
in the Palette. When the component type is selected in the Palette a new button can be added to the page by drawing a rectangle into the Drawing Area. Open the Properties view and enter Height: 45, Width: 180, X: 560, and Y: 500 in the section Position. Set the property Border Width: 1 in the section Display. Now find the tab Appearance ![]() and click it, and change the formatting of the button. Select
and click it, and change the formatting of the button. Select Arial as font and set the font size to 16. Moreover, set the border color to black using the button ![]() . Next, double-click the button and enter the text
. Next, double-click the button and enter the text Continue in the dialog Configure a Multiline Text, before closing the dialog wit OK. Finally, right-click the button in the Page Editor an select the entry Set command in the context menu. In the dialog Set Runtime Command click on the entry NEXT_TASK and confirm the selection with OK.
6. Configure the button Next on page01: Open the page page01 and find the button with the label Next. Right-click the button and select the entry Set Command. In the dialog Set Runtime Command select the element Empty to remove the command NEXT_TASK, that was previously assigned to this Button. After closing the dialog with OK, right-click the button Next again and select the entry Link Page. In the dialg Link Page don’t select a page on the left part of this dialog, but click the button Edit Condition. This will open a syntax window with the title Link $.... In this dialog, enter the following conditional link syntax: {FeedbackCorrect: c} This will link to page FeedbackCorrect, if the button is pressed and the element with the UserDefinedId: c is selected. Close the link syntax editor via the small cross in the tab title (![]() ).
).
7. Duplicate page FeedbackCorrect to create page FeedbackCorrect: For the next step, close all open Page Editors first using the small cross in the tab title (![]() ). If no editor is open, right-click on the page
). If no editor is open, right-click on the page FeedbackCorrect in the Project View and select the entry Save As Template. Define a template name (e.g., dialog) and hit OK in the dialog Save As Template.
If the current specification of the page FeedbackCorrect as saved as template dialog, create new page from template (using the entry New page from template in the Project-menu) and select the template dialog. Define the page name as FeedbackWrong and create the new page. Open the Page Editor of the new page FeedbackWrong and change the text of the HTMLTextfield to Your answer was wrong..
Right-click the button Continue and use the entry Dublicate in the context sub-menu Edit to duplicate the Button-component. Change the text to Retry. Use the Properties view to change the position of the Button (X: 50 and Y: 500). Assign the command CLOSE using the context menu (right-click) and the option Set Command. Confirm the dialog Set Runtime Command with OK after selecting the command CLOSE.
8. Create Page FeedbackMissing from template: Use the option create new page from template (using the entry New page from template in the Project-menu) again. Create a new page from the template dialog created in step 7 and change the text of the HTMLTextField to Please provide an answer. Duplicate the Button Continue“ again (see step 7) change the text to Retry, change the command to CLOSE and the position to X: 50 and Y: 500.
9. Update the link condition of Button Next on page01: Open page page01 in the Page Editor and right-click on the Button with the text Next. Select the entry Link page and open the link condition syntax editor using the button Edit condition. The syntax defined in step 6 should be extended to the following three lines:
{FeedbackCorrect: c}
{FeedbackWrong: ((a or b) or d)}
{FeedbackMissing: true}
10. Save, Preview and Test: This concludes the Feedback using Dialogs and the project can now be saved (![]() ) and previewed (
) and previewed (![]() ). Check the feedback by selecting either nothing, the correct response (
). Check the feedback by selecting either nothing, the correct response (c) or any other response (and press Next).
4.3.2.2 Feedback using PageAreas
1. Open SinglePageItems_02MC.zip and Save as SinglePageItems_02MC_Feedback.zip: Open the item created in the section 3.3.3 (or download SinglePageItems_02MC.zip) using the icon ![]() in the CBA ItemBuilder (or use the main menu
in the CBA ItemBuilder (or use the main menu File and the entry Open project). Save the Project File with the new name SinglePageItems_01SC_Feedback.zip using the main menu File and the entry Save as... (or use the icon ![]() ).
).
2. Create new Page: Make sure the project name SinglePageItems_02MC_Feedback is shown in the Project View in the left part of the CBA ItemBuilder. Right-click on this project name in the Project View and select the entry Add new simple page in the context menu. In the dialog that opens, a Page Name, e.g. feedbackCorrect, must be entered. Confirm the dialog with OK (without ticking the checkbox Create as X-page?).
3. Add Frame and Panel: The Project View now contains the newly created page feedbackCorrect. Double-click this page to open the Page Editor in the main area of the CBA ItemBuilder’s main window. In the Page Editor that opens, the Palette is now required. If the Palette is not displayed, it can be shown at the right window border with the small icon ![]() . Select the
. Select the Frame-component by clicking on ![]() ) in the palette. Draw the
) in the palette. Draw the Frame in the empty drawing area of the Page Editor by first click and then move the mouse with the pressed left mouse button, so that a gray rectangular with dashed line appears. Release mouse and select the newly created Frame by clicking on the rectangular. Right-click on the Frame and select the entry Show Properties View in the context menu. Find the section Position and enter the following values: Height: 130, Width: 950, X: 0, and Y: 0.
Select the Frame in the Page Editor and create a new Panel on the page feedbackCorrect. Select the Panel ![]() in the Palette. To add the
in the Palette. To add the Panel to the Frame click in the drawing area of the Page Editor within the area that is covered by the Frame, hold the mouse button while moving the mouse and see a small rectangle appearing. Open the Properties view and enter the following values in the Position section: Height: 130, Width: 950, X: 0, and Y: 0.
4. Add Button and HTMLTextField: Buttons can be added to components of type Panel. Select the Panel created in step 3 and find and click the entry Button ![]() in the Palette. When the component type is selected in the Palette a new button can be added to the page by drawing a rectangle into the Drawing Area. Open the Properties view and enter
in the Palette. When the component type is selected in the Palette a new button can be added to the page by drawing a rectangle into the Drawing Area. Open the Properties view and enter Height: 30, Width: 100, X: 40, and Y: 10 in the section Position. Set the property Border Width: 1 in the section Display and define the text as Check (either in the Properties view using the edit button ... in the Text property or by right-clicking on the Button in the Page Editor and using the entry Edit Text). Now find the tab Appearance ![]() and click it, and change the formatting of the button. Select
and click it, and change the formatting of the button. Select Arial as font and set the font size to 8. Moreover, set the border color to black using the button ![]() .
.
The Panel created in step 3 needs to be selected again in the Page Editor. If the Panel is selected, the palette allows to select the HTMLTextField entry (![]() ). Draw a rectangle in the Drawing Area (inside the
). Draw a rectangle in the Drawing Area (inside the Panel) to add the HTMLTextField. If the Properties view is visible, click on the HTMLTextField and enter the following values in the Position section: Height: 80, Width: 700, X: 160, and Y: 10. To enter text, double-click the HTMLTextField and enter the text Correct in the HTML Text Editor. Select the text and change the font size to 25. Finally, save the changes using the button Save and Close.
5. Duplicate page feedbackCorrect to create page feedbackWrong and feedbackCheck: For the next step, close all open Page Editors first using the small cross in the tab title (![]() ). If no editor is open, right-click on the page
). If no editor is open, right-click on the page feedbackCorrect in the Project View and select the entry Save As Template. Define a template name (e.g., area) and hit OK in the dialog Save As Template. Repeat the step and create also the page feedbackCheck using template area.
6. Add PageArea to page page01: Open the page page01 in the Page Editor and select the Frame. Use the context-menu entry Show Properties View to make sure you selected the Frame. If the Frame is selected, a component of type PageArea can be selected in the Palette. Once the PageArea is selected in the Palette, a rectangle can be drawn inside the Frame (but not inside the Panel). So, in order to add the PageArea, left-click in the margin area, that is the area of the Frame that is not covered by the Panel. Draw a small rectangle to add the PageArea and then select the PageArea to change it’s position in the Properties view (X: 40, Y: 530, Witdth: 950, Height: 130). Moreover, specify the UserDefinedId in section Identification of the PageArea to be area. Finally, right-click the PageArea and select the entry Link Embedded Page. In the dialog Link Embedded Page select feedbackCheck and confirm the dialog with OK.
7. Finish page feedbackCheck: Open the page feedbackCheck in the Page Editor and delete the HTMLTextFiel (for instance, using the context menu entry Delete From Model). Change the text of the Button to Check and define the following syntax as Condition for a link. For that purpose, right-click the Button and select the entry Link Page. In the dialog Link Page click on the button Edit Condition:
{page01: (e1 and e3) | setEmbeddedPage(area, feedbackCorrect) setFrozen(e1)
                       setFrozen(e2) setFrozen(e3) setFrozen(e4)}
{page01: true | setEmbeddedPage(area, feedbackWrong) setFrozen(e1)
                setFrozen(e2) setFrozen(e3) setFrozen(e4)}
8. Finish page feedbackCorrect: Open the page feedbackCorrect in the Page Editor and define the following syntax as conditional link (i.e., as syntax defined using context menu Link Page and the button Edit Condition):
{page01: true | setEmbeddedPage(area, feedbackCheck) unsetFrozen(e1)
                unsetFrozen(e2) unsetFrozen(e3) unsetFrozen(e4)}
9. Finish page feedbackWrong: Open the page feedbackWrong in the Page Editor and define the same syntax as in step 8 as conditional link (i.e., as syntax defined using context menu Link Page and the button Edit Condition). Finally, edit the text of the HTMLTextField and enter Wrong. Save the changes using the button Save and Close.
10. Save, Preview and Test: This concludes the Feedback using Dialogs and the project can now be saved (![]() ) and previewed (
) and previewed (![]() ). Check the feedback by selecting either nothing, the correct response (
). Check the feedback by selecting either nothing, the correct response (c) or any other response (and press Check).
4.3.2.3 Feedback using MapBasedValueDisplays
1. Open SinglePageItems_03TXT.zip and Save as SinglePageItems_03TXT_Feedback.zip: Open the item created in the section 3.3.4 (or download SinglePageItems_03TXT.zip) using the icon ![]() in the CBA ItemBuilder (or use the main menu
in the CBA ItemBuilder (or use the main menu File and the entry Open project). Save the Project File with the new name SinglePageItems_03TXT_Feedback.zip using the main menu File and the entry Save as... (or use the icon ![]() ).
).
2. Define States and Variables: For this example the definition of two States and two Variables is necessary. To define states and variables, open the State Machine Tree View using the icon ![]() (or use the main menu
(or use the main menu Project and the entry Edit State Machine). In the State Machine Tree View right-click on the entry Machine and select the entry State in the sub-menu New Child to add the first state. After adding the state use the Properties view to change the name of the state from <not set> to ST_Start. Select STARTas Type. Repeat the same steps to add a second state (Name: ST_Main, Type: NORMAL).
Continue and add two variables and define their names as V_Frequency and V_Feedback.
3. Edit State Machine Syntax: Change to the tab State Machine Rules and copy the following text:
Events: EMPTY;
Rules: ST_Start -> ST_Main{true|set(V_Frequency,0), set(V_Feedback,99)}
Close both tabs (State Machine Rules and State Machine) and confirm to save the changes.
4. Add Button with label Check: Open page page01 in the Page Editor and add a new Buttonto the Frame. Define the position (X: 500, Y: 350, Height: 30, Width: 120) and the TextCheck(Font: Arial, Font Size 8). Right-click the button and open the entryLink Page. In the dialogLink pageclickEdit Condition` and enter the following syntax into the syntax editor:
{page01: matches(txt,"42")  | set(V_Frequency,V_Frequency+1) set(V_Feedback,1)}
{page01: (not matches(txt,"42") and not matches(txt,"")) |
                              set(V_Frequency,V_Frequency+1) set(V_Feedback,0)}
{page01: matches(txt,"") | set(V_Frequency,V_Frequency+1) set(V_Feedback,2)} 5. Use the Resource Browser to Insert Images: As an example on how to use images in value maps, two image should be added. For this purpose, the picture must be added using the Resource Browser to the Project File first. Open the Resource Browser over the main menu Project and the entry Browse resources (or use the icon ![]() ). Any image in one of the supported file formats (see section 3.10.1) can be used. Two pictures are needed, one for a correct response and one for a wrong response. If you don’t have a picture at hand, a sample image can be downloaded here: SinglePageItemFeedbackResources. Unpack this ZIP archive and then click the ‘Add’ button in the Resource Browser of the CBA ItemBuilder to add the files ‘ThumbsDown_min.png’ and ‘ThumbsUp_min.png’ to the list of Available resources. Close the Resource Browser via the small cross in the tab title (
). Any image in one of the supported file formats (see section 3.10.1) can be used. Two pictures are needed, one for a correct response and one for a wrong response. If you don’t have a picture at hand, a sample image can be downloaded here: SinglePageItemFeedbackResources. Unpack this ZIP archive and then click the ‘Add’ button in the Resource Browser of the CBA ItemBuilder to add the files ‘ThumbsDown_min.png’ and ‘ThumbsUp_min.png’ to the list of Available resources. Close the Resource Browser via the small cross in the tab title (![]() ).
).
6. Add ValueMaps (M_Feedback and M_Frequency): The values of the two variables V_Frequency and V_Feedback should be mapped to text and images. This is possible using so-calle value maps. To edit value maps, click the icon ![]() (or use the main menu
(or use the main menu Project and the entry Browse Value Maps). In the upper part of the Value Map Editor use the button Addto create a first value map and enter M_Feedback as name. Select the value map M_Feedback and enter the following assignments using the buttons Addand Edit in the lower part of the Value Map Editor:
| Guard | Text | Image |
|---|---|---|
| 99 | ||
| 0 | Wrong | ThumbsDown_min.png |
| 1 | Correct | ThumbsUp_min.png |
| 2 | Empty |
Repeat the same steps and create a second value map M_Feedback with the following mappings:
| Guard | Text |
|---|---|
| 0 | Press the check button to verify your answer. |
| [1,5] | You have checked a few times. |
| * | You have checked multiple times. |
7. Add ImageValueDisplay for Feedback: Open page page01 in the Page Editor and select the Panel. Open the Palette and select the component with the name ImageValudDisplay. Draw a small rectangle within the Panel to add the ImageValudDisplay and define the following properties: X: 750, Y: 250, Height: 200, Width: 200. Right-click the ImageValudDisplay and use the entry Link Variable to link the ImageValudDisplay to the variable V_Feedback. Confirm the dialog Set State Machine Variable. Right-click the ImageValudDisplay again to link the value map M_Feedback using the context-menu entry Link Value Map. Close the editor Set Value Map with OK.
8. Add a first TextValueDisplay for Feedback: Add a component of type TextValueDisplay to the Panel and define the following properties: X: 230, Y: 310, Height: 30, Width: 260. Right-click the TextValueDisplay and use the entry Link Variable to link the TextValueDisplay to the variable V_Feedback. Confirm the dialog Set State Machine Variable. Right-click the TextValueDisplay again to link the value map M_Feedback using the context-menu entry Link Value Map. Close the editor Set Value Map with OK.
9. Add a secondTextValueDisplay for Frequency: Add a second component of type TextValueDisplay to the Panel and define the following properties: X: 230, Y: 350, Height: 30, Width: 260. Right-click the TextValueDisplay and use the entry Link Variable to link the TextValueDisplay to the variable V_Frequency. Confirm the dialog Set State Machine Variable. Right-click the TextValueDisplay again to link the value map M_Frequency using the context-menu entry Link Value Map. Close the editor Set Value Map with OK.
10. Save, Preview and Test: This concludes the Feedback using ValueMaps and the project can now be saved (![]() ) and previewed (
) and previewed (![]() ). Check the feedback by selecting either nothing, the correct response (
). Check the feedback by selecting either nothing, the correct response (42) or any other response (and press Check).
4.3.3 Trigger Actions in Links using Operators
If you take a closer look at the example Answer-Until-Correct in Figure 4.26 in a web browser or in the Preview of the CBA ItemBuilder, you will notice that the Next button is initially disabled. Only when you put the focus into the SingleLineInputField and start entering an answer, the Next button is activated. This behavior is also implemented using a Conditional Link. For this the SingleLineInputField links to the current page and removes the deactivation of the button with the unsetFrozen() operator.
The syntax of the Conditional Links is extended by a component after a pipe operator (|) to the following scheme:
{Page: Condition | Operator1() }Again, embedded in curly brackets is first the page, followed by a colon. After the colon the condition is formulated. If several conditions are to be combined, this is again possible in compliance with the bracket rule (see section 4.1.3). If an additional action is to be added, which is executed when the Conditional Link is activated and the condition is met, an operator can be added after the vertical bar (|).
If multiple operators are to be executed, then they must be listed in the syntax for Conditional Links separated by spaces, as the following scheme for multiple operators illustrates:
{Page: Condition | Operator1() Operator2() }In the CBA ItemBuilder, links can usually also be formulated as Conditional Links. A simple link is a Conditional Link with only one target page and the keyword true as condition.
It is possible to link to the same target page multiple times in Conditional Links. Conditions can then be used to define more precisely when which actions should be executed, i.e. which operator(s) should be triggered by a particular (Conditional) Link.
Various Operators are illustrated in the following example (see figure 4.28):
To enable and disable components, there is the
setFrozen(UserDefinedId)-operator and its inverseunsetFrozen(UserDefinedId). Only if theButtonis not disabled, an action can be executed with it (i.e. a regular or Conditional Link can be activated or a FSM event can be triggered, see section 4.4.3). In the example, thebuttonopens a modal dialog.To set the value of an FSN variable (see section 4.2), the
set(Varialbe)-operator can be used. In the example, thisset()-operator is used to implement various conditional links which set the value of the variableVar1to0(set(Var1,0)), increase the value by one (set(Var1,Var1+1)) and decrease the value by one (set(Var1,Var1-1)).Third, the item in Figure 4.28 illustrates the use of the
setActiv(Component)operator. Selected components (e.g.,RadioButtons) can be selected with it.Finally, the example contains Conditional Links at the
Hidebutton (and, when pressed, theShowbutton that then appears). The operatorssetHidden(UserDefinedId)andunSetHidden(UserDefinedId)are used here to hide and show individual components.
4.3.4 Link PageAreas using Conditional Links
When links are used in the CBA ItemBuilder, they are always linked within the current page area. This approach makes it easy to implement links inside and outside X-Pages. If a page is included within a PageArea, then links within the PageArea lead to the page, which includes the PageArea being replaced. If you want to override this default behavior, you can do this with the help of Conditional Links. The following example illustrates how conditional links (to the current page) can be used to change the page displayed within the PageArea using the setEmbeddedPage()-operator.
The setEmbeddedPage()-operator can also be used as operator within the finite-state machine (see section 4.4.6 for details). A complete listing of all operators is included in the appendix B.2.
4.4 Finite-State Machine(s)

The creation of interactive assessment content with the CBA ItemBuilder can require a logic layer for dynamic content in addition to the design of static content (i.e., the Page Editor used for designing pages, see section 3.7), Variables (see section 4.2) and Value Maps (see section 4.2.4). Following the design principles of the CBA ItemBuilder (see section 2.11), this logic layer is not defined in a concrete interpreted or compiled scripting or programming language. Instead, this logic layer is implemented in the CBA ItemBuilder based on so-called finite-state machines (also called UML statechart). Abstracting the logic required within items from a concrete programming language to the generic approach of finite-state machines allows the concrete source code required for a runtime environment to run an actual item to remain separate from the definition of the required interactivity (see section 2.11.2). For people with programming experience, however, it requires a bit of rethinking, since typical concepts (such as loops or branching) are possible with finite-state machines, but may require different approaches than loops or vectorization.
4.4.1 Introduction
The following text describes the use of finite-state machines in the specific implementation of the CBA ItemBuilder, as far as they are needed to implement interactive assessment content. The goal of the presentation is to describe the functionality of the CBA ItemBuilder, and this goal should be achievable without the need for further literature on the general concept of finite-state machines or automata theory. In fact, the implementation in the CBA ItemBuilder is only metaphorically related to the formal idea of finite-state machines due to the possibility of using multiple finite-state machines within an item (see section 4.4.8) and the integration of variables in conditions (see section 4.4.5).
The following gives a brief introduction to the idea: A finite-state machine is something in the logic layer of the CBA ItemBuilder, that always starts in a specified state, called the Start State. Each finite-state machine can be in exactly one state at a time and the number of states is limited (i.e., finite). A finite-state machine is, however, a machine that can change it’s state according to deterministic Rules. The Rules describe the Transition between the states and rules are triggered by Events. If no Event occurs, the finite-state machine stays in it`s current state, but events can defined as timed events (see section 4.4.3), and timed events trigger automatically after a pre-defined time interval. Finally, each finite-state can reach one out of multiple End States.
The CBA ItemBuilder implementation allows to use multiple finite-state machines (based on Regions, see subsection 4.4.8). When Transitions are triggered successfully by Events, additional Operators can be executed (see subsection 4.4.6). And Variables can be used in conditions, so that the Rules can define Transitions between States that depend on variable values.
User Interface for Finite-State Machines: To define and edit finite-state machines, the user interface of the CBA ItemBuilder provide two parts. Both can be opened at once by clicking on the icon ![]() in the Toolbar (see section 3.1.1) or using the
in the Toolbar (see section 3.1.1) or using the Project menu Edit State Machine). The first part of the user interface is titled State Machine and contains the State Machine Tree View as shown in Figure 4.30. A second tab with the title State Machine contains the so-called State Machine Rules Editor for state machine syntax, and both parts always opens together.
FIGURE 4.30: Empty State Machine Tree View of the CBA ItemBuilder.
x next to the title of the tabs, so that only the State Machine Tree View is displayed. Note, however, that it does not work the other way around. Closing the State Machine Tree View automatically closes the State Machine Rules Editor.57
State Machine Tree View The first component of the user interface is a tree representation of the defined states, optionally organized in regions (see Figure 4.30). After selecting the root, new states can be added to this tree by using either the menu Statemachine Editor (see left part in Figure 4.31) or the context menu in the State Machine Tree View (see right part in Figure 4.31).

FIGURE 4.31: Main menu Statemachine Editor and context menu in the State Machine Tree View to define a state
State Machine Rules: Events and finite-state machine rues are defined using syntax, edited in the State Machine Rules editor. By default, the state machine rules file is empty.58 The following example shows a valid rules file:
Events:  EV_Name; /* Define events here, separated by comma.
                     End the list with a semicolon. */
Rules:            /* Define rules here.
                     Examples: */
ST_Start -> ST_First {true}
ST_First => ST_Second {EV_Dummy}
At least one event must be defined. Text within /* … */ or behind // is ignored as a comment (see section 4.1.2).
4.4.2 States
States are defined in the State Machine Tree View of the CBA ItemBuilder. After adding a new State using the context menu or the main menu as shown in Figure 4.31, the CBA ItemBuilder lists an undefined state in the State Machine Tree View as illustrated in the upper part of Figure 4.32. Continue by double-click on the new node <not set> to finish the configuration. This opens the Configure State dialog (see lower part of Figure 4.32).
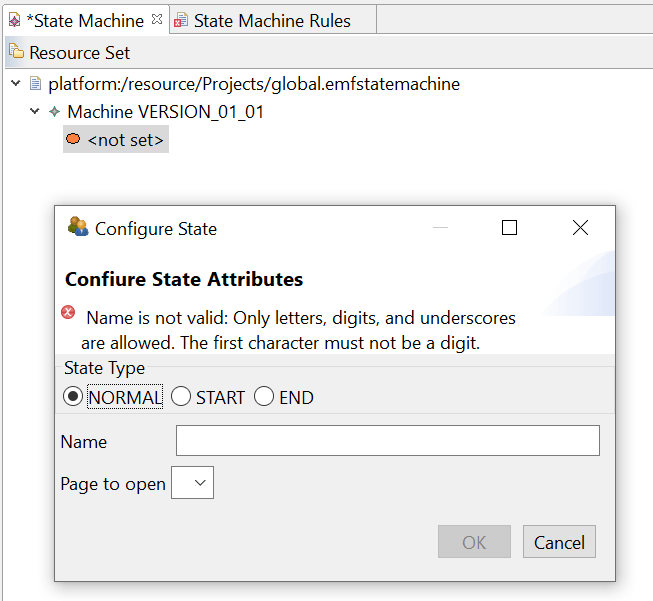
FIGURE 4.32: Newly created State and Configure State dialog.
For defining the state using the dialog Configure State it is essential to differentiate three different State Types (NORMAL, START and END).
Normal States (NORMAL): A finite-state machine typically differentiates multiple Normal States. The state in which a finite-state machine is (labeled the Current State) represents the main information of a finite-state machine. Transitions between normal states describe the functioning of the finite-state machine and the possible flow between the internal states. In the CBA ItemBuilder the transitions are triggered by Events (see section 4.4.3) and transitions can trigger actions (called Operators, see section 4.4.6). Most of the states are regular states.
Start State (START): However, every finite-state machine needs a starting state in which it is initially located. For this purpose, the state type START must be selected for exactly one state for each finite-state machine. A Start State is required for the very first Start Rule (->, see section 4.4.4), that links the Start State to a first Normal State.
End States (END): The CBA ItemBuilder also allows defining states as End States. The use of End States is optional for the design of assessment components but can be helpful if, for instance, reaching a dedicated state in the logic layer itself is information for scoring (see section 5.3.7). While a start state and several normal states are needed for the typical use of the finite-state machine, the definition of end states is rarely necessary.
State Names: After selecting a State Type in the dialog Configure State (see lower part of Figure 4.32), states require a unique State Name. State Names need to be a string literal without white spaces and without special characters (underscores, i.e., _ is possible). Numbers are allowed but not as the first character.When defining states make sure that the state name is valid and not followed by white spaces.
Page to open: Finally, the dialog Configure State (see lower part of Figure 4.32) also provides the option Page to open. States can also assigned to pages, so that the Page is shown, if the particular State is entered (see section 4.4.9 for details about the assignment of Pages to States).
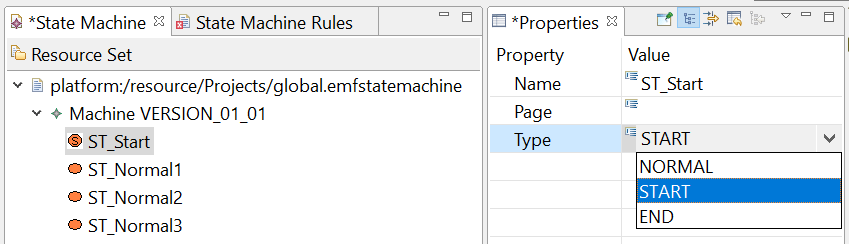
FIGURE 4.33: State Machine Tree View with four states and Properties view.
Note that states can be ordered within the State Machine Tree View using drag-and-drop. For a real application of finite-state machines in the CBA ItemBuilder, multiple states need to be defined, and ordering the states can increase the readability. As soon as the first state is defined, the CBA ItemBuilder also provides a context menu for states with the option to define states and so-called Regions as child elements. This feature is related to multiple (nested) finite-state machines, described in section 4.4.8. If only one finite-state machine is to be used, care must be taken when creating the states that all states created directly below the node Machine VERSION_01_01. As can also be seen in Figure 4.33, the State Type (and the State Name and assigned Page to open) can also be configured in the Properties view.
4.4.3 Events
After defining a set of States in the State Machine Tree View of the CBA ItemBuilder, Events are defined in the State Machine Rules editor that was automatically opened as described in section 4.4.1. Events are used to trigger Transitions in the Finite-State Machine(s). There exist two type of events:
1. Events Linked to Components: Components used in the Page Editor to create visual parts of the assessment components provide slots to link Events. For instance, components of type CheckBox can trigger events when the user selects the CheckBox (called Raised Event) and when the user de-selects a previously selected CheckBox (called Raised Alternate Event). Components that can raise one or different Events provide a context menu entry to link the event to events defined in the State Machine Rules syntax.
2. Timed Events: The finite-state machine concept of the CBA ItemBuilder also includes events that are automatically triggered repeatedly after a defined time interval. Such Timed Events can be used to change the behavior and appearance of items without user interaction by triggering Transitions. Timed events are also defined in the State Machine Rules syntax.
Events can also be triggered within transitions (see the raise()-operator in section 4.4.6), meaning that events that trigger transitions can be used to trigger an additional event.
Definition of Events: Before events can be linked to components in the Page Editor, they must be defined in the State Machine Rules. While States can be created in the State Machine Tree View with a graphical user interface, the definition of Events is only done by syntax. The structure of the syntax for State Machine Rules is:
Events: Event1, Event2, Event3; // Events defined as list
Rules:  // Start rule
        ST_Start -> ST_First {true}
        // Additional rules
        ST_First => ST_Second {EV_Dummy}
        /*...*/
Since the syntax editor initially contains an empty document, times must enter the keyword Events: (incl. colon) first. Afterwards at least one event must be defined, if necessary as placeholder. The list of events must contain valid event names. Again, valid event names must not start with a number, must not contain spaces, and only letters or the _ character are allowed.
The assignment of event names in the State Machine Rules syntax should be chosen in such a way that the meaning is clear from the event name. Only events must be defined which are used within the Finite-State Machine, e.g., for transitions between states or the triggering of operators. The specified name should be so unique that it can be identified in the Page Editor when using the dialog Link Raised Event.
To link an event to a particular component, the context menu in the Page Editor offers an entry called Link Raised Event, as shown in Figure 4.34.
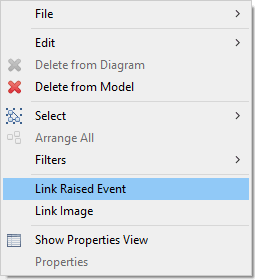
FIGURE 4.34: Link Raised Event in the context menu of the Page Editor.
Link Events to Components: For most components events can be assigned (i.e., linked) using the context menu in the Page Editor.59 Events are triggered by click by default (e.g., an event can be raised, if a panel is clicked, called Raised Event). Components that can be selected or deselected, components used for text entry and for components for audio/video content provide more specialized events are triggered by particular actions (see below). The CBA ItemBuilder item shown in Figure 4.35 illustrates which user-interactions trigger events that can be linked for most components.60
Components of different type provide different slots that can be used to link events. The meaning of the different slots is described mostly in chapter 3 together with the components itself.
Defining Timed Events: The definition of events that trigger automatically after a defined amount of time is done directly in the first section of the State Machine Rules syntax after the keyword Events:. If a number is specified there separated by a space after the event name, this number will be used as the time interval in seconds.
In the following example two Timed Events are defined. Event E_T1 is fired after two \(3.5\) seconds, E_T2 is fired after \(10\) seconds:
Events: E_ChangeState,
        E_T1 3.5,
        E_T2 10;
Rules:  // ...
The definition of timed and regular (un-timed) events (e.g., E_ChangeState) can be mixed and time intervals can have decimal places. Timed events are started when the finite-state machine changes the Current State.
State => State, see section 4.4.7).
Timed events can be used to implement Timers (i.e., components that show the remaining time for a Timed Event, see section 4.4.10).
Since timed events are restarted when entering states, the processing of timed events in finite-state machine rules is critical to their behavior, as illustrated in Figure 4.36. To create independent finite-state machines, nested finite-state machines can be used (see section 4.4.8).
To fully understand the design possibilities with Timed Events shown in Figure 4.36, one must consider the difference between different rules for defining transitions. Transitions that lead to a change of the Current State are described in the next section 4.4.4, the processing of events without changing the current state is shown in section 4.4.7. More advanced scenarios can be implemented using so-called Nested Finite-State Machines (see section 4.4.8 and Figure 4.63 for an example).
4.4.4 Rules
The behavior of finite-state machines is described by rules that specify how a concrete event of a particular type is to be processed in a particular state. If no rule is defined that event of a particular type is to be processed in state, then the finite-state machine ignores events of that type in that state. If a rule is defined, then events of this type are accepted in a state and processed according to the rule.
Start Rule (Start Transition): At runtime, each finite-state machine is initially in its start state. A first rule with the syntax element -> is therefore necessary to define which regular state the finite-state machine should enter first:
StartState -> StateA {true}The definition of a state of type Start State (see section 4.4.2) and the specification of an initialization rule from the Start State to a first Normal State is mandatory. If this rule should always be executed, the keyword {true} is specified in curly brackets.
Advanced Use of Start Rules: When working with multiple Tasks within one CBA ItemBuilder project file (see section 3.6) or when combining multiple finite-state machines (see section 4.4.8), some additional features can be used. Finite-state machine rules are defined for all Tasks of a CBA ItemBuilder project file. Instead of true specific conditions can be formulated to initialize a finite-state machine in a particular Task:
StartState -> StateA{isCurrentTask(Task01)}
StartState -> StateA{isCurrentTask(Task02)}
The condition isCurrentTask(TaskName) will be true, if the current task equals the specified TaskName, so that different initial states of a finite-state machine are possible if multiple initialization rules are defined.
It is also possible to use read the page defined in the Task Definition (see section 3.6.1) in a condition for the Start Rule, as the following syntax illustrates:
ST_Start -> ST_C{current_page(page2)}If more than one start rule is defined, the order in which they are defined is decisive. For the example in Figure 4.37, four tasks are defined (Task01-Task04). All tasks except Task03 use page page1 as the Start Page (as defined in the Tasks view, see section 3.6.1).
Here is the shortened finite-state machine syntax of the item in Figure 4.37. The order of the Start Rules is crucial, which can be easily seen by the fact that only for Task04 the state ST_D is assigned. Although the condition true is always true, this last defined Start Rule is only applied if no previous condition is true.
Events: Placehoder; // No event is used in this example, but the syntax
                    // requires the definition of at least one event.
Rules: ST_Start -> ST_A{isCurrentTask(Task01)| /* ... */ }
       ST_Start -> ST_B{isCurrentTask(Task02)| /* ... */ }
       ST_Start -> ST_C{current_page(page2)| /* ... */ }
       ST_Start -> ST_D{true| /* ... */ }
In simple CBA ItemBuilder projects, typically only one Start Rule is needed per finite-state machine. Besides the first transition in a regular state, further rules are used as described next.
Regular Rules (State Transitions): The possible connections between (normal) states are defined as transitions with rules using the syntax element =>:
StateA => StateB {TriggerEvent}State Transitions can be read this way: From state StateA is changed to state StateB when event TriggerEvent occurs.
->) and multiple State Transitions (=>).
As TriggerEvent all events can be used, which are defined after the keyword Events: at the beginning of the State Machine Rules syntax. The use of Timed Events is possible as well as the use of Events created by user interactions with a component created in the Page Editor.
The use of user interactions in the finite-state machine of the CBA ItemBuilder is done via events that are first defined in the State Machine Rules. These events are assigned to components via Link Raised Event and the Events can be used within Rules for State Transitions.
In this way, the processing of user interactions becomes dependent on the Current State of a finite-state machine. Conditions (i.e. different processing of identical events) are realized by defining different rules for different States (see Figure 4.38 below).
Actions in Transitions (Operators): The Current State of a finite-state machine can be interpreted like the value of a categorical variable. Thus, it already represents information in itself. For the use of finite-state machines for the dynamic design of assessment components, however, the Transitions are also central, i.e. the transitions between States which are triggered by Events. With these Transitions changes can be made to the item, for instance, to the visual representation or to values of Variables, which form the dynamic parts of items depending on user interactions or Timed Events.
To trigger actions for a defined Transitions of a finite-state machine in state StateA when the Event TriggerEvent occurs, Operators can be called as seen in the following syntax:
StateA -> StateB {TriggerEvent | Operator1(), Operator2(), ..., OperatorN())}The names of the states (StateA and StateB) can be freely assigned when defining them in the State Machine Tree View (see section 4.4.2) and should be chosen sensibly in the context of the current CBA ItemBuilder project. Similarly, the names of Events can be freely specified by entering text in the State Machine Rules syntax (see section 4.4.3). In contrast, the operators inserted to the right of the | character in the syntax must be valid operators provided by the CBA ItemBuilder. Operator1(), Operator2() etc. in the example, are for illustration purposes only. Operators may require arguments, which are passed in single parentheses. If multiple arguments are passed, they must be separated by commas within the single parentheses. When entering operators, the auto-complete function helps (see section 4.1.1). Care must be taken to ensure exact spelling, including upper and lower case. A description of valid operators can be found in section 4.4.6.
The use of operators is also possible with Start Rule, as the following syntax illustrates:
StartState -> StateA {true | Operator1(), Operator2(), ..., OperatorN())}A selection of operators can also be used in the Task Initialization syntax (see section 4.5).
Self-Transitions: Transitions from a state A to the identical state A are called Self-Transitions. Self-Transitions restart the Current State A, and must therefore be distinguished from the use of operators without transitions (with the keyword internal) and the execution of operators when entering (with the keyword entry) and leaving (with the keyword exit) states (see section 4.4.7).
StateA => StateA {TriggerEvent|Operators()}) re-start the Current State and are not identical to internal processing of events (StateA internal {TriggerEvent|Operators()}).
In addition to operators, conditions can be defined for transitions, as described in the next section 4.4.5.
Figure 4.38 shows a simple item with four States and two Events. The two Events are linked to the buttons. ST_Start is the start state that always leads to state ST_A because of the first rule (ST_Start -> ST_A{true}):
Events: EV_Next, EV_Previous;
Rules: ST_Start -> ST_A{true}
// Transitions when FSM is in state ST_A
ST_A => ST_A{EV_Previous|openDialog(dialogBegin, 240, 20)}
ST_A => ST_B{EV_Next|setEmbeddedPage(PA,pageB)}
// Transitions when FSM is in state ST_B
ST_B => ST_C{EV_Next|setEmbeddedPage(PA,pageC)}
ST_B => ST_A{EV_Previous|setEmbeddedPage(PA,pageA)}
// Transitions when FSM is in state ST_C
ST_C => ST_C{EV_Next|openDialog(dialogEnd, 240, 20)}
ST_C => ST_B{EV_Previous|setEmbeddedPage(PA,pageB)}
In each state, the events EV_Previous and EV_Next are used in transitions. ST_A is the first in the sequence, if event EV_Previous occurs in state ST_A the openDialog()-operator (see section 4.4.6) is used to show the page dialogBegin at position \(X=240\) and \(Y=20\). If the event EV_Next occurs in state ST_A, the the rule requests the finite-state machine to change to state ST_B and the showEmbeddedPage()-operator is used to show the page with name pageB in the PageArea with UserDefinedID: PA. Rules for state ST_B define transitions for both events. Event EV_Next is used to change to state ST_C and to show the embedded page pageC, and EV_Previous changes to state ST_A and shows the embedded page pageA. Hence, the same buttons linked to the events EV_Previous and EV_Next are used and the triggered events are processed differently, according to the Current State of the finite-state machine.
4.4.5 Condional Rules (Guards)
Transitions in the finite-state machine are described by rules that specify how the finite-state machine should react to an event. Conditions (Guards) can be used to restrict that a transition is only executed, when a condition (typically formulated using Variables, see section 4.2.1) is fulfilled.
Conditions in Rules (Guards): The definition of conditions in transitions of the finite-state machine is introduced by a colon, followed by the condition in square brackets:
StateFrom => StateTo { EventName : [Condition] | Operator)}As usual, operators are optional (if no operators are required, the syntax simplifies to StateFrom => StateTo { Event : [Condition]}). Conditions are typically formulated by using variables (see section 4.2), and only variables of type INTEGER or NUMBER are currently supported in guards.
The conditions need not be mutually exclusive. However, it is important to note that the order of the rules can be relevant. The first condition that is fulfilled for the current state and for which a rule is defined for an event will be executed.
In the following definition, if the variable V_Example has the value 3, for example, the second transition would be executed (if event EV_Example was raised and the machine is in state state1), but not the third transition:
state1 => state2  {EV_Examle : [V_Example>10] | /*...*/ }     // Transition 1
state1 => state3  {EV_Examle : [V_Example<5]  | /*...*/ }     // Transition 2
state1 => state1  {EV_Examle : [V_Example<4]  | /*...*/ }     // Transition 3
The finite-state machine would then be in state state3 after processing event EV_Example, if the value of V_Example would be 3.
Named variable values (see section 4.2.1) can be used to make the finite-state machine syntax more readable, and syntax comments are suggested (see section 4.1.2).
state1 => state2 { event : [Variable1 == Variable1.NameValue1] | /*...*/ }
state1 => state3 { event : [Variable1 == Variable1.NameValue2] | /*...*/ }
If conditions are used in particular to execute different operators on identical state changes, then a shortened notation can be used. The following long form defines two different conditions, for the identical self-transition that occurs within state1.
state1 => state1 { event : [Condition1] | Operator1() }
state1 => state1 { event : [Condition2] | Operator2() }
For a clearer presentation, the formulation can also be shortened as follows:
state1 => state1 { event : [Condition1] | Operator1() }
                 { event : [Condition2] | Operator2() }
Item Example: A content motivated example of a conditional transition can be seen in Figure 4.39. In this example, the Next-button should only be activated after 5 seconds (see Blocked Item Response in section 2.4.1 for more background). Timed events (see section 4.4.3) can be used for this purpose, in combination with the so-called unsetFrozen()-operator (see section 4.4.6 below for details).
In the example, the timed event EV_TimeTick is triggered every second. In a variable V_TimeOnPage, it counts how long the page has been visible, i.e., the variable is incremented by 1 every second if the maximum value has not yet been reached. If the maximum value is reached, the Next button is activated.
For illustration purposes there is also a reset button is added to the example, which can be used to reset the time.
FIGURE 4.39: Item illustrating a delayed activation of a button using a timed event and the unsetFrozen()-operator (html|ib).
The following listing shows the finite-state machine syntax including the conditions [V_TimeOnPage<4] and [V_TimeOnPage>=4] for the item shown in Figure 4.39:
Events: EV_TimeTick 1, EV_Reset;
Rules: Start -> page{true|raise(EV_Reset)}
page => page
 // Condition 1
 {EV_TimeTick:[V_TimeOnPage<4]|set(V_TimeOnPage,V_TimeOnPage+1)}
 // Condition 2
 {EV_TimeTick:[V_TimeOnPage>=4]|unsetFrozen(ButtonNext),set(V_TimeOnPage,5)}
 {EV_Reset|set(V_TimeOnPage,0),setFrozen(ButtonNext)}
Processing the event EV_TimeTick is central to the illustration of conditions in state machine rules. If the variable V_TimeOnPage has a value less than 4, the variable V_TimeOnPage is increased by one with the statement set(V_TimeOnPage,V_TimeOnPage+1) (see section 4.4.6 for details on the set()-ooperator). Since condition 1 is fulfilled, the processing of the event ‘EV_TimeTick’ is thus terminated (the button remains deactivated). If condition 1 is no longer fulfilled, i.e. the variable V_TimeOnPage has a value that is not less than 4, the CBA ItemBuilder runtime checks whether condition 2 is fulfilled when the event EV_TimeTick occurs. This is always the case in this example. Connected to the transition defined for condition 2, the ButtonNext-button is then activated (i.e. the operator unsetFrozen(ButtonNext) is executed, see section 4.4.6). For cosmetic reasons the variable V_TimeOnPage is also set to the value 5, because in the example item it is displayed with a so called NumberValueDisplay (see section 4.2.5).
In addition, the syntax shown also shows the EV_Reset event, which is assigned to the reset button. This event is also triggered during initialization of the state machine, i.e. in the transition from the start state Start to the state page using the operator raise() (see section 4.4.6). When the machine is in state page and the event EV_Reset is triggered, the variable V_TimeOnPage is set to the value 0 and the button is deactivated.
Note: In a real application, the timed event EV_TimeTick would be defined to fire after the required amount of time (without the additional variable that counts the number of ticks). By this change, the functionality illustrated in the example shown in Figure 4.39 can be achieved without conditional rules, and the unsetFrozen()-operator can be executed directly after the required amount of time.
Contextualization of Events: As the following example in Figure 4.40 illustrates, the meaning of events can change depending on the current state.
Combination of Conditions: A specific syntax is available to combine conditions to more complex logical expressions.61 Note that logical expressions need to be in square brackets, and grouped into pairs of two (see also section 4.1.3).
// V1 == 1
state1 => state2 {EventName : [V1==0]}

// V1 == 1 and V2==2
state1 => state2 {EventName : ([V1==1] and [V2==2])}

// V1 == 1 or V2==2
state1 => state2 {EventName : ([V1==1] or [V2==2])}

// (V1 == 1 or V2==2) and (V3==3)
state1 => state2 {EventName : (([V1==1] or [V2==2]) and [V3==3])}
Current Task in Conditions: As already described for Start Rules (see section 4.4.4), conditions make use of the the isCurrentTask(Taskname)-syntax. However, to define a valid condition for a conditional finite-state machine rule, it must be wrapped in an additional ifthenelse(Condition, ExprTrue, ExprFalse)==ExprTrue)-block:
state1 => state2 {EventName : [ifthenelse(isCurrentTask(Task01),1,0)==1]}The isCurrentTask(Taskname) evaluates to true if the current Task has the name specified as Taskname. In this case, the ifthenelse(Condition, ExprTrue, ExprFalse) returns ExprTrue, i.e., the value 1. This value is then compared with ==1 and the condition is true if Taskname is the current Task.
Current Page in Conditions: The identical procedure can also be used to formulate transitions between states with conditions that check whether a particular page is the current page:
state1 => state2 {EventName : [ifthenelse(current_page(pagename),1,0)==1]}
Text Input in Conditions: Specifically for text input only, the CBA ItemBuilder also provides the ability to use the matches()-operator to check whether specific text is entered into an input field (or whether the text matches a regular expression):
state1 => state2 {EventName :
   [ifthenelse(matches(UserDefinedId,"text or regex"),1,0)==1]}
Mathematical Expressions in Conditions: Simple mathematical calculations using basic arithmetic (+, -, *, / and %) and some selected functions (floor / ceil / trunc and round) can be used in conditions:
state1 => state2 {EventName : [V1 >= V2]}
state1 => state2 {EventName : [V1 + V2 == V3]}
state1 => state2 {EventName : [round(V1/2) == V1*2]}
Elapsed Time in Conditions: The elapsed time (in milliseconds) during task execution of the current task can also be used in conditions:
state1 => state2 {EventName : [elapsedTime() < 5000]}In the current version of the CBA ItemBuilder, scoring operators and access to other components (such as CheckBox, RadioButton etc.) are not provided for conditional rules (guards). However, in most instances, variables can be used instead. An example showing different conditional rules can be found in Figure 4.41.
4.4.6 Operators
The transitions between states defined by Rules (see section 4.4.4) and the internal processing of events without state changes as well as entry and exit of States (see section 4.4.7) can be used to execute operators. The available operators of the CBA ItemBuilder are described next.
Operators for Variables: For variables defined in the Browse Variables view (see section 4.2.1), the set()-operator and a reset()-operator is available to be used either in the Finite-State Machine or in Conditional Links (see Figure 4.42).
set(Variable, Value)
reset(Variable, Variable, ...)The set()-operator assigns the provided value to a particular variable and requires two arguments: The first argument is the variable name (without quotes), the second argument is the value that should be assigned to the variable. The value can also be provided as formula, for instance, referring to other variables.
set() and reset() without quotation marks directly in brackets.
The reset()-operator assigns the value \(0\) to the variable (or variables) provided as arguments. The reset(Var1)-operator is identical to the statement set(Var1,0). The set()-operator is also available for conditional links, but the reset()-operator is provided for finite-state machine syntax only and must be re-written using the set()-operator for conditional links.
Operator to Freeze Components: Figure 4.43 demonstrates how components can be changed to Frozen using the setFrozen()-operator.
setFrozen(UserDefinedId)
unsetFrozen(UserDefinedId)
The setFrozen()-operator is illustrated in Figure 4.43 for Finate-State Machines and Conditional Links. In the Finite-State Machine the operator is triggered with an event EV_SetFrozen linked to the button Set Frozen. If the components are frozen, the button Un-set Frozen linked to the event EV_UnsetFrozen changes the components back to the default (Is Frozen: false).
The following listing shows the shortened finite-state machine syntax for the item shown in Figure 4.43:
Events: EV_SetFrozen, EV_UnsetFrozen;               // Definition of two events
Rules: Start -> ST_Unfrozen {true | /*...*/}        // Rule 1
ST_Unfrozen => ST_Frozen {EV_SetFrozen | //...      // Rule 2
    setFrozen(myButton),
    setFrozen(myInputField),
    setFrozen(mySingleLineInputField),
    //...
}
ST_Frozen => ST_Unfrozen {EV_UnsetFrozen | //...    // Rule 3
    unsetFrozen(myButton),
    unsetFrozen(myInputField),
    unsetFrozen(mySingleLineInputField)
    //...
}
After the task is loaded the finite-state machine changes from state Start to state ST_Unfrozen (Rule 1). In state ST_Unfrozen the components myButton, myInputField and mySingleLineInputField are not frozen (property Is Frozen in section Misc of the Properties view is false). The finite-state machine defines the two events EV_SetFrozen and EV_UnsetFrozen. The two events are triggered by the buttons Set Frozen and Un-set Frozen. If the item is in the state ST_Unfrozen the event EV_SetFrozen triggers the transition to state ST_Frozen (Rule 2). In this transition, the setFrozen()-operator is used, to change the Is Frozen property of the components with the user define Ids myButton, myInputField and mySingleLineInputField to true. Likewise, the event EV_UnsetFrozen triggers the transition to the state ST_Unfrozen, and in this transition the unsetFrozen()-operator is applied to the components (Rule 3).
UserDefinedId of the component to be changed is written directly in brackets in the operators setFrozen(UserDefineId)/unsetFrozen(UserDefineId)` without additional quotation marks.
The setFrozen() / unsetFrozen() - operators can also be used in Conditional Links as shown in the lower part of Figure 4.43. The conditional link syntax refers to the current page (i.e., no page is changed when the Conditional Link is triggered. The literal true is used as the condition, meaning that no specific condition needs to be fulfilled, and the list of operators right to the | we be always executed.
{page: true | setFrozen(myButton)
    setFrozen(myInputField)
    setFrozen(mySingleLineInputField)
    /*...*/
    setFrozen(myFrame,0)}
The setFrozen() / unsetFrozen()-operators are can be applied to input elements (i.e., components of type Button, SingleLineInputField, InputField, Checkbox, RadioButton, ComboBox, List and Menu) and the operators are also available in conditional links (see Figure 4.43). The operators can also be applied to Frame Select Groups (see section 3.9.4) when two arguments are provided: The UserDefinedId of the Frame and the index of the Frame Select Group (i.e., the GroupNumber starting with \(0\)).
setFrozen(Frame, GroupNumber)
unsetFrozen(Frame, GroupNumber)
Operators to Hide/Show Components: Components can be not only frozen from the Finite-State Machine and using operators in Conditional Links, but also completely hidden:
setHidden(UserDefinedId)
unsetHidden(UserDefinedId)
As Figure 4.44 shows, the operators setHidden() and unsetHidden() can be used to hide and show components specified by a valid User Defined Id.
Components of type PageArea, Table, ImageMap, and List are not supported by the setHidden()-/unsetHidden()-operator. Panels are supported, but components nested within panels are not affected by hiding / un-hiding Panels.
The operators can also be applied to Frame Select Groups (see section 3.9.4) when two arguments are provided: The UserDefinedId of the Frame and the index of the Frame Select Group (i.e., the GroupNumber starting with \(0\)).
setHidden(Frame, GroupNumber)
unsetHidden(Frame, GroupNumber)
Operator to Focus Input Fields: In SingleLineInputFields and InputFields (see section 3.9.1) text can only be entered if these components are focused. The following operator can be used to set the input focus from the finite-state machine or from conditional links to SingleLineInputFields or InputFields with a named User Defined Id.
focus(UserDefinedId)The item shown in Figure 4.45 illustrates the use of the focus()-Operator, used either in the Finite-State Machine or in Conditional Links.
Operator to Insert Text into Input Fields: For technical reasons (e.g., when using touch screens) or for diagnostic reasons (e.g., when administering tests to children), it may be challenging to enter special characters or special characters in components of type SingleLineInputFields and InputFields (see section 3.9.1). For these situations, CBA ItemBuilder provides an operator for inserting text:
insertText(InputField, TextToInsert, InsertPosition, DropLength)The operator requires at least two arguments, the UserDefinedId of the component into which text is to be inserted (InputField) and the argument TextToInsert specified in quotes (e.g., " * "). The text can contain several characters. Figure 4.46 shows an example where the insertText()-operator is used together with the focus()-operator. Both operators can be used as operators in the finite-state machine and in conditional links.
If the argument InsertPosition is not specified, the value \(-1\) is used as default with the meaning that the text added to the end of the old text (i.e., the already existing text in the InputField). If InsertPosition is specified, an additional argument DropLength can be provided. If a value different from -1 is provided for DropLength, the specified number of old characters starting with the InsertPosition to the end of the old text will be dropped. If not given it defaults to -1 (i.e. drop all old characters after the insert position).
Operator to Select Components: Components that can be selected (Buttons with the property Is Toggle: true, Checkboxes and RadioButtons) can be selected (setActive) and deselected (unsetActive) from the Finite-State Machine or in Conditional Links:
setActive(UserDefinedId)
unsetActive(UserDefinedId)
The operators (see Figure 4.47) require a valid User Defined Id as an argument.
The operators setActive() and unsetActive() can be applied to frozen components. Constraints resulting from defined groups of components (i.e., RadioButtonGroups, see section 3.9.2, and Frame Select Groups, see section 3.9.4) are applied.
Operators for Text-Highlighting: The color for text highlighting can be defined using the following finite-state machine operators (see appendix B.2):
setGlobalProperty(highlight_color,"-5848680")}Another operator is available for conditional links to enable and disable the highlighting-feature for text fields (see section 3.8.3 for more details):
setHighlightable(UserDefinedId)
unsetHighlightable(UserDefinedId)
The use of both operators is illustrated in Figure 4.48 (see also Figure 3.84 in subsection 3.8.3). To find the correct value for the third argument (i.e., the RGB color integer value), use the internal color editor to format, for instance, the background color of a panel. Copy then the value of the color property (from the Properties view) to the state machine syntax, and included it into the operator within double quotation marks (").
Operators to Set Values of Components: The default text of components to collect text responses (see section 3.9.1) can be defined using the property text (in the Properties-view). During runtime, text of input fields can also be changed using the setInputValue()-operator:
setInputValue(Source,Target)                           // Use-case 1
setInputValue(Source,Target,"New text for the source") // extended

setInputValue(Source,Source,"New text for the source") // Use-case 2
Source and Target are UserDefinedIds of InputFields or SingleLineInputFields. The setInputValue()-operator is illustrated in Figure 4.49. Use-case 1 shows how to copy the text from one input field (Source) to another (Target). The extended version shows how to specify an additional text, that is used as the new text in the source field, after the existing text is copied to the target field. Use-case 2 uses identical UserDefinedIds for source and target, but uses the additional text to set the value of a specific InputField or SingleLineInputField.
Operators for Frame Select Groups: As described above, components can be disabled with the setFrozen()-operator. The components will then remain visible but shown in a way that indicates that these components cannot be used. For components that allow selection (e.g., checkboxes, radio buttons, toggle buttons), it can also be helpful to disable the ability to select without displaying them visually differently. This functionality is suggested, for example, if radio buttons or checkboxes are shown in an instruction and when it is desired that the components are presented in the same way as they are used in the following tasks.
Frame Select Groups, as described in section 3.9.4, can be configured to be not selectable at design time, and the operator unsetSelectable() can be used to change Frame Select Groups at runtime:
setSelectable(Frame, GroupNumber), unsetSelectable(Frame, GroupNumber)The operator requires as the first argument the UserDefinedId of the Frame in which the Frame Select Group is defined. The second argument refers to the group index (i.e., the number corresponding to the Frame Select Group, starting with \(0\)). The item shown in Figure 4.50 illustrates the use of the setSelectable()- and unsetSelectable()-operator in the Finite State Machine.
Also, the other properties of frame select groups (i.e., Multiple Select and No Deselect, see section 3.9.4 for a description) can be modified at runtime using the following operators from the Finite-State Machine:
setMultiselect(Frame, GroupNumber), unsetMultiselect(Frame, GroupNumber)
unsetNoDeselect(Frame, GroupNumber), setNoDeselect(Frame, GroupNumber)
Note that previous versions of the CBA ItemBuilder used implicit select groups within containers (i.e. all components within a container such as Panel, ImageMap, RadioButtonGroup, etc.). For this reason, the syntax setSelectable(Container or Table), unsetSelectable(Container or Table), setMultiselect(Container), unsetMultiselect(Container), unsetNoDeselect(Container) and unsetNoDeselect(Container) is still valid. However, implicit select groups are deprecated and replaced by the Frame Select Groups (see section 3.9.4).
Operators for MapBasedValueDisplays (i.e., Drag-and-Drop): The ability to perform drag and drop operations with ‘MapBasedValueDisplays’ (see section 4.2.6) is activated by defining the ‘Drop Mode’ property different from DROP_NONE. With the help of the setValueDisplayMode()-operator this property can be also controlled from the Finite-State Machine:
setValueDisplayMode(UserDefinedId, Mode)The followings keywords are defined for the argument Mode:
-
dd_none: The component does not allow dragging or dropping. -
dd_drag: The component only allows dragging. -
dd_drop: The component only allows dropping. -
dd_dragdrop: The component allows both dragging and dropping.
Operators to Trigger Commands: Navigation between Tasks using Commands is essential for the use of assessment components created with the CBA ItemBuilder (see section 3.12). In parallel to Commands that can be linked directly to buttons, the CBA ItemBuilder provides operators for the Finite-State machine to enable navigation between Tasks:
next_task()
back_task()
cancel_task()
The operators are not available for Conditional Links.
Note that, if supported by the deployment software (see chapter 7), the next_task()-operator is also prepared to take either a TaskName or a TestName and a TaskName as arguments.
Operators for Dialog Pages: The openDialog()-operator can be used to open a particular page as regular dialog at a specific position provided as \(X\) and \(Y\) coordinate (see Figure 4.52).
openDialog(PageName, X, Y)Note that the page can only opened once (either left or right) and that the modal dialog is configured using the frame as Dialog=MODAL_DIALOG and Closable=false (see section 3.15.1).
Dialog pagess can be closed with the closeDialog()-operator (when visible):
closeDialog(PageName)Instead of specifying the name, dialog pages can also be closed using the flags isXPage and isModal:
closeDialog(isXPage, isModal)
Operators for Scrolling: If necessary, the scrolling of pages can be triggered from the Finite-State Machine. For main pages (regular pages or X-pages), the following operator is available:
scrollTopLevelPage(isXPage, PositionParameter, PositionParameter)The argument isXPage can be set to true, if the XPage should be scrolled. The PositionParameter can either be defined in % or in pixels, as shown in the following examples:
scrollTopLevelPage(false, yPosition=>0px)
scrollTopLevelPage(false, yPosition=>50%)
scrollTopLevelPage(false, xPosition=>30px, xPosition=>50%)
scrollTopLevelPage(false, xPosition=>0px, xPosition=>0px)
A second operator is provided to scroll embedded pages, illustrated in Figure 4.53.
scrollEmbeddedPage(PageArea-ID, PositionParameter, PositionParameter)Operators for Media Components: An operator to start, stop and resume audio and video outputs can be used for multiple purposes. As shown in Figure 4.54, it can be used to limit the frequency of audio output. It is also possible to automatically start audio or video output when a page is visited, a state occurs, or an event is triggered. Finally, this operator is essential to replace the default control buttons for ‘Audio’ and ‘Video’ components.
To start, stop and pause the audio or video output, the CBA ItemBuilder provides the setMediaPlayer() operator. This operator takes two arguments. Argument 1 specifies which audio or video component should be changed with the User Defined Id. Argument 2 is the action to be performed:
setMediaPlayer(ComponentID, Action)The requested action can be either mp_start, mp_stop or mp_pause. The item in Figure 4.55 provides an example.
A similar operator can also be used to control the volume of audio or video outputs. The setMediaPlayerVolume operator also needs as the first argument the User Defined Id of the component to be changed and as the second argument the volume to be set. This operator can also be called before the first audio output to control the default volume:
setMediaPlayerVolume(ComponentID, Value)The requested value is an integer value between \(0\) (not audible or silent) and \(10\) (maximum volume).
In the Task Initialization syntax (see section 4.5), the properties of media components can also be defined. The initMediaPlayer() operator is available for this purpose:
initMediaPlayer(ComponentID, Property, Property, ...)The ComponentID is the UserDefinedId of a component of type Audio or Video, and the property values are specified as shown in the following example:
{page:true|initMediaPlayer(mp,automaticStart=>true, hideControls=>true, maxPlay=>2)}Note that the initMediaPlayer()-operator is only available in the Task Initialization syntax and that the operators ? ´setMediaPlayer()andsetMediaPlayerVolume()` are only available in the Finite-State Machine syntax.
Operators for Calculator: The CBA ItemBuilder provides a Calculator Engine, which can be used to convert different calculators. The connection of the Calculator Engine with the designed page is realized by calling operators in the Finite-State Machine (see Figure 4.56 for an example).
The calcOpnd()-operator is required for implementing digit input (i.e., calcOpnd(add, 0) to calcOpnd(add, 9)), for deleting the last character (calcOpnd(back)), for changing the sign (calcOpnd(invadd)), and for adding the decimal separator (calcOpnd(decimal)).
calcOpnd(Operation, Digits)To request a specific calculation, the calcOp()-operator is available (see Figure 4.56 or Table B.13 for possible values of the arguments Operation and IntegerParam).
calcOp(Operation, IntegerParam)To read the value of the memory, the following operator is available (with MemoryIndex as index, starting with \(0\)):
calcGetMem(MemoryIndex)General settings of the operator can be defined with the calcSettings()-operator (see Table B.13 for possible Parameters and the Finite-State Machine defined in Figure 4.56 for an example).
calcSettings(Parameter, Parameter, ...)Operators for Embedded Pages: Links in pages embedded are processed within the PageArea of the source page, and the setEmbeddedPage()-operator that was already introduced in section 4.3.4 can be used to change an embedded page of any PageArea specified by the User Defined Id:
setEmbeddedPage(PageAreaUserDefinedId,PageName)Within a given CBA ItemBuilder project file, the User Defined Id of all components must be unique and the CBA ItemBuilder ensures that no User Defined Id is used more than once (see section 3.7.4). Moreover, pages have unique names and the CBA ItemBuilder only allows the specification of page names not yet used within a project file (see section 3.4). However, multiple components of type PageArea (see section 3.5.4) can be used to embeds identical pages. Accordingly, the complete path of UserDefinedIds is necessary to specify which page should be changed by the setEmbeddedPage()-operator. Figure 4.57 shows that the setEmbeddedPage()-operator can also be used to switch pages within pages (i.e., nested PageAreas), whereby the UserDefinedId’s of the PageArea-components must be concatenated with a dot:
setEmbeddedPage(ParentPageArea.ChildPageArea,PageName)Since this logic is a common source of errors when using nested pages, it has been explicitly mentioned again here (see also sections 4.1.4 and 5.3.9).
As shown in Figure 4.57, the setEmbeddedPage()-operator can be used in both the finite-state machine and conditional links. When first called, the operator overwrites the static assignment made when configuring the PageArea via the context menu and the Link Embedded Page entry (see section 3.5.4).
Note that the setEmbeddedPage()-operator does not work for TreeChildAreas since these are controlled by their attached tree (see section 3.9.9).
Operator to Raise / Trigger Events: Mainly for technical reasons and to structure or simplify the finite-state machine syntax, additional events can also be triggered as operators. For this requirement the raise() operator is available in the finite-state machine syntax, which expects the name of a defined event as argument.
raise(EventName)
Events can also be triggered in Conditional Links. The following operator can be used for this purpose (see Figure 4.58 for an example):
initFSM(EventName)
Operators to Change Events: Timed Events as introduced in subsection 4.4.3 are triggered automatically after a specific amount of time. For that purpose, the interval is specified, when the Timed Event is defined in the State Machine Rules File. Remember that timed events are automatically started when a state is entered and that an internal transition is different from a self-transition (see subsection 4.4.7). Hence, Timed Events are often used multiple times (because, for instance, the current state of a Finite-State Machine is changed triggered by the Timed Event, meaning the timer is restarted every time). A specific setFSMEvent()-operator is provided to modify the time interval for a Timed Event:
setFSMEvent(EventName, Time)The item in Figure 4.59 illustrates the setFSMEvent() operator.
The item in Figure 4.59 provides an example also for another operator, that changes the page that is assigned to a state (see section 4.4.9 for the concept of Pages assigned to States):
setFSMState(StateName, PageName)In the example in Figure 4.59 the button Remain Page1 and Alter Pages trigger conditional links that contain the setFSMState()-operator. If the button Remain Page1 is clicked, the state ST_NavigationPage2 is assigned to the start page of the Task (i.e., page1). But if the button Alter Pages is clicked, the conditional link triggers the operator setFSMState(ST_NavigationPage2, page2) and changes the page that is assigned to the state ST_NavigationPage2.
The setFSMEvent()- and setFSMState()-operators are only available for Conditional Links and Task Initialization and only integer numbers can be assigned to Timed Events.
Operators to Create Trace Messages: Events in this chapter always refer to the events defined in the syntax (see section 4.4.3), which are used to control the finite-state machine. With the help of special operators, however, entries can also be written to the log data (i.e., trace messages can be created):
trace_text(text)The text argument is interpreted as Argument Lists (see section 4.1.5), so that additional argument such as variables can be used to include additional values in the stored text.
trace_typed_text(type, text)trace_text() and trace_typed_text() can be used.
Item authors can use the following operators to trigger the creation of a snapshot:
trace_snapshot(TextSource)
trace_snapshot(TemplateSource, ValueSource, ValueSource, ...)
trace_typed_snapshot(Type, TextSource)
trace_typed_snapshot(Type, TemplateSource, ValueSource, ValueSource, ...)
Operators for Tree-Components: To make changes to Tree components, the CBA ItemBuilder provides the following two operators:
tree_move(Tree, NodeIdPattern)tree_copy(Tree, NodeIdPattern)Operator to Measure (Elapsed) Time: Timed events (as described in section 4.4.3) give item authors the ability to define actions or changes after a specified time. Hence, timed events allow various scenarios to be implemented, but no precise time measurement is possible when user interactions need to be incorporated. For this use case, the elapsedTime() operator can be used, which returns the elapsed time since the start of a task in milliseconds.
elapsedTime()Figure 4.60 illustrates the use of the elapsedTime()-operator to measure the time between two clicks:
4.4.7 Trigger Operators without Transitions
Finite-state machine rules consist primarily of defined Transitions from a state A to a state B (see section 4.4.4). When a transition is triggered by an event, additional operators can be executed. Hence, this part of the finite-state machine concept of the CBA ItemBuilder focuses on transitions, i.e., state changes.
Operators can also be executed without transitions, either using Conditional Links (see section 4.3) or within the finite-state machine. For this purpose, the following syntax provides the possibility to define operators that are executed when a particular finite-state machine enters or leaves a specific state. These operators will be executed regardless of the transition that changed the state (i.e., the focus is on states, not transitions).
State Entry and State Exit: Operators that are to be executed when a finite-state machine changes to a state can be defined using the following syntax:
State entry {operator1(), operator2()}The name State must be the name of a valid state, defined in the State Machine Tree View (see section 4.4.2), followed by the keyword entry and a comma separated list of operators within curly brackets. The specification of an event name and a |-character are not necessary, since the operators are executed independently of the event or transition that brought the finite-state machine into the state specified as State.
Operators can also be defined that are always executed when a state is exited:
State exit {operator1(), operator2()}If multiple state-entry or state-exit definitions are provided for a state, then all operators are executed, i.e., the following definition results in the same two operators executed when either State1 or State2 is entered:
State1 entry {operator1(), operator2()}  // One statement

State2 entry {operator1()}               // Two statements
State2 entry {operator2()}
Internal Processing of Events: Processing events to execute operators without effectively changing the current state of a Finite-State Machine
is possible, for instance, with the transition State_A => State_A (Self-Transitions). However, this is defacto a transition from State_A to State_A and state -entry and state-exist are triggered. If operators within a state should be triggered by a particular events without* the state being changed via a transition, this is possible with the keyword internal:
State internal {Eventname | operator1(), operator2()}The Self-Transition State => State {Eventname | operator1(), operator2()} is only similar to the definition State internal {Eventname | operator1(), operator2()} with respect to the provided possibility to process events without defectively changing the state of a finite-state machine. However, only the internal processing of events defined with the syntax above is executed without triggering state-entry and state-exit (see Figure 4.61). Since Timed Events are restarted on state changes (and also on Self-Transitions), the distinction between State internal {TimedEvent|/*...*/} and State =>State {TimedEvent|/*...*/} is central to be able to control the behavior of Timed Events purposefully (see Figure 4.63 in section 4.4.3).
internal processing and self-transitions to the same state are defined, the internal processing is prioritized. Only self-transitions trigger state entry and exit.
Keep in mind, that each event is only processed once by a rule that is defined for a finite-state machine in a particular state. Rules of type internal are interpreted prior to the rules pointing from a particular state to itself. Hence, in the example shown in Figure 4.61 the transitions ST_A => ST_A and ST_B => ST_B will never be executed (regardless of the order in the finite-state machine syntax definition) in mode Implicit internal, because the definitions ST_A internal and ST_B internal are processed first.
The Internal Processing of Events can, analogous to Conditional Rules (see section 4.4.5) be restricted by Conditions (i.e., Guards, see section 4.4.5), which can be formulated with the help of variables.
Note that a single event can, however, be processed by multiple nested state machines, as described in the next section (see section 4.4.8).
4.4.8 Nesting Finite-State Machines (in Regions)
If several independent sets of states are to be distinguished or, for example, several timers are required within a Task, the limits of a single finite-state machine are reached quickly. For this reason, the CBA ItemBuilder provides the possibility to use several Finite-State Machines, which can be nested within each other. This functionality is illustrated in the item in Figure 4.62. The outer Finite-State Machine starts in the state ST_OuterStart, which is exited directly when the Task is loaded with the rule ST_OuterStart -> ST_OuterMain{true}. Within this state, two Finite-State Machines are defined in parallel. This is done by adding two regions (Region1 and Region2) in the State Machine Tree View, as shown in Figure 4.62. Each region contains a set of states, including precisely one Start state and (one or) multiple Regular states.
An example illustrating the operation of nested finite-state machines in interaction with Timed Events is shown in Figure 4.63.
4.4.9 Assignment of Pages to States
Normal and end states can be connected with pages. If a transition is triggered that changes the Current State to a state assigned to a page, the linked page is shown.
Simple Example: The following example in Figure 4.64 illustrates how pages can be changed using state transitions in a finite-state machine. In the example, two states are defined: One state ST_First and one state ST_Second. Changing between states is operationalized by two buttons that are triggering the events EV_GoToSecond and EV_GoToFirst, respectively. State ST_First is connected with page First and ST_Second is connected with page Second. In this setup, the pages are not linked to the buttons, but to the states:
In order to assign a page to a state, a state must be selected in the State Machine Tree View of the CBA ItemBuilder. Afterward, a right-click gives access to the context menu, which contains the entry Configure States.
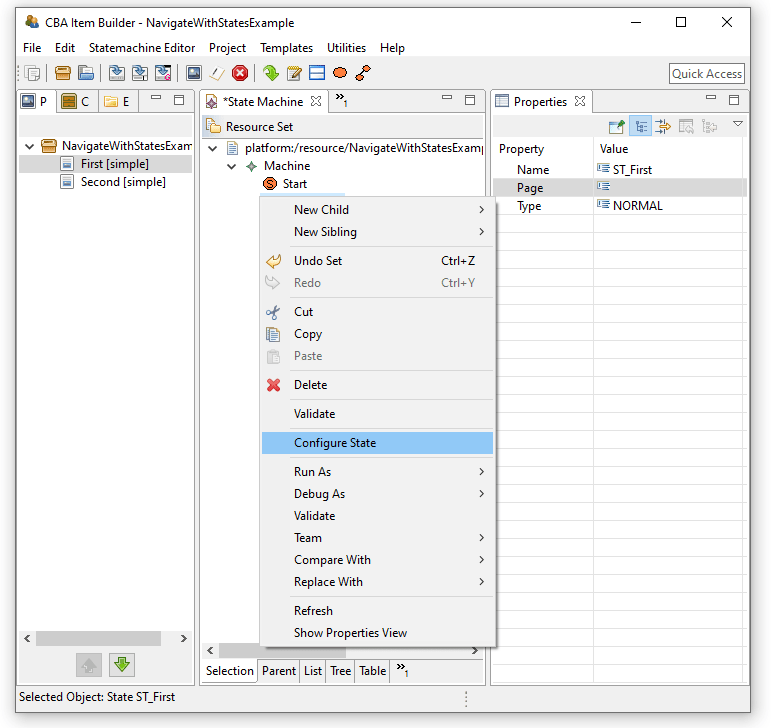
FIGURE 4.65: Context menu Configure State to assign a Page to a State.
The opening dialog Configure State allows to define which page should be opened when changing to this state. One of the defined pages can be selected from the combo box. An empty entry corresponds to the setting that the currently displayed page should not be changed when changing state.
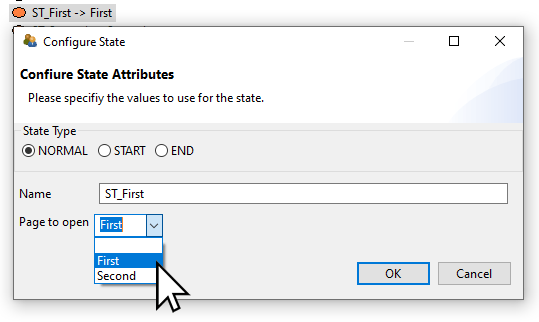
FIGURE 4.66: Dialog Configure State showing Page to open to assign a Page to a State.
After the dialog was closed with OK, the selection is also visible in the tree view of the finite-state machine. The arrow with the reference to a page name indicates that this state is linked to a page.
Advanced Example using X-Pages and Pages Assigned to States: Let us now consider the example, which has already been described and discussed in subsection 3.11.4 to illustrated linking between pages and x-pages (see Figure 3.136).
In addition to buttons with links to pages and modal dialogs (see section 3.11.2), selected buttons are also linked to events of the finite-state machines. Using two nested finite-state machines (see section 4.4.8), one particular state always corresponds to the current page and one state corresponds to the current x-page. Note the region named X and the region named Regular. Within each region, a start-state and two states are defined, each assigned to a page or a X-Page (see Figure 4.67).
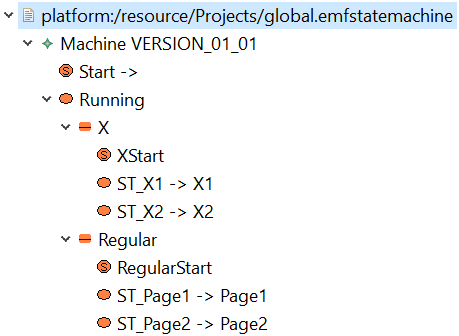
FIGURE 4.67: States Linked to Pages in two Regions as implemented in the item shown in Figure 3.136.
The buttons in the example item with the labels EV_X1, EV_X2, EV_Page1 and EV_Page2 are assigned to the events of the same name. The events are defined in the finite-state machine syntax and are used in the following rules:
Events:EV_X1, EV_X2, EV_Page1, EV_Page2;  // Definition of events
Rules: Start -> Running{true}             // Start of the Region "Running"

XStart -> ST_X1{true}                     // (Nested) FSM for X-pages in
ST_X1 => ST_X2{EV_X2}                     // thre region "X"
ST_X2 => ST_X1{EV_X1}

RegularStart -> ST_Page1{true}           // (Nested) FSM for pages in
ST_Page1 => ST_Page2{EV_Page2}           // the region "Regular"
ST_Page2 => ST_Page1{EV_Page1}

ST_X2 => ST_X2{EV_X2}                    // Necessary, since the page
ST_X1 => ST_X1{EV_X1}                    // is also changed via links
ST_Page1 => ST_Page1{EV_Page1}
ST_Page2 => ST_Page2{EV_Page2}
Finally, let’s look at the use of state and page linking in the context of dialogs. If you click the XDialog-button in Figure 3.136, then the page XDialog1 is displayed as a modal dialog (button Dialog and page Dialog1 in parallel). These dialog-pages each contain a button that triggers an event in the finite-state machine, and the defined state transition rules lead to new states that are linked to pages again.
If, for example, on page X1 (the finite-state machine will be in region X in state ST_X1), the event EV_X2 is triggered, and the FSM will change to state ST_X2 because of the rule ST_X1 => ST_X2{EV_X2}. Since the page X2 is assigned to this state, it is displayed. However, page X2 is not configured as a dialog, meaning that the underlying page will be changed even though the event was triggered from a dialog page. The dialog page remains visible. To close the dialog, you have to use the command CLOSE (see subsection 3.12.2 for more information about Runtime Commands), which is only assigned to the button CLOSE in this example. The CLOSE command can either be made available separately via an additional button (as it is implemented in Dialog1 in the example) or the CLOSE command can be linked to the button in addition to the event (as it is implemented in XDialog1 in the example). Not shown in this example: If a dialog is to be exchanged with a page linked via states, it is sufficient if the target page is configured as a dialog.
Change Page and X-Page Simultaneously: The separation of pages into the two categories (regular pages and X-pages) simplifies most scenarios, where Links as well as Pages Linked to States are either affecting the regular page area or the X-page area. To change a page and a X-Page simultaneously in an item at once, the connection of states and pages must be separated into two regions again, since each state can only be linked to one page.
Apart from this procedure, in which the pages are switched via the finite-state machine, the entire layout including the X-Page pages can also be changed by navigating to another task (see 3.6.2 for details on CBA ItemBuilder Tasks and see 3.12 for details on switching between tasks using runtime commands).
Change Page with States and Timed Events: The mechanism to change pages linked to states in the finite-state machine opens up a variety of design possibilities. For example, in combination with timed events (see section 4.4.3) items with controlled presentation time can be implemented.
4.4.10 Timer Component
Time constraints in assessments can be implemented in different ways. The decisive factor is whether the restriction is to be implemented within a task or across several Tasks. In a nutshell: If a Page is to be displayed within an item after the timeout, the time limit must be implemented with the CBA ItemBuilder project. If another task is to be displayed afterward, the time limit must be implemented at the test delivery level. Therefore, in the concrete implementation, it is also essential to consider how assessment content is broken down into ItemBuilder projects (i.e., into individual Tasks, see section 8.2).
Timed behavior of items and time constraints within tasks can be implemented with timed FSM events (see section 4.4.3). Timed events are invisible and defined as recurring events, automatically triggered and processed when rules are defined in the finite-state machine (see section 4.4.4). To visualize selected timed events, a specific component is provided by the CBA ItemBuilder that can be added to pages in the Page Editor. To visualize the remaining time of a timed FSM event (backwards) or the time since the last occurance of a timed event (forwards), the Timer-component shown in Figure 4.70 can be used.
Timer-components must be linked to a timed FSM event (assigned using the context menu entry Link Timer Event) and support the property Vertical Orientation, can show the remaining time automatically (Show Remaining Seconds), and can run either Run Forward=true or false.
4.5 Task Initialization Syntax

CBA ItemBuilder project files must define at least one Task as the entry point (see section 3.6). However, they can also contain several Tasks. The delivery software can then determine which order of tasks taken from one or from multiple CBA ItemBuilder project files is used (see section 7.2.7). In the Preview (see section 1.4.2), the tasks are displayed according to the order in which they are listed in the Tasks editor, and the order can be adjusted there (see section 3.6). In the Tasks editor, it can also be defined which page and, if necessary, which additional X-Page is displayed at the beginning of a Task. However, all Tasks share the Variables and the Finite-State Machine(s) among themselves. As described in section 4.4.4, the Task Name can be used in conditions of the Finite-State Machine, for instance in the Start Rule (Start Transition). With the Task Initialization Syntax, the CBA ItemBuilder provides an additional possibility to define Task-specific default values. Hence, the Task Initialization syntax is of particular importance if within one CBA ItemBuilder project several Tasks are defined.
The general syntax follows the syntax of Conditional Links:
{Page: Condition | Operator1() Operator2() }Example
{ page1 : true | set(V_Task,2)}Multiple operators can be defied, separate by white space.
4.6 Interactive Content in ExternalPageFrames
Assessments created with the CBA ItemBuilder can use existing HTML5/JavaScript content. As described in section 3.14, HTML5/JavaScript content can be embedded using components of type ExternalPageFrame. (i.e., components that are integrated into the CBA ItemBuilder-based items as iframes during runtime, see section 3.14).
ExternalPageFrames are not suitable for item authors who want to create computer-based tasks with the CBA ItemBuilder without programming in a concrete programming language (see section 2.11.2). External content must be created in a way that this HTML-content supports a) the API of the CBA ItemBuilder for the transfer of data and b) can be used in the intended way in all browsers potentially used in deployments. Moreover, long-term archiving of content independently of the used rendering technology is not possible for content implemented directly in HTML5 / JavaScript. If HTML5 / JavaScript content is prepared appropriately, it can be integrated into the CBA ItemBuilder using the Embedded HTML Explorer as described in section 3.14.2.
4.6.1 Package External Content for CBA ItemBuilder
For software developers who want to create content for ExternalPageFrames without studying the CBA ItemBuilder in detail, the crucial aspects are summarized below:
(Screen) Size for External Content: Items in the CBA ItemBuilder have a fixed size (in pixel, see section 3.2.2 for details). The deployment software used to deploy assessments can align the content in the view port of the web-browser (either in window mode or in full-screen mode). To allow deployments on heterogeneous hardware (with respect to screen size and resolution) while maintaining standardization of the presentation (no responsive design), proportional scaling can be activated. Proportional scaling is implemented as css transformation of the
iframethat embeds the HTML/JavaScript runtime component of the CBA ItemBuilder. If the item itself is scaled, all components including theExternalPageFramesare scaled.Size and Margins: The content is embedded as
iframe(calledExternalPageFramewithin the graphical Page Editor of the CBA ItemBuilder). The embedding is done with a fixed size defined in pixels. To avoid unwanted scrollbars at runtime, the provided HTML files have to convert the frames and size, e.g. via CSS, so that they fit into available size of a particularExternalPageFrames. In practice, it has been proven that item authors find out the available space with a placeholder document, and then read theWidthandHeightof theExternalPageFramesin the Page Editor and use them for the creation of the external content.Embedding Files and Resources: Assessments created with CBA ItemBuilder can be delivered online and offline (e.g., USB sticks). Hence, using external sources (i.e., libraries or content referenced from any URI) can be impossible or pose a potential privacy risk. Accordingly, although the use of online content is supported, the suggested default approach is to embed all content into the CBA ItemBuilder project files. Embedded content can be split into several files, and the importing of single files or folders into CBA ItemBuilder Project Files is possible. Embedded content becomes part of the CBA ItemBuilder project files (i.e., it can be found and even modified in the folder
external-resourcesof the zip archives that are edited and previewed with the CBA ItemBuilder by item authors and that are used with the deployment software for data collections).ExternalPageFramesrequire a file as an entry point (e.g., a fileindex.html). The content in the folderexternal-resourcesof the zip archives (i.e., the CBA ItemBuilder Project Files) can be updated and used as long as the entry points remain available.Save and Restore Content State:
ExternalPageFrames/iframesare included in the CBA ItemBuilder on pages, and if CBA ItemBuilder tasks contain multiple tasks, the test-takers typically can navigate between pages. If test-takers navigate to different pages, it is possible that theExternalPageFrames/iframesis unloaded and reloaded when the test-taker navigates back to the page that contains theExternalPageFrames/iframes. By design, the data or the editing state ofExternalPageFrames/iframeswill be lost if it is not saved. In order to implement persistence ofExternalPageFrame’s/iframes’s state across page changes, the CBA ItemBuilder provides a simple mechanism: Before anExternalPageFrame/iframeis unloaded, its state is queried with a JavaScript function callsetState(). The data required for persistence is expected to be passed as aJSONserialized object so that the delivery software or the CBA ItemBuilder Runtime can take care of caching. In the opposite direction, the JavaScript function callgetState()can be used to retrieve the last state. Therefore, when the created component is rendered, it should usegetState()to query theJSONserialized object of the last state so that it can restore its state.Add Trace Messages (Provide Log-Data): Everything that should be stored in the long term, e.g., answers and results for assessment components that are included as
ExternalPageFrame/frame, can be passed via apostMessage-interface. The data is expected asJSONobjects. The information provided using this API is stored as part of the log data (together with a time stamp and a person or session identifier). The type must be recognizable from the object itself if differentiation is necessary during data post-processing. This approach is mainly intended for the storage of log data, whereby the final result data can also result from all log data or the last log events of a type.Provide Result Variables: Log data is typically not available for data preparation until the assessment is complete. Suppose answers or results from the
ExternalPageFramesare already needed during the assessment or needed in the scoring (i.e., creating result variables) within the CBA ItemBuilder. In that case, they can be passed as variable-value pairs whenever the variables are changed within theExternalPageFrame. The CBA ItemBuilder API also provides a mechanism forExternalPageFramesto announce which variable values they will provide. This allows item authors to plan with these variables while creating the items and defining the scoring. At runtime, theExternalPageFramethen passes the individual variable-value pairs viapostMessage, making them available afterward in the logic layer of the CBA ItemBuilder (i.e., the finite-state machine) and for the final computation of item scores.Answer Calls from the Finite-State Machine: The aforementioned logic layer of the CBA ItemBuilder (the finite-state machine) can also be used to pass information into the
ExternalPageFrames/iframe. The JavaScript code can respond topostMessagesfor this purpose, and change the display or functioning of the content provided viaExternalPageFrames/iframes.Trigger Finite-State Machine Events: Finally, the other direction of the message chain is also possible, i.e. actions in the logic layer of the CBA ItemBuilder can be triggered by making calls from the
ExternalPageFrames/iframesthat trigger events within the finite-state machine. For this, the item authors must define the events in the finite-state machine by assigning a unique name and an event with this name can then be triggered in the programming of the external content. This procedure is necessary, for example, if a navigation to a next item (i.e., in the terminology of this CBA ItemBuilder to a next task) is to be triggered from the external content.
Template A template file for programmers is provided and the following briefly describes what to look for when creating external content for use in ExternalPageFrames of the CBA ItemBuilder. The template is shown in Figure 4.73 and can be downloaded as a CBA ItemBuilder project file using the link in the figure caption. To view the template locally in the CBA ItemBuilder preview and to view the HTML / JavaScript source code of the template with the CBA ItemBuilder, the CBA ItemBuilder must be installed as described here (see section 1.1). After that the project file can be opened and the preview can be started as described in section 1.4 the Preview can be started. The prepared HTML / JavaScript files can be seen in the Embedded HTML Explorer described in section 3.14.2.
When creating a CBA ItemBuilder Project Files, an HTML file example.html is created automatically, this file contains JavaScript examples and can be edited and exported in the Embedded HTML Explorer (see section 3.14).
Examples: Additional examples how content can be used in ExternalPageFrames is provided in section 6.6. ExternalPageFrames can be used to collect responses, for instance, to measure how long a sound is played (see Figure 6.25). Moreover, ExternalPageFrames can be used to use online or offline voice recognition (see section 6.6.3), ExternalPageFrames can also be used to embedded content in other formats, such as H5P (see section 6.6.4), to collect mathematical input (see section 6.6.5) or even to embedd item content in the standardized IMS Question & Test Interoperability (QTI) format using, for instance, the QTI.js library (see section 6.6.6 for an example). Finally, offline questionnaires implemented, for instance, with the SurveyJS library can be embedded (see section 6.6.7).
4.6.2 Communication between with ExternalPageFrames (JavaScript) and Finite-State Machine

The simple JavaScript API for embedded content as ExternalPageFrame is described in depth in this section.
4.6.3 Provide Information to the Finite-State Machine from JavaScript
The communication between the embedded JavaScript and the CBA ItemBuilder runtime (and thus the Finite-State Machine as defined by item authors in the CBA ItemBuilder) is done via postMessages.
window.parent.postMessage(JSON.stringify(message), '*'); Depending on the configuration of the JSON string passed as message, posteMessages can be sent for various purposes. The various use cases are illustrated in the item shown in Figure 4.74.
Create Custom Log-Entries: Log events (i.e., event-based data generated during test-taking) are stored by the delivery software and are available after the assessment. Only for components from the CBA ItemBuilder model are log events automatically created when the components are added to the design of pages (and thus the design of assessment components) via the Page Editor. For content that is included as an ExternalPageFrame, care must be taken in the programming of the HTML5/JavaScript content to ensure that all relevant information is logged (see section 2.8.1 for completeness of log data).
If the payload transmitted as postMessage contains a traceMessage attribute, a log entry is created by the CBA ItemBuilder runtime:
var message = "Random message, e.g., " + new Date().toLocaleString();
var type = "CustomTraceType";

var pass_data = {
     indexPath: indexPath,
     userDefIdPath: userDefIdPath,
     traceMessage: message,
     traceType: type,
     traceCount : traceCount++
 };
window.parent.postMessage(JSON.stringify(pass_data), '*'); ExternalPageFrame can be found in the CBA ItemBuilder log data with events of type JavaScriptInjected. They can contain log events from the embedded content. However, this interface can also be used to store result data from ExternalPageFrames.
The log entries can use their event types if the traceType attribute is also passed. The transmission of log data from ExternalPageFrames can be used to transmit arbitrary string serializable data and have them stored by the delivery environment.
Set FSM Variables: From a content included as ExternalPageFrame, also values of FSM variables can be set. This option allows, for instance, returning values from embedded content, which can also be used in scoring. In addition, arbitrary calculations at runtime of items are also possible via JavaScript and possible embedded libraries. To set a variable, the payload microfinVariable must be submitted as a JSON structure with the values variableName (name of the variable that will be set) and newValue (new value for the named variable). The type of the variable must be taken into account.
var varname = "V_OutputInteger";
var value = Math.floor(Math.random() * 100);

var pass_data = {
     indexPath: indexPath,
     userDefIdPath: userDefIdPath,
     microfinVariable: { variableName: varname, newValue: value },
     traceCount : traceCount++
};

window.parent.postMessage(JSON.stringify(pass_data), '*');
Request Value of FSM Variables: Besides setting FSM variables, the value of FSM variables can also be retrieved. To do this, the JavaScript sends a postMessage with the payload getVariable, in which the name of the desired variable and an (arbitrary) callId must be contained as variableName:
var callId = "ID" + new Date().toLocaleString();

var pass_data = {
      indexPath: indexPath,
      userDefIdPath: userDefIdPath,
      getVariable: {  variableName: variableName,   callId: callId},
      traceCount : traceCount++
};

window.parent.postMessage(JSON.stringify(pass_data), '*');
The CBA ItemBuilder runtime responds to this postMessage and transmits back the value of the variable, which can then be captured and further processed with an EventListener. In the example in Figure 4.74, the transmitted return JSON is displayed as alert.
Trigger FSM Event: FSM events defined in the Finite-State Machine syntax in the Events: section can be triggered from ExternalPageFrames when a payload with the microfinEvent attribute is submitted via postMessage:
var eventName = "EV_JSTriggeredEvent";
var pass_data = {
     indexPath: indexPath,
     userDefIdPath: userDefIdPath,
     microfinEvent: eventName,
     traceCount : traceCount++
};
window.parent.postMessage(JSON.stringify(pass_data), '*');
Using this part of the interface, transitions can be triggered in the Finite-State Machine, and operators can be used. If, for example, HTML5/JavaScript content included via an ExternalPageFrame should be able to end a task, then the next_task() operator (see section 4.4.6) can be integrated into the Finite-State Machine and placed into a Rule, which is triggered by an FSM Event. The FSM Event is fired when the JavaScript content sends a postMessage with the payload microfinEvent and the corresponding name of the FSM Event.
4.6.4 Call JavaScript-Function of ExternalPageFrames from Finite-State Machine(s)
Once an HTML5/JavaScript resource included as ExternalPageFrame is loaded, functions can be called using the FSM operator callExternalPageFrame:
callExternalPageFrame(UserDefinedId, ...)Several ExternalPageFrames can be integrated in one page or in one Task of a CBA ItemBuilder Project Files. The first parameter must be the UserDefinedId of the particular ExternalPageFrame component that should process the JavaScript call. Additional optional parameters are possible. As illustrated in Example 4.75, the optional parameters can be used to pass static strings or values of FSM variables. The values of the arguments are then available in the called JavaScript function.
As can be seen in the item in Figure 4.75, calls to JavaScript functions from the Finite-State Machine can be used for quite different purposes.
4.6.5 Provide ExternalPageFrames-State for Persistence (getState/setState)
HTML/JavaScript extensions inserted as ExternalPageFrame on pages inside CBA ItemBuilder projects lose their content when the page that contains the ExternalPageFrame is unloaded. Unloading occurs on page changes either within a task or when exiting a task. To allow ExternalPageFrames to save and restore their content, the API includes the getState/setState-functionality.
The following behavior is expected: When the getState() methods is called, then a string (e.g., a JSON serialized object) can be passed from the ExternalPageFrame to the CBA ItemBuilder runtime. The call of getState() is done automatically before the page that contains the ExternalPageFram is unloaded by the CBA ItemBuilder Runtime.
component is embedded. If the content is needed again when the page is revisited, it must be passed to the CBA ItemBuilder runtime viagetState(). Furthermore, the embedded content needs to handle the call tosetState()` and restore its content when requested.
function getState() {
    try {
      // Specific JavaScript Code Required
        var json = JSON.stringify(/* your data */);
        return json;
    }
    catch (e) {
        console.debug(e);
    }
}
When navigating to a page that contains an ExternalPageFrame that has already been displayed, the CBA ItemBuilder Runtime calls the setState() method and passes the state serialized as a string that was passed the last time getState() was called.
function setState(stateString) {
    try {
        // Specific JavaScript Code Required
        // ...
    }
    catch (e) {
        console.debug(e);
    }
}
The minimal example shown in Figure 4.76 illustrates the expected behavior.