6 Recipes and Examples

This chapter provides concrete recipes and examples for creating innovative assessments using the CBA ItemBuilder. The first section 6.1, starts with tips about regular expressions, mainly used for scoring purposes and to restrict the possible text input. The subsequent sections focus on resource files (i.e., images, audio, and video files; see section 6.2) and on the global properties (i.e., definitions that a shared within a CBA ItemBuilder project file; see section 6.3). Examples illustrating the use of Conditional Links and Finite-State Machines syntax for different purposes are described in section 6.4. Section 6.5 focuses on digital calculators and the implementation using either Finite-State Machines or ExternalPageFrames. More examples for the use of HTML5/JavaScript content with ExternalPageFrames are provided in section 6.6. Section 6.7 summarizes possible approaches to implementing adaptive assessments using the CBA ItemBuilder. Finally, section 6.8 focuses on efficiency and tricks to implement content using the CBA ItemBuilder with less effort, and section 6.9 refers to creating items in multiple languages.
6.1 Regular Expressions

For different purposes, the CBA ItemBuilder supports the use of so-called Regular Expressions. Regular expressions are sequences of characters (i.e., strings) that can be used to formulate patterns that match text with specific properties. The CBA ItemBuilder allows regular expressions to restrict the input to SingleLineInputFields and InputFields. If a regular expression is defined in components of this type as Input Validation Pattern, only text that matches the defined pattern can be entered. The CBA ItemBuilder also supports the use of regular expressions for the scoring of text responses and for conditional links. The syntax for defining patterns as regular expressions that can be used for restricting input as well as for matching responses is listed in the Appendix (B.3).64 In regular expressions used for scoring, conditional linking, or for definitions in any other syntax part of the CBA ItemBuilder, \ need to be escaped (i.e., replaced with \\). Some characters have special meaning in regular expressions and must be escaped. All escaped characters begin with the ’' character. Within a regular expression , only \, –, and ] need to be escaped.65
6.1.1 Valid UserDefinedIds as Regular Expression
To illustrate how regular expressions can be used to define patterns for valid text, we illustrate how the possible schema for UserDefinedIds (see section 3.7.4) can be translated into a regular expression:
UserDefinedId: ([A-Za-z][A-Za-z_0-9]*)
According to the syntax of regular expressions (see table B.3 in the appendix for details) this expression defines the following pattern:
- Only uppercase or lowercase characters are allowed as first characters:
[A-Za-z]. This matches the requirement that a User-Defined Id must start with a character and must have a length greater or equal one. - Digits and underscores are allowed after the first position in addition to uppercase and lowercase characters:
[A-Za-z_0-9]*, but no umlauts / vowel mutations are allowed. - The number of characters is not limited, and white spaces are not allowed.
This restriction of allowed characters also applies to name of Tasks (see 3.6.1), name of Finite-State Machine Variables (see section 4.2) and States (see section 4.4).
6.1.2 Scoring (Text) Responses with Regular Expressions
Regular expressions are often used to define hit or miss conditions when scoring CBA ItemBuilder tasks. The item shown in Figure 6.1 illustrates with a synthetic example the use of regular expressions for scoring text responses.
Regular Expressions with Alternatives: The first hit (Variable1_Correct) defined in the example uses the syntax [D|d]og within a regular expression, which recognizes both upper and lower case forms of dog:
matches(txtVar1,"\\s?[d|D]og\\s?")This syntax is supplemented by \\s?, i.e. an optional space before or after the searched words. As described above, the expression \s (see appendix B.3) was thereby paraphrased as \\s.
Combination of matches()-operators: Alternatives can be formulated within regular expressions. However, it is often easier to combine several matches() operators in the scoring condition. The hit Variable1_Wrong is an example of this, where the already described case detection is combined with an operator that detects empty text fields:
(not matches(txtVar1,"\\s?[d|D]og\\s?") and not matches(txtVar1,""))matches() operators with and and or the rules for bracketing multiple operands must be observed (see section 4.1.3). The negation with not can additionally be added as part of the operands.
Empty Response: For encoding missing (text) responses, an empty string can be provided as argument for the matches()- operator to check whether a character was entered at all:
matches(userDefinedIDInputField,"")This pattern was used in the item in Figure 6.1 for defining hits to identify missing responses. Because the CBA ItemBuilder’s implementation of the matches(userDefinedIDInputField,"") (i.e., the use of "" empty expressions) is also triggered in multiline TextFields as soon as one empty line is included, it may also be useful to check if no characters have been entered with the following regular expression:
not matches(userDefinedIDInputField,"^(?!\\s*$).+")`Figure 6.2 illustrates the difference between empty expressions "" and the expression to match white spaces "^(?!\\s*$).+".
Decimal Numbers (with . or ,): Another application of a selection via | can be used to accept both dot and comma as decimal separators ([.|]). In cultures where a thousands separator is not typically used, this can be useful when checking decimal numbers:
matches(txtVar2,"\\s?3[.|,]5\\s?") As shown in the second item in Figure 6.1, this can be used to check whether the correct answer (3,5 or 3.5) was entered in the SingleLineInputField with the UserDefinedId: txtVar2.
Numerical Ranges using Regular Expressions: By combining the components, it is also possible to check whether an entered decimal number is within a desired range:
((matches(txtVar3,"\\s?[2][.|,][5-9]\\s?") or
  matches(txtVar3,"\\s?[3-6][.|,][0-9]\\s?")) or
  matches(txtVar3,"\\s?[7][.|,][0-33]\\s?"))
Scoring conditions like this (see Hit Variable3_Correct) can also be negated and combined with a check for empty inputs (see Hit Variable3_Wrong).
6.1.3 Input Validation with Recuglar Expressions
Regular expressions are also commonly used when creating items with the CBA ItemBuilder to limit the possible inputs of text. A restriction of the possible characters that can be entered to text fields, such as SingleLineInputFields and InputFields, is a common requirement for the implementation of items with (short) text responses. To apply an input restriction using the CBA ItemBuilder, components that support this feature provide the property Input Validation Pattern in section Misc of the Properties-view.
To define an input validation, the component must be selected in the Page Editor. If necessary, the context menu can be used to open the Properties-view (entry Show Properties View). Regular expressions are entered in as Input Validation Pattern property (see Figure 6.3).
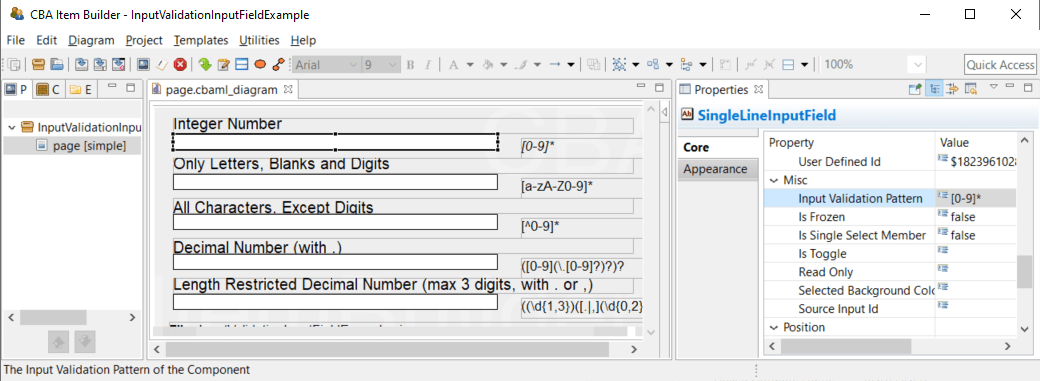
FIGURE 6.3: Property Input Validation Pattern in the Properties-view.
When using regular expressions to restrict text input, please note that the pattern must be valid not only for the final response but also for all intermediate steps in the input of the response.
Since the input is made characterwise, the input 3., for example, must also be valid with respect to a particular pattern so that a decimal number 3.0 can be entered. This is not necessary for the identification of different free text responses with regular expressions (see 6.1.2).
The item shown in Figure 6.4 illustrates some of the regular expressions often used to restrict text entry for SingleLineInputFields.
Restricting the possible characters that can be entered into a SingleLineInputFields (or InputField) simplifies scoring for short text responses and also affects the design of tasks. The rejected characters are, however, included in the Log Events provided by components of type SingleLineInputField and InputField.In the following we provide commented and documented regular expressions for input validation that are used in the item shown in Figure 6.4.
Integer Numbers: Only the numbers 0 to 9 can be entered in an input field with the following Input Validation Pattern:
[0-9]*Empty strings are allowed (because of the *).
Only Letters, Blanks and Digits: Only the numbers 0 to 9, small letters a to z and capital letters A to Z can be entered in an input field with the following Input Validation Pattern:
[a-zA-Z0-9]*Only Single Letters: Only one single letter A-Z, or an empty sctring is allowed when using the following Input Validation Pattern:
[A-Z]{0,1}?All Characters, Except Digits: With the help of the following Input Valiation Pattern it can be achieved that all characters except digits can be entered:
[^0-9]*Decimal Number (with .): The input of decimal numbers is possible with this Input Validation Pattern, where both only . as decimal separator is allowed.
([0-9](\.[0-9]?)?)?The expression allows one digit left to the digital delimiter (\.). The digital delimiter and one additional digit is optional. Empty strings are allowed.
Length Restricted Decimal Number (max 3 digits, with . or ,): If inputs are to be limited in length, this can also be implemented with regular expressions:
((\d{1,3})([.|,](\d{0,2}))?)?In this example, only digits ‘(\d]{1,3})’, one to three characters, are accepted before the decimal delimiter. A dot or comma are allowed as decimal delimiters ([,|.]). Up to three digits can be entered right to the decimal delimiter ((\d{0,2})). The second group “()?” is optional ([.|,](\d{0,2}))? and empty strings are allowed.
Feedback using Input Validation Events: If an Input Validation Pattern applies to the current input into a SingleLineInputField or a InputField, an FSM Event can be triggered. The following example in Figure 6.5 illustrates the use of Input Validation Events, Raised In Events and Raised Out Events to inform test-takers about allowed characters and ignored inputs.
Regular Expressions are one of the standard approaches to search for patterns in text strings. In the CBA ItemBuilder, regular expressions are used at Runtime for scoring text responses and for restricting input. The examples described in this section can only illustrate how regular expressions can be used. Concrete requirements can lead to more complex regular expressions, which can also be used to prevent the entry of sensitive information such as telephone numbers, for example. The regular expressions used must be tested in a systematic test strategy (see, for instance, 8.4.2) to collect reliable empirical data.
6.2 Ressources Files

Multimedia resources (images, videos, and audio files) are of great value in contextualizing interactive assessment, creating simulations and small experiments, and designing static and interactive content.
6.2.1 Preparing Image Files
Section 3.10.1 describes supported file formats. As it supports lossless compression, the PNG format (Portable Network Graphics) is often a good choice when preparing image files for designing items with the CBA ItemBuilder.
Some open source tools that might be helpful include:
For CBA ItemBuilder versions prior to Version 10.0, images where suggested to display text with non-web-safe fonts.66 In particular for online deployment (see section 7.2.1), image size can make a difference. If possible, images should be reduced to the required size, and stored as efficiently as possible (for instance, using vector quantization algorithms for PNG images, as provided by pngquant).
How to use transparent images? As shown in Table 3.9, transparency is also supported by the PNG format. To use images in the PNG format with transparent background, the property Is Transparent of the component that will be used within the CBA ItemBuilder to show the image, must be set to true (see Figure 6.6).
How to create multiple layers? The example shown in Figure 6.7 illustrates that components of type ImageField can be arranged in different Z-order (see section 2.11.4 and also section 3.7.5 for an example).
FIGURE 6.7: Example item illustrating ImageFields with alpha transparency and different Z-Order (html|ib).
Advanced scenarios combining and overlaying several images with semi-transparency currently need to be prepared outside the CBA ItemBuilder. To implement semi-transparency, please merge the images in a graphics tool and, if necessary, cut them into several pieces. The components described in section 3.10.2 can be used to design items with multiple images.
How to find the original size of an image in pixel? The size of images in pixels is relevant for the design of computer-based items (not only with the CBA ItemBuilder). If the images are too small, i.e., smaller than the size in which they are displayed, then a blurred impression results from the extrapolation during enlargement. If the images are too large, they must first be loaded entirely in the browser before they can then be reduced to the actual size for display. This consumes bandwidth unnecessarily.
To learn about the size of an image file, right-click the file in either Explorer or Finder, and select Get Info (Mac) or Properties (Windows) to see the physical size of images (in pixels). On Windows, a click either on Details or Summary can be required to access the information (the tab name will depend on the specific operating system).
To support the display in the size that matches the file size, the CBA ItemBuilder will automatically resize the component (e.g., ImageFiled) to the size of the image after linking the image to the component.
Why to resize images before adding them to the CBA ItemBuilder? It is recommended to reduce images for use in the CBA ItemBuilder to the size with which the images should actually be used. This does not only reduce the file size and thus potentially the loading time in online deliveries, it also allows a better control over the result of the scaling, as shown in Figure 6.8.
Always use Proportional Scaling: If image files are resized in the CBA ItemBuilder, please make sure that the aspect ratio does not change (proportional scaling). The easiest way to do this is to resize the image display component using the grid points at the corners (and not to use the grid points in the middle between the corners).
6.2.2 Preparing Audio and Video Files
Audio and video files can be used in CBA ItemBuilder Tasks as part of the instruction, as a stimulus (for example, for listening comprehension tasks), or for test accommodation (i.e., reading aloud test accommodation). In the current version, CBA ItemBuilder supports libraries for generating conversion from Text to Speech only via ExternalPageFrames. The default way is to create audio files and videos (analogous to images) before using them in the CBA ItemBuilder and import media resources via the Resource Browser (see section 3.10.1).67 Some open-source tools that might be helpful include:
- Tools for audio editing and converting, e.g., audacity
- Tools for video converting (e.g., ffmpeg, VLC player)
- Tools for video capturing (e.g., OpenShot or OBS)
How to convert audio and video files formats? Various tools, such as the VLC player, exist that support converting file formats. The CBA ItemBuilder supports the file formats listed in section 3.10.1 for audio and video files. For video resources, not only the file format but also the codec used must be taken into account. Whether an audio or video file in a particular format can be used for test delivery depends not only on the CBA ItemBuilder. The browser or web browser component used to display the item content must support the format used. Therefore, it is recommended to keep the sources, especially for self-created audio and video files, and to test the usability in the concrete setting before converting and integrating many files.
How to change the volume of the audio files? The volume of audio and video is fixed within the files and can, within certain limits, be increased or decreased as part of the pre-processing. For audio files, this can be done, for instance, with audacity. The VLC player and other tools support this functionality for video files.
How test-taker can change the volume? The volume of audio resources within the file is one of many factors determining how loud audio files are played during Runtime. The components used for embedding Audio and Video resources can also change the audio output volume (see section 3.10.3 for details), either using the visible Controls or using a Finite-State Machine operator.
6.3 Global Properties

Each CBA ItemBuilder project file has global settings that are used for all tasks (and thus for all pages) of the project.
6.3.1 Project Settings
As described in section 3.2.2, the context menu that is available using right-click on the project name in the Project View gives access to the Project Settings using the entry Global Properties.
Presentation height/width: The display size of an assessment component is set in pixels for a currently opened project file in the Global Properties (see section 3.2.2 and also section 3.6.2). Content created with the CBA ItemBuilder can be displayed in different ways (see section 7.2.1), including the use of Proportional Scaling (see section 2.4).
Link Color / Visited Link Color: General settings for the link color and the color of visited links can be set for the entire project in the Global Properties. These settings are used for components of type Link (see section 3.11.1) and also for components of type Button (see section 3.11.2).
Highlight Color: For the response format Highlighting (see section 3.8.3) the default color can be defined.
Context Menu Settings: By default, the context menu is disabled at runtime for CBA ItemBuilder web-based deliveries (i.e., Show browser context menu is not selected). However, under specific conditions, a context menu that gives access to Copy, Cut, and Paste can be helpful, activated using the option Show edit context menu.
Page Size Warnings: Before executing a preview, the CBA ItemBuilder checks if all pages stay within the size defined as CBA Presentation Size (see section 3.2.2 and also section 3.6.2). If scrollable areas are to be created, e.g. with the help of components of the type PageArea (see section 3.5.4), the warning message (shown in Figure 3.51) can be ignored or deactivated via the setting in the Global Properties.
Trace Variable Changes: Log entries for changes to variable values (see section 4.2) can be created automatically if the Trace Variable Changes option is enabled.
Deprecated Features / Features under Development: The tab Project Settings contains additional options that are kept for compatibility reasons, are currently not used or not documented so far. The options Deactivate Firefox context menu, Ctrl+F - Page, and Right-To-Left Orientation and XLIFF Support are not available, tested or supported in the current version of the CBA ItemBuilder. The Default Language / Extension should match the language of the test, but the setting is not yet used at many places.
6.3.2 Translations and Icons
The tab Translations (see Figure 6.9) can be used to provide translated texts for various English default texts that can be of relevant at runtime. Default icons that are used in different components can be linked to embedded resource files in a CBA ItemBuilder project file in the tab Icons. Note that the files must be added using the Resource Browser (see section 3.10.1) before the icons can be assigned.
FIGURE 6.9: Tabs Translation and Icons in the Global Properties of CBA ItemBuilder Project Files.
6.3.3 CSS Styles
If items are to be designed according to precise specifications, selected properties can be missing in the CBA ItemBuilder. For example, in the current CBA ItemBuilder, the text color for disabled buttons cannot be defined via the Properties View. For such (rather extraordinary) use cases and refinements, CSS classes can be used for HTML5 generation. CSS styles are defined by entering valid CSS syntax into the text field in the tab CSS Styles of the Global Properties. CSS classes can be assigned by entering the class name into the field CSS Class Name in the Properties-view of components (see Figure 6.10 for an example).
In this example, the following CSS definition is used to define the text color of buttons when they are de-activated (frozen):
.mycssdemo:disabled {
    color: rgb(205 213 225)!important;
}Please note that the use of CSS styles should be the exception since these CSS styles may not be adopted in case of a possible change of the delivery technology and that the CBA ItemBuilder does not check the validity of the CSS styles.
6.3.4 Metadata (about Content)
The CBA ItemBuilder provides an interface to define metadata for each project file (see Figure 6.11), that can be edited in the Global Properties (right-click the project name in the Project View), in the tab Meta-Data.
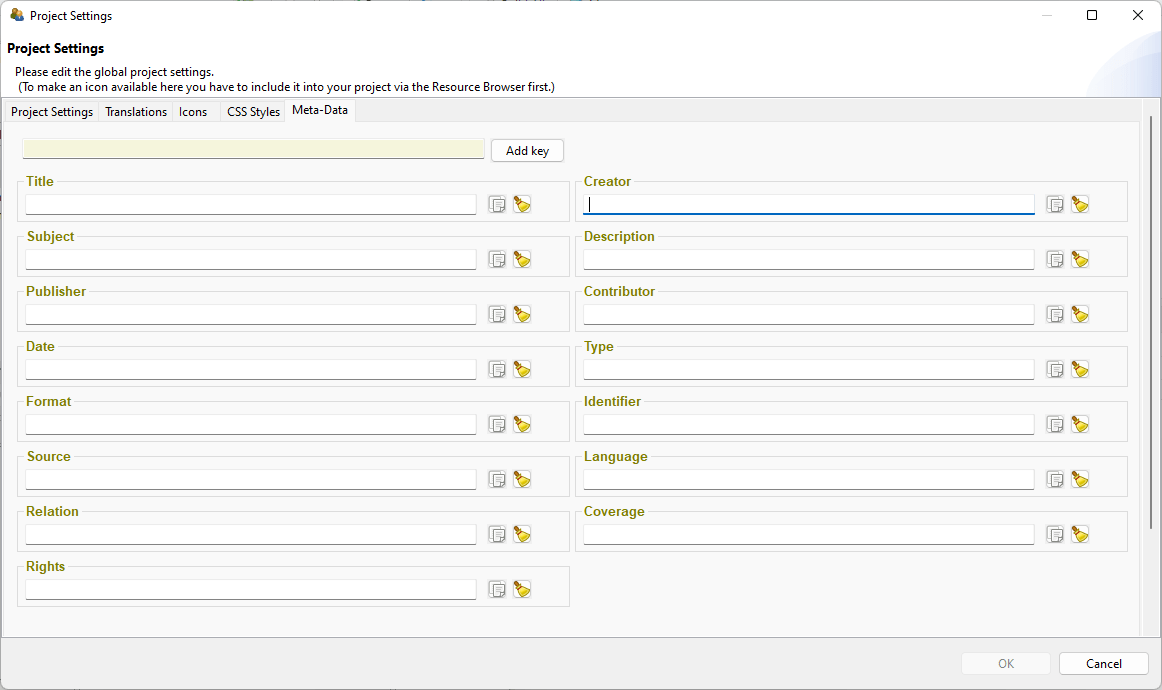
FIGURE 6.11: Tab Meta-Data in the Global Properties of CBA ItemBuilder Project Files.
The entries are stored as key-value pairs, providing the following Dublin Core keys as default (definitions copied from the Dublin core specification):
Title: A name given to the resource (i.e., the CBA ItemBuilder project file including one or multiple Tasks). Within a collection of CBA ItemBuilder items belonging to an instrument, test, or item pool, the usage should be consistent, e.g., the unit name, the item name, or even for several CBA ItemBuilder projects, the test name. If the identical title is used for multiple CBA ItemBuilder project files, the concrete items can be distinguished by the identifier.
Description: A text-based account of the resource, describing, for instance, the measurement goals, the required competences, skills or sub-skills, etc.
Subject: The topic of the items or material combined into a CBA ItemBuilder project file. If possible, a controlled vocabulary should be used.
Date: A point or period of time associated with an event in the lifecycle of the CBA ItemBuilder project file (i.e., the year in which a particular assessment used the item or similar).
Language: A language of the resource (i.e., the CBA ItemBuilder project file). Recommended general best practice is to use a controlled vocabulary such as RFC 4646 (Phillips and Davis 2009)
Format: The file format of the resource. For the CBA ItemBuilder it is suggested to include the URI of the CBA ItemBuilder and the version information (e.g., created with CBA ItemBuilder 9.8, https://www.itembuilder.de)
Type: The nature or genre of the resource. For assessment content, the type could refer to the item type (e.g., multiple-choice task), the function of the component within the assessment (e.g., instruction, tutorial, cover page, etc.), or the assessment type (e.g., summative or formative assessment).
Identifier: An unambiguous reference to the resource within a given context. For assessments this could be an Item-ID, or any other ID that is used to describe the assessment content stored in this CBA ItemBuilder project file.
Coverage: The spatial or temporal topic of the resource, the spatial applicability of the resource, or the jurisdiction under which the resource is relevant.
Source: A related resource from which the described resource is derived. The described resource may be derived from the related resource in whole or in part. Recommended best practice is to identify the related resource by means of a string conforming to a formal identification system.
Relation: A related resource. Recommended best practice is to identify the related resource by means of a string conforming to a formal identification system.
Rights: Information about rights held in and over the resource. Typically, rights information includes a statement about various property rights associated with the resource, including intellectual property rights.
Creator: A person, an organization or a service primarily responsible for making the resources.
Contributor: A person, an organization or a service that is responsible for making contributions to the resources.
Publisher: An entity responsible for making the resource available. Examples of a Publisher include a person, an organization, or a service. Typically, the name of a Publisher should be used to indicate the entity.
Additional Meta-Data as key-value pairs can be defined by using the button Add key and defining the values of the user-defined keys.
6.4 FSM and Conditional Link Syntax Examples

6.4.1 Create Animated Instructions
In order to achieve a higher degree of standardization of assessments, e.g. if it is not ensured that all target persons can or want to read fluently, instructions are often read aloud. For this requirement the CBA ItemBuilder allows the use of components for the playback of audio files or videos (see section 3.10.3). The following example in Figure 6.12 illustrates how mp3 files are played back one after. The playback for each audio file one.mp3, two.mp3 and three.mp3 is started in a transition between two states and the transitions are triggered by either the button (one.mp3) or the audio Stop Event (see subsection 4.4.3) linked to the Audio component used to playback the preceding audio file.
Multiple events (see subsection 4.4.3) are used to create the example shown in Figure 6.12:
Events: EV_AudioOneFinished, EV_AudioTwoFinished,   /* Audio Stop Events */
        EV_AudioThreeFinished
        EV_Start, EV_Reset;                         /* Start and Reset */
The three audio stop events are used to trigger the transitions between the states One, Two and Three, the two additional events EV_Start and EV_Reset are used to start the instruction and to reset the illustration. Note that in real assessments the instruction would like be implemented to start automatically (using, for instance, the property Automatic Start of the first Audio component, see section 3.10.3 for details).
The remaining finite-state machine rules (simplified) are shown in the following listing:
// First transition starts automatically
Rules: Start -> NotStarted {true|setFrozen(B_Next)}

// Triggered by button 'Start'
NotStarted => One {EV_Start|setMediaPlayer(A_One, mp_start),
                            setFrozen(B_Start)}

// Triggered by the audio end event of audio one, two, or three:
One => Two{EV_AudioOneFinished|setMediaPlayer(A_Two, mp_start)}
Two => Three{EV_AudioTwoFinished|setMediaPlayer(A_Three, mp_start)}
Three => InstructionFinished{EV_AudioThreeFinished|unsetFrozen(B_Next)}

 // Reset (the illustration) triggered by button `Reset`
InstructionFinished => NotStarted{EV_Reset|setFrozen(B_Next),
                                           unsetFrozen(B_Start)}
6.4.2 Adaptivity Within Tasks using Conditional Links
Adaptive testing based on item response theory requires a scaled item pool. If assessments are not performed with the goal of IRT-based ability estimation using already known item parameters, skip rules using conditional links can also be used to implement explicitly specified branching.
The item in Figure 6.13 shows an example where tasks are presented following a predefined branching tree (see Figure 6.14) depending on the solution of previous tasks.
In this hypothetical example, the assessment is done separately in two sections. In a first learning phase, additional pages are displayed after each incorrect answer, which could contain explanations or motivational feedback, for example. These additional pages are not displayed if a task has already been solved correctly. In the second measurement phase, no feedback provided, but the difficulty of the administered task take still previous responses into account.
FIGURE 6.14: Adaptivity in the with-task adaptivity example shown in Figure 6.13.
The following tasks are used in the example, adminsitrated according to the logic shown in Figure 6.14:
Question 1: What fraction of the square is blue?
 (A: \(\frac{4}{3}\), B: \(\frac{5}{8}\), C: \(\frac{3}{8}\), D: \(\frac{7}{3}\), E*: \(\frac{1}{2}\))
Instruction 1: Some useful hint how to count the number of highlighted areas in a figure, using the plot of Question 1 as an example.
Question 2: What fraction of the square is red?
 (A: \(\frac{1}{2}\), B: \(\frac{2}{3}\), C: \(\frac{4}{9}\), D*: \(\frac{5}{9}\), E: \(\frac{1}{5}\))
Instruction 2: Some useful hint how to count the number of highlighted areas in a figure, using the plot of Question 2 as an example.
Question 3: What is the denominator of the fraction \(\frac{12}{25}\) (Short text: \(25\))
Question 4: What is the numerator of the fraction \(\frac{7}{8}\) (Short text: \(7\))
Instruction 3: Some useful hint how the two components of a fraction are labeled (i.e., \(\text{Fraction}=\frac{\text{Numerator}}{\text{Denominator}}\)).
Question 5: Express \(3\div 5\) as a fraction (A: \(\frac{5}{3}\), B*: \(\frac{3}{5}\), C: \(15\))
Question 6: What fraction of one kilogram are 3 grams? (A: \(\frac{3}{10}\), B: \(\frac{3}{100}\), C*: \(\frac{3}{1000}\), D: \(\frac{3}{10000}\),E: \(3\))
Question 7: How do we write two-thirds? (A: \(\frac{3}{2}\), B*: \(\frac{2}{3}\), C: \(\frac{1}{3}\), D: \(\frac{1}{2}\))
Question 8: What fraction are 2 months of one year? (A: \(2\), B: \(\frac{1}{12}\), C*: \(\frac{1}{6}\), D: \(\frac{2}{10}\), E: \(\frac{1}{2}\))
Question 9: What is the number that makes these fractions equal? \(\frac{2}{?}=\frac{4}{12}\) (A: \(4\), B*: \(6\), C: \(8\), D: \(3\), E: \(10\))
In this example, forcing answers has been omitted and missing answers are treated as incorrect.
6.4.4 Approaches to Show Additional Content
Figure 6.16 illustrates different options to show additional information on request of test-takers. Example 1 displays additional information using a page configured as Dialog Page, linked to a button. The Dialog Page is configured as Closable: false and positioned using the X and Y coordinate of the Frame. The information is hided using a button defined with the command CLOSE that is placed on the Dialog Page. Example 2 uses a MapBasedVariableDisplay to show either a question mark or a text depending on the value of a variable, and the value of the variable is changed using the Finite-State Machine and an event assigned to the MapBasedVariableDisplay.
Example 3 also uses events. The page shown in a PageArea is changed when the test-taker clicks into the SingleLineInputField using an event linked as Raised In Event and an empty page is shown in the PageArea when the Raised Out Event is triggered. Example 4 makes additional information visible using the unsetHidden()-operator, linked to the Raised Events of RadioButtons.
6.4.5 Implement Time Limits for Tasks
Limiting the available time for test parts in which test-takers may be able to navigate freely can be provided by the test delivery software. However, time limits are also doable within assessment components. In multi-page CBA ItemBuilder projects, time limits can be implemented with timed FSM events (see section 4.4.3). Figure 6.17 illustrates how a time limit can be implemented for multiple tasks. The example also uses PageAreas (see section 3.5.4) to implement a permanently visible outer page in which the time-limited tasks on sub-pages are embedded.
To understand the example in Figure 6.17, it is crucial to see that the timed event EV_Timelimit only results in a timeout within the ST_Started state:
Events: EV_Start,                  // Start time restricted section
        EV_Timelimit 10,               // Timed event (10 seconds)
        EV_Task1, EV_Task2, EV_Task3;  // Events for navigation

Rules: ST_Start->ST_NotStarted{true}

ST_NotStarted => ST_Started{EV_Start|setEmbeddedPage(PA,task1)}

ST_Started internal {EV_Task1|setEmbeddedPage(PA,task1)}
                    {EV_Task2|setEmbeddedPage(PA,task2)}
                    {EV_Task3|setEmbeddedPage(PA,task3)}

ST_Started => ST_Timeout{EV_Timelimit|setEmbeddedPage(PA,timeout)}

ST_Timeout => ST_NotStarted {EV_Start|setEmbeddedPage(PA,instruction)}
This desired behavior is achieved by defining a rule for the event EV_Timelimit only in the FSM state ST_Started.
6.4.7 Video with Built In Questions
Inspired by the Interactive Video format from H5P, the following example shows how a video can be used split into multiple parts to combine the presentation of multimedia content and opportunities for interaction. Figure 6.19 illustrates how segments of a video can be shown, interrupted with questions.
6.4.8 Click-Sensitive Labels
For RadioButtons (and Checkboxes) the label texts should be click-sensitive. That means, a click on the text next to a radio button or checkbox should select the corresponding element. This ensures that RadioButtons and Checkboxes are not only activated when the test-taker hits exactly the (small) control. As shown in the following example (A), this is the default behavior if the label text (i.e., the distractor text) is defined using the text property of the RadioButton (or Checkbox). If the text property is not used, a click on the additional component (for instance, an HTMLTextField or a SingleLineInputField with Readonly=true showing the distractor text) is not linked to the RadioButton (or Checkbox, see B). In this case, it is suggested to use the advanced features of the CBA ItemBuilder to make the components used to show the distractor text click-sensitive. This goal can be achieved with the CBA ItemBuilder using syntax operators either as part of Conditional Links (see section 4.3) or in transitions of a Finite-State Machine (see section 4.4).
Solution Using Conditional Links: A first and simple solution based on Conditional Links is shown in Figure 6.20. The example item illustrates the expected behavior (A) if the text property of RadioButtons is used. The item also shows the problem of labels that are not click-sensitive (B). To use of Conditional Links as additional click-sensitive labels for RadioButtons (C) the labels were designed using SingleLineInputFields with the property Readonly=true:
FIGURE 6.20: Example for using operators in Conditional Links to align SingleLineInputFields and RadioButtons (html|ib).
As can be seen, when clicking on the text label for the different distractors for option C, each click on the text automatically activates the corresponding RadioButton. This behavior is implemented by assigning Conditional Links to each SingleLineInputField, as shown in the following example:
{page : true | setActive(rb1)}The target page of the Conditional Link is the current Simple Page (with the name page). The Boolean value true is defined as the condition, meaning that this particular condition will always be executed. Next to the pipe symbol, the operator setActiv(UserDefinedID) (see Appendix B.2 for details) is used to set the RadioButton with the User-Defined-ID rb1 active (i.e., selecting the RadioButton and thereby, as the default behavior of components of type RadioButton de-selecting all other RadioButtons in this particular RadioButtonGroup).
Solution Using Finite-State Machine: A second more general solution uses the Finite-State Machine to align the RadioButton selection and clicks on the components used as labels.68 The example looks identical to Figure 6.20, but components of type HTMLTextField are used as labels. The reason is, that HTMLTextFields allow to assign FSM Events (see section 4.4.3).69 To implement option C with a Finite-State Machine, one FSM Event must be defined for each response option (i.e., for each RadioButton). These events can then be used in a particular state, to activate the RadioButton (or Checkbox) using the setActive-operator (see Appendix B.2 for details), for instance, in an internal transition as shown in the following FSM syntax:
Events: EV_RB1, EV_RB2, EV_RB3, EV_RB4;     // One event for each RadioButton,
                                            // triggered by the HTMLTextFields
Rules: Start -> Running {true}
Running internal {EV_RB1 | setActive(rb1)}  // The setActive-operator is used
     {EV_RB2 | setActive(rb2)}                // to change the selected RadioButton,
     {EV_RB3 | setActive(rb3)}                // when the event that is linked to
     {EV_RB4 | setActive(rb4)}                // the HTMLTextField's is triggered.
Both approaches also work to create click-sensitive labels for other components such as Checkbox (see section 3.9.3). The choice between the two options is mostly a matter of taste. However, some components can only be linked with Conditional Links and other components only allow linking with FSM Events.
6.4.9 Contextualized Multiple-Choice Items
Figure 6.21 shows how components of type ImageValueDisplays and the Finite-State Machine can be used to contextualize a multiple choice answer format. In the example, the shown items shall be striked through.
The visual design of the response format is created with ImageValueDisplays so that for each single choice an ImageValueDisplay shows either the selected or the un-selected option. Each ImageValueDisplays triggers one of the events EV_Item01, EV_Item02, EV_Item03, or EV_Item04 and the following FSM is used to change the values of the variables:
Events: EV_Item01, EV_Item02, EV_Item03, EV_Item04;  // Events for the options

Rules: Start -> Running {true|set(V_Item01,1),  // Initiallize the value of
                      set(V_Item02,1),          // variables, used to store the
                      set(V_Item03,1),          // selected state for each option
                      set(V_Item04,1)}          // (1:=deselected, 2:=selected)
Running internal
   {EV_Item01 : [V_Item01 == 1] | set(V_Item01,2)}   // Conditional internal
   {EV_Item01 : [V_Item01 == 2] | set(V_Item01,1)}   // rules for switching
   {EV_Item02 : [V_Item02 == 1] | set(V_Item02,2)}   // between selected and
   {EV_Item02 : [V_Item02 == 2] | set(V_Item02,1)}   // deselected state for
   {EV_Item03 : [V_Item03 == 1] | set(V_Item03,2)}   // each option.
   {EV_Item03 : [V_Item03 == 2] | set(V_Item03,1)}
   {EV_Item04 : [V_Item04 == 1] | set(V_Item04,2)}
   {EV_Item04 : [V_Item04 == 2] | set(V_Item04,1)}
Use of the responses given by clicks on components of type ImageValueDisplays (stored internally in the variables V_Item01, V_Item02, etc.) for scoring the task is possible using the variable_in()-operator (see section 5.3.5).
6.4.10 Shuffle Response Options using ValueMaps
The CBA ItemBuilder does not explicitly support the representation of answer alternatives in random order (shuffling). However, the functionality can be implemented using MapBasedVariableDisplays and ValueMaps as shown in Figure 6.22.
In addition to MapBasedVariableDisplays, the example uses an invisible component of type ExternalPageFrame to generate the random numbers in JavaScript. The random numbers are requested from the Finite-State Machine with the callExternalPageFrame()-operator (see section 4.6.4), calling a JavaScript code to set the variable values. Since the ExternalPageFrame is not yet loaded at the time of loading the item, initializing the variable values is triggered by calling the FSM event EV_Shuffle from the ExternalPageFrame as soon as it is loaded and ready.
6.5 Calculators Examples

The CBA ItemBuilder offers two different approaches to integrate a calculator into items. Digitalized calculators provide some advantages, e.g., the calculator can be enabled or disabled according to item-specific needs. Simple pocket calculators can be designed using visual components of the CBA ItemBuilder and directly integrated into items with the finite-state machine without any further programming knowledge. More specific and possibly more complex calculators can be integrated into CBA ItemBuilder projects via ExternalPageFrames.
6.5.1 Basic Calculator using Finite-State Machine
The following item in Figure 6.23 shows a basic calculator using the internal Finite-State Machine:
FIGURE 6.23: Example for a calculator based on ‘Finite-State Machine’.
To implement the calculator using the CBA ItemBuilder Page Editor, components of type Button (see section 3.11.2) and a component of type SimpleTextField (see section 3.8.1) are placed on a page. The Input Source property of the SimpleTextField type component must be assigned to the CALCULATION_ENGINE_RESULT value. All components that have this Input Source are used by the CBA ItemBuilder to display the output of the calculations that are calculated by the calculator engine of the finite-state machine. If the property Input Source Catch Focus for this SimpleTextField is set to true, the keyboard input is automatically collected by the SimpleTextField and the calculator can be used using the keyboard. An optional second SimpleTextField can be used to show the calculator engine’s stack (using the value CALCULATION_ENGINE_OP_STACK for the property Input Source).
The buttons must be assigned to Events so that in Finite-State Machine Rules the input can be passed to the calculator engine.70 An example FSM is shown below:
Events:  /* One event is defined for each button: */
  calc0, calc1, calc2, calc3, calc4, calc5, calc6, calc7,calc8, calc9,
  calcPI, calcDecimal, calcMult, calcDiv, calcAdd, calcSub, calcRes,
  calcC, calcAC;

Rules:  /* Calculator settings are defined in very first transition */
  Start -> Process{true | calcSettings(displayWidth => 12, scale => 24)}
  /* Calculator operators are processed as internal rules  */
  Process internal { calc0  | calcOpnd(add, 0) }
  Process internal { calc1  | calcOpnd(add, 1) }
  Process internal { calc2  | calcOpnd(add, 2) }
  Process internal { calc3  | calcOpnd(add, 3) }
  Process internal { calc4  | calcOpnd(add, 4) }
  Process internal { calc5  | calcOpnd(add, 5) }
  Process internal { calc6  | calcOpnd(add, 6) }
  Process internal { calc7  | calcOpnd(add, 7) }
  Process internal { calc8  | calcOpnd(add, 8) }
  Process internal { calc9  | calcOpnd(add, 9) }
  Process internal { calcPI     | calcOp(clear), calcOpnd(add, 3),
      calcOpnd(decimal), calcOpnd(add, 1),
      calcOpnd(add, 4), calcOpnd(add, 1),
      calcOpnd(add, 5) }
  Process internal { calcDecimal    | calcOpnd(decimal) }
  Process internal { calcMult   | calcOp(multiply) }
  Process internal { calcDiv    | calcOp(divide) }
  Process internal { calcAdd    | calcOp(add) }
  Process internal { calcSub    | calcOp(subtract) }
  Process internal { calcRes    | calcOp(equals) }
  Process internal { calcC  | calcOp(clear) }
  Process internal { calcAC | calcOp(clearall) }
The actual processing of test taker input is done by the special operators for the calculator engine (see section 4.4.6). The user interfaces created as part of the CBA ItemBuilder Project File’s content can be customized and adapted by item authors to the needs of items and tasks by placing, adding, and omitting buttons.
6.5.2 Embedding Calculator using ExternalPageFrame
An example for an external calculator that can be embedded using the ExternalPageFrames (see section 3.14) is shown in Figure 6.24.71
Note that if logging of calculator actions is required, it can be implemented in JavaScript using the API for trace events (see section 4.6.2).
6.6 ExternalPageFrame Examples

The functionality of the CBA ItemBuilder does not limit the possibilities for designing Technology-Enhanced Items. Instead, the CBA ItemBuilder can be understood as a platform where recurring elements are made available as components for item authors while new and innovative components provided by software developers can be integrated using the ExternalPageFrames (see section 4.6.2). In this section, some examples are shown to illustrate the possibilities. However, it is by no means a complete overview.
6.6.2 Alternative Editors as ExternalPageFrame
The CBA ItemBuilder does not natively support the input of mathematical formulas. The following example in Figure 6.26 illustrates the use of the mathlive library. Mathlive provides a virtual keyboard that also allows formula input on touch devices. The library can be included and used via an ExternalPageFrame component.
In the same way as a specific editor for mathematical input, a text editor can also be included as an ExternalPageFrame, as shown in Figure 6.27.
Displaying the number of words already written (or the number of words remaining, if specified) and, for example, detailed JavaScript-based logging of keystrokes is also possible with an ExternalPageFrame, as illustrated in Figure 6.28.
6.6.3 Adding Speech Recognition using ExternalPageFrame
Speech recognition functions can also be embedded in ExternalPageFrames. A generic variant that should work in many browsers and delivery options is illustrated in Figure 6.29.
Offline: The following item shows an offline capable speech recognition. For this, a large language model must be loaded before spoken language can then be translated into characters without transferring the data to the server. For this example, the model of one language is loaded, i.e. the speech recognition in the CBA ItemBuilder item in Figure 6.29 recognizes only German speech.
Online: As an alternative to client-side recognition, some browsers also provide access to server-side speech recognition. The following example in Figure 6.30 will only work in the Chrome browser and requires an internet connection:
6.6.4 Showing HTML5 Package (H5P) using ExternalPageFrame
Using the MIT licensed H5P standalone player it is possible to embed HTML5 Package (H5P) into CBA ItemBuilder projects as interactive content. The following example shows how to display H5P content without using a web server inside the CBA ItemBuilder using ExternalPageFrames (for more details, open ExternalPageFrameH5PIntegrationExample.zip in the CBA ItemBuilder):
FIGURE 6.32: Example for the integration of H5P content in an ExternalPageFrame.
Note: An integration of data storage and xAPI needs to be added.
6.6.5 Including GeoGebra Applets using ExternalPageFrame
Using ExternalPageFrames it is also possible to integrate other interactive content such as GeoGebra applets into CBA ItemBuilder tasks (see figure 6.33, for more details, open ExternalPageFrameWithGeoGebra.zip in the CBA ItemBuilder).
6.6.6 Incluing QTI Item Content using ExternalPageFrame
With the help of JavaScript (client-side) rendering of content in the IMS Question & Test Interoperability (QTI) format, using, for instance the MIT licensed QTI.js library, QTI can be used within CBA ItemBuilder items (see Figure 6.3472).
6.6.7 Including SurveyJS Questionnaires using ExternalPageFrame
The creation of long surveys with the CBA ItemBuilder is possible but can be more complex than known from survey tools. An easy way to integrate surveys in all delivery modes supported by CBA ItemBuilder (online, offline) is offered by the SurveyJS library.
As shown in the following screenshot (see Figure 6.36), the runtime environment of SurveyJS can be inserted into the Embedded HTML Explorer. The JSON configuration of the survey can be stored in the file index.html, which is used as the Local page address in the ExternalPageFrame. This file is part of the CBA ItemBuilder project files and is available at runtime.
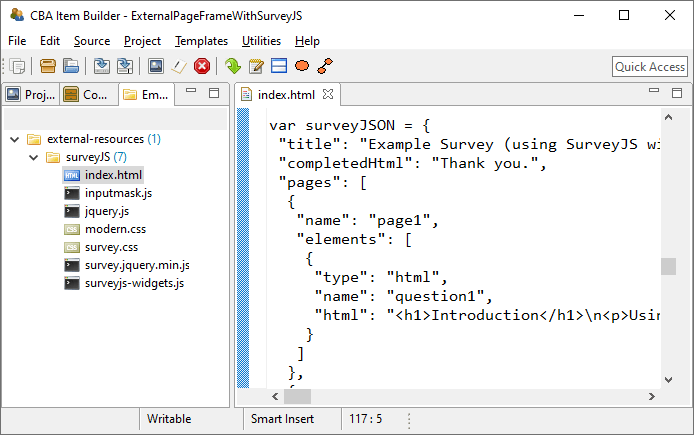
FIGURE 6.36: Screenshot of the Embedded HTML Explorer using SurveyJS conent.
The JSON configuration can be assigned, for instance, to a JavaScript variable surveyJSON:
var surveyJSON = <!-- COPY JSON OR JSON STRING HERE--> ;

function sendDataToServer(survey) {
    postLogEvent("SurveyJS results changed to: " + JSON.stringify(survey.data));
    postFsmEvent('EV_NextTask');
}

function doOnCurrentPageChanged(survey) {
    postLogEvent("Page changed to: " + survey.currentPageNo);
}

function doOnValueChanged (sender, options) {
    postLogEvent("Answer changed to: " + options.name + " ; " + JSON.stringify(options.value));
};

var survey = new Survey.Model(surveyJSON);
$("#surveyContainer").Survey({model: survey, onComplete: sendDataToServer});
$("#surveyContainer").Survey({model: survey, onCurrentPageChanged: doOnCurrentPageChanged});
$("#surveyContainer").Survey({model: survey, onValueChanged: doOnValueChanged});
Two further details of the integration are worth mentioning (see ExternalPageFrameWithSurveyJS.zip):
In order that the administration of the CBA ItemBuilder tasks can be continued after the completion of the survey with the integrated SurveyJS, a function is bound to the
onCompleteevent of SurveyJS. In this functionsendDataToServerthe answers are passed as JSON String into the log data of the ItemBuilder delivery. After storing the answers, an FSM-event is triggered in order to call, for instance, theNEXT_TASK-command.In addition, the
onCurrentPageChangedandonValueChangedevents are also used by SurveyJS. With their help, the collection of log events is possible that indicate the loading of a page (onCurrentPageChanged), and that identifies a change in response. These two pieces of information are necessary in order to extract response times at item-level for detailed analyses (Kroehne and Goldhammer 2018).
Note that a deeper integration of the data storage might be developed in future.
6.7 Adaptive Testing with the CBA ItemBuilder

6.7.1 Adaptive Testing within CBA ItemBuilder Tasks
Simple forms of adaptivity, e.g. multi-stage tests with routing based on observed scores, can be implemented directly in the CBA ItemBuilder. For this purpose, within a task (i.e. also within a CBA ItemBuilder project) the selection of pages on which items are displayed can be controlled, for example, via the finite state machine.
Inspired by the number sequence test as used in the National Cohort (see Schmiedek et al. 2022), the item in Figure 6.37 illustrates a simple multi-stage test with 8 items.
Each person should be shown only a selection of items. For this purpose, two items are administered in a first stage (A). Based on the number of correct answers in stage A (0 items correct –> B0, 1 item correct –> B1, 2 items correct –> B2), a suitable second stage is then administered. The test is implemented with the CBA ItemBuilder in such a way that it can be operated without keyboard exclusively with buttons, which can be operated by mouse or touch screen. The routing is completely implemented in the Finite State Machine, as is the scoring of the input.
The number series used here in the example do not correspond to the instrument used in NAKO but are example number series as summarized in the following table:73
| Stage | Item | Number Series | Corret Response |
|---|---|---|---|
| A | 1 | 5, 6, 9, 14, 21, __ | 30 (+1,+3,+5,+7,+9; The series consists of a pattern of addition of consecutive odd numbers.) |
| 2 | 1, 3, 9, 27, __ , 243 | 81 (\(*3\), \(*3\), \(*3\), \(*3\), \(*3\); Next number of this series is multiplication of 3 with previous one. ) | |
| B1 | 3 | 1, 3, 6, 11, 18, __ | 29 (+2,+3,+5,+7,+11; The series consists of a pattern of addition of prime numbers.) |
| 4 | 1, 2, 6, 15, 31, __ | 56 (\(+1^2\),\(+2^2\),\(+3^2\), \(+4^2\); The series is based on addition of squares of consecutive natural numbers.) | |
| B2 | 5 | 32, 19, 8, __ | 1 (-13,-11,-7; The series consists of a pattern of subtraction of prime numbers.) |
| 6 | 225, 100, 36, 9, 1, __ | 0 (\(-5^3\), \(-4^3\), \(-3^3\), \(-2^3\), \(-1^3\); The series is based on subtraction of cubes of consecutive natural numbers.) | |
| B3 | 7 | 1296, 648, 216, 108, __, 18, 6, 3 | 35 (\(/2\), \(/3\), \(/2\), \(/3\), \(/2\), \(/3\), \(/2\); The terms are divided by 2 and 3 alternately.) |
| 8 | 71, 55, 46, 42, __ | 41 (\(-4^2\),\(-3^2\),\(-2^2\), \(-1^2\); The series is based on addition of squares of consecutive natural numbers.) |
6.7.2 Adaptive Testing across CBA ItemBuilder Tasks
Adaptivity across CBA ItemBuilder tasks must be supported by the deployment software. The R package ShinyItemBuilder provides a simple example to implement an adaptive test using CBA ItemBuilder tasks and R/Shiny (see 7.3.3).
6.8 (More) Efficient use CBA ItemBuilder

The CBA ItemBuilder is a complex tool for designing interactive assessment components. The features described below and hints on how to use the CBA ItemBuilder can help to work efficiently with this tool.
6.8.1 Window Management
Section 3.1 describes the user interface of the CBA ItemBuilder in the default configuration (i.e., after a fresh installation). The arrangement of views in the three columns of the CBA Item Builder’s user interface can be adjusted and configured according to the user’s needs (and the available space on the screen). The video included in the item in Figure 6.38 shows how to customize the user interface of the CBA ItemBuilder.
6.8.2 Available Fonts and Font-List
Assessment content created with CBA ItemBuilder is used in a web browser at runtime. Accordingly, only fonts available for display in the web browser should be used.
Web Safe Fonts: Fonts that should be available in all browsers and result in similar renderings are called Web Safe Fonts. The following fonts are typically considered to be web safe:
- Arial (sans-serif)
- Verdana (sans-serif)
- Tahoma (sans-serif)
- Trebuchet MS (sans-serif)
- Times New Roman (serif)
- Georgia (serif)
- Garamond (serif)
- Courier New (monospace)
- Brush Script MT (cursive)
Font List: The CBA ItemBuilder uses the fonts registered on the system and therefore offers quite many fonts (e.g., in the editors for TextFields, HTMLTextFields and in the Appearance tab of the Properties view). This (usually) long font list should be reduced to the fonts that are planned to be used (i.e., Web Safe Fonts and similar fonts across several items). Since the item contents created with the CBA ItemBuilder are rendered in the browser, it must also be taken into account when selecting the fonts that these must then be available on the target system.
To reduce the list of fonts available in the CBA ItemBuilder to design items, the list of CBA Item Fonts can be configured (see Figure 6.39) in the section CBA Item Fonts in the Preferences (menu Utilities > Preference).
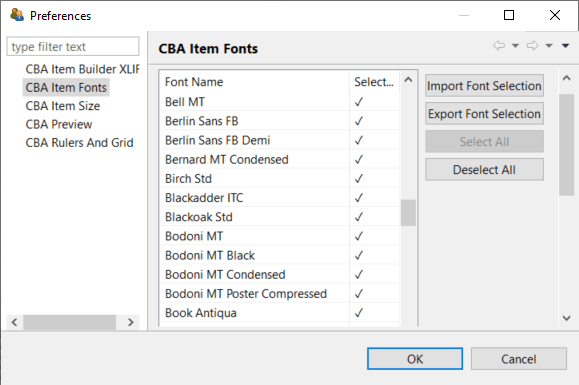
FIGURE 6.39: ‘CBA Item Fonts’ setting of the CBA ItemBuilder.
To adjust the list first remove the selection in this list using the Deselect All button and then select the fonts you want to use by clicking on them. You can also export (Export Font Selection) and import (Import Font Selection) fonts if you want to use different fonts for different projects or assessments.
6.8.3 Color Codes
The same selection dialog is always used to define color in different editors of the CBA ItemBuilder. Colors can be chosen from a selection of example colors or defined precisely in different formats (HSV, HSL, RGB, and CMYK, see Figure 6.40).
Save Selected Colors: To avoid entering identical color values multiple times, the dialog shown in Figure 6.40 also allows to Add a color to the user-defined buttons of Recent colors.
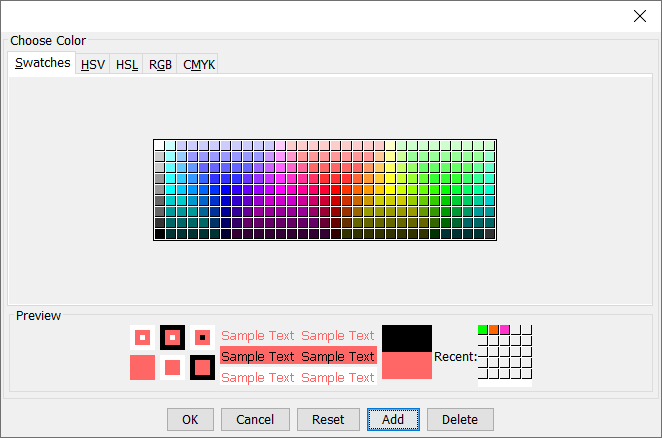
FIGURE 6.40: Color selector (Choose Color) of the CBA ItemBuilder allows storing Recent-colors.
Colors in the Properties View: The CBA ItemBuilder uses a color representation in the tab Core of the Properties view as decimal numbers (e.g., white is represented by DEC -1, corresponding to hex #FFFFFF, black is represented by DEC -16777216, corresponding to hex #000000). The item shown in Figure 6.41 contains via an ExternalPageFrame an example of JavaScript functions to convert the decimal colors of the CBA ItemBuilder into other formats.
6.8.4 Error Messages
When using the CBA ItemBuilder, especially when calling the Preview and saving Project Files, error messages are displayed if the created assessment content is inconsistent. While this might be confusing when using the CBA ItemBuilder for the first time, the error messages typically give precise information on where to find the inconsistency. The item shown in Figure 6.42 allows searching for error messages and provides additional tips on fixing the issues.
6.8.5 Hints for Designing Interactive Items
The CBA ItemBuilder gives item authors a wide range of freedom in designing assessment components. Some hints are compiled below to ensure that the resulting items work well (and look good, if possible).
Visual Overlapping Components: The CBA ItemBuilder allows to place elements freely using X and Y coordinates within containers (i.e., Frames, Panels etc., see Page Editor in section 3.1.3), and each component has a size defined as Width and Height. The item authors’ responsibility is to ensure that the components created and designed in the Page Editor are displayed appropriately (i.e., in a meaningful order).
Z-Order: If multiple components are defined on a page, they are displayed in a specific order. This order can be called the Z-Order (i.e., besides X and Y for horizontal and vertical placement, the Z-Order defines the order concerning a third dimension, Z). In most use cases, item authors do not need to worry about the Z-Order any further since it essentially follows from the container principle (see section 2.11.4): The elements within a container (child elements) are always rendered on top of the containers itself (parent elements). The CBA ItemBuilder automatically applies this rule, together with an additional grouping of components within containers into meaningful layers.
The layers group components within containers by component type. Only for components in the same layer the order in which components are listed in the Component Edit view (i.e., the order in which components are created).74
Functioning Affected by Overlapping Components: Although the CBA ItemBuilder approach of avoiding user-defined Z-Orders by applying heuristics based on layers was proven to be useful over the last years, item authors should be aware of the issue that overlapping components can result in a particular functioning. If, for instance, an HTMLTextField is placed so that it entirely or partially covers a Button (see Figure 6.43 for an example), the functioning of the Button might result in unexpected behavior. The same is true for various other components. If something overlaps with SingleLineInputFields, it can become difficult or even impossible to enter any text into the SingleLineInputField. Therefore, when designing assessment components, ensure that the components do not overlap or only overlap sensibly.
The difference between the Visual Z-Order and the Interactions Z-Order can be seen in Figure 6.43.
The left side in Figure 6.43 shows a screenshot of the design time from the Page Editor. HTMLTextField 1 is shown below the button, overlaid by HTMLTextField 2. In the Preview and at Runtime, as shown on the right, the CBA ItemBuilder follows this structure regarding the filled background (white color) and the border (red color). But note that the text in HTMLTextField 1 is displayed above the Button. An identical rendering is also created by the CBA ItemBuilder for HTMLTextField 3, i.e. similarly the text overlays the SingleLineInputField, although the filled white background and the red border are rendered behind the SingleLineInputField.
Exploring the behavior (i.e. the Interactions Z-Order) in the item shown in Figure 6.43, we see that not only the text HTMLTextField 1 and HTMLTextField 3 overlay the underlying components Button and SingleLineInputField. Also, due to the overlapping of the components, the connected events are forwarded to Button and SingleLineInputField only at the points where no HTMLTextField is defined.
Scrollbars: When collecting diagnostic information (i.e., when assessment content is created with the CBA ItemBuilder), the necessity to scroll should be used as controlled as possible. Following this principle, assessment content created with the CBA ItemBuilder is designed for screen sizes (i.e., for an aspect ratio) called CBA Presentation Size (see section 3.2.2).
Scrollbars will automatically appear when pages are larger (in width and height) than the available space.75 The available space for simple pages (i.e., pages at the highest hierarchy level) is identical to the CBA Presentation Size, minus the space of an optionally configured X-Page (see section 3.4.2). Similarly, pages within PageAreas (see section 3.5.4) or TreeViewArea (see section 3.9.9) and Web Child Pages within a WebChildArea (see section 3.13.2) are always displayed with scrollbars if the width or height of the embedded exceeds the width or height of the corresponding area.
Widht and Height properties of the Frame.
Un-proportional Scaling of Images and Videos: Images and videos added as resources to CBA ItemBuilder projects have a native resolution, i.e., a size defined in pixels (height and width). For optimal display, images and videos should be added to CBA ItemBuilder items in the size they will be displayed by the corresponding component (see section X). The Page Editor allows resizing components to display image and video resources.
If images or videos are larger than they will be used during display, the resources will be unnecessarily large and may produce load times that could be avoided by scaling the resources before insertion. If images or videos are smaller than the area used for display, they are scaled up and may only be visibly blurred.
Standardize Page Layout Across Pages: Test takers typically see many individual pages during the processing of assessments created with the CBA ItemBuilder. It is recommended to standardize spacing, font, font size, formatting (font color, bold, italics), etc., as much as possible to ensure a consistent appearance for the test takers.
6.8.6 Export and import Pages
In order to use once-designed pages multiple times when designing multiple assessment components with the CBA ItemBuilder, multiple tasks can be defined within one project file (see Task Editor in section 3.1.4 and tips on the division of content to tasks in section 3.6.3). This approach is recommended if feasible, as it eliminates the need to make copies of pages.
If there are already designed and tested CBA ItemBuilder assessment components that already contain the required functionality, it can also be efficient to use them as templates. The CBA ItemBuilder provides the Save As feature, and the project name can be changed using the Rename Project function (see section 3.2.1). If this approach is chosen, potential changes that are made to the source file afterward must also be applied to the copy.
Export Page: If instead of an entire project file only a single page is to be moved or copied from one project to another, CBA ItemBuilder provides the option to export pages in the context menu (right-click on the project name) of the Project Tree (see Figure 6.44).
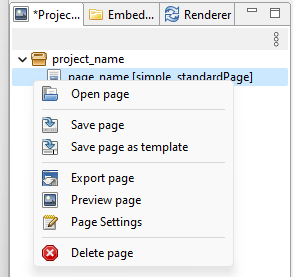
FIGURE 6.44: Context Menu in the Project Tree.
One page at a time can be exported and saved as a ZIP archive.
Import Page: Using the similar function Import Page, pages can be inserted into another CBA ItemBuilder Project File.
6.8.7 Working with Page-Templates
If pages are exported via the Export Pages function as in the past section 6.8.6, they are available as ZIP archives in the file system and can be copied, moved, and (for instance) sent as files or uploaded to versioning systems (see section 8.3.2).
If pages are to be used as templates on a computer (i.e., within one instance of the CBA ItemBuilder), the CBA ItemBuilder additionally provides the template functionality.
Save Page as Template: Using the context menu (right-click on the project name) of the Project Tree (see Figure 6.44, pages can also be stored as Template. Templates need a unique name (see Figure 6.45) and are stored inside of the CBA ItemBuilder.
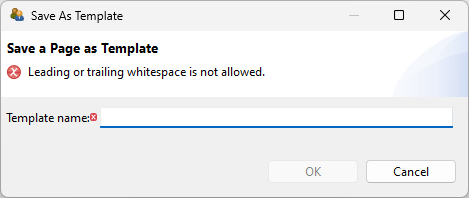
FIGURE 6.45: Dialog to specify the name of a Template.
Create Page from Template: Pages saved as templates can then be used to create new pages within a CBA ItemBuilder Project File. The toolbar contains the icon ![]() for this purpose, and the function is also accessible via the context menu in the Project View.
for this purpose, and the function is also accessible via the context menu in the Project View.
Template Browser: Selecting and managing page templates is done in the Template Browser (see Figure 6.46). After entering a name for the new page to be created, a template can be used with Create Page. If Skip Preview is not selected, then the view from the Page Editor is displayed in the Template Preview area. Figure 6.46 shows that templates (analogous to pages) can also be exported or imported. The Delete Template button can be used to delete a template from the CBA ItemBuilder instance.
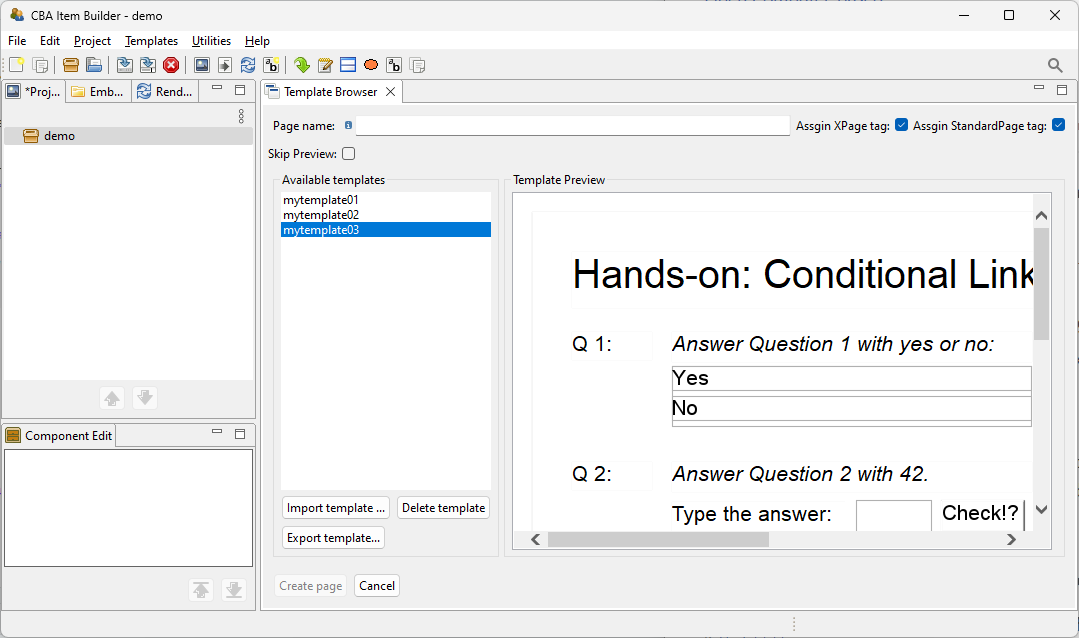
FIGURE 6.46: Dialog to specify the name of a Template.
When pages are created from templates, they can be flagged with the XPage and StandardPage tags.
6.8.8 How to run two CBA ItemBuilder Simultanously
The CBA ItemBuilder is an application that can be started only once per installation. The underlying reason is that each CBA ItemBuilder installation (also referred to as instance in the following) has its dedicated workspace in which the contents of a CBA ItemBuilder Project File are unpacked during processing.
At the same time, when creating many (as uniform as possible) assessment components with CBA ItemBuilder, it can be helpful to have a Project File open to view implementations there while working on another project file in a second CBA ItemBuilder (see Figure 6.47 for an example).
Multiple Instances: The CBA ItemBuilder can be installed multiple times to run several instances in parallel. Each installation must have its own directory. In addition, a so-called port (i.e., a dedicated connection address on the computer on which CBA ItemBuilder is installed) must be different for each instance. Therefore, after installing a second CBA ItemBuilder or copying the entire program directory, a port configuration must be changed for one of the instances to be operated in parallel.
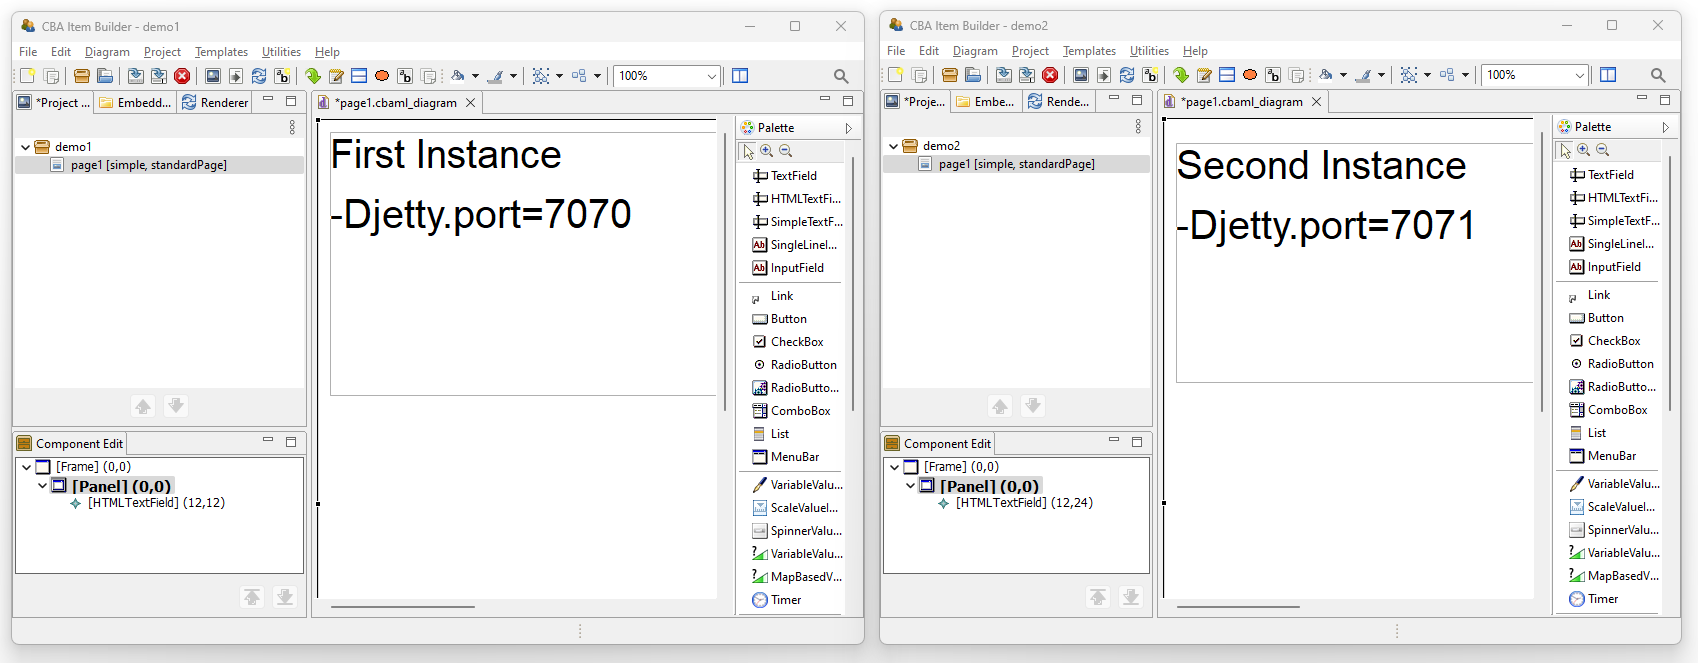
FIGURE 6.47: Example screen shot running two CBA ItemBuilder in parallel.
The following steps are necessary to manually enable the use of two instances of the CBA ItemBuilder:
Install the CBA ItemBuilder (if not yet done, as described in section 1.1).
Locate the program directory. By default this should be `C:/users/{UserName}/AppData/Local/CBA-IB-{Version}´
Duplicate the sub-directory
IB(i.e., create a copy of the directoryIBand rename it toIB2).Find the file
cba-itembuilder.iniin the duplicated folder (IB2) and open it with a text editor (e.g.,notepad).Change the number that is assigned to the
Djetty.portto a higher and different value, e.g.:
-Djetty.port=7072Save the file
cba-itembuilder.iniand close the editor.Create a new shortcut in Windows Explorer to the file
cba-itembuilder.exein the directoryIB2. Starting this application from the copied directory should now be possible in parallel to the application from the directoryIB.
Make sure you never open an identical CBA ItemBuilder Project File in two instances in parallel. The clipboard (see section 3.7.2) cannot work between different instances of CBA ItemBuilder, i.e., if something is copied in one instance, it cannot be pasted in another instance. To transfer content from one instance to another, the function to export and import pages is available (see section 6.8.6). Alternatively, to transfer content within an instance, the template function can be used (see section 6.8.7).
6.9 Creating Assessments in Multiple Languages

The current CBA ItemBuilder supports assessment content in one language at a time. If assessment components are required in multiple languages, they can be translated with the CBA ItemBuilder as an authoring tool and saved in another CBA ItemBuilder Project File. In addition to the manual translation of all texts directly within the Page Editor, CBA ItemBuilder also supports a translation workflow based on the XLIFF format. Several details should be considered when designing items and implementing workflows to use this functionality efficiently. Use the contact options (see section 1.2) to learn more about XLIFF support.